-
Welcome to the new SAOCA website. Already a member? Simply click Log In/Sign Up up and to the right and use your same username and password from the old site. If you've forgotten your password, please send an email to membership@sunbeamalpine.org for assistance.
If you're new here, click Log In/Sign Up and enter your information. We'll approve your account as quickly as possible, typically in about 24 hours. If it takes longer, you were probably caught in our spam/scam filter.
Enjoy.
You are using an out of date browser. It may not display this or other websites correctly.
You should upgrade or use an alternative browser.
You should upgrade or use an alternative browser.
Sunbeam 2000 build
- Thread starter belmateo
- Start date
belmateo
Gold Level Sponsor
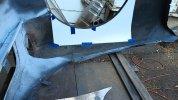
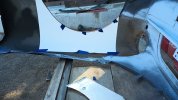
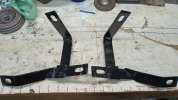
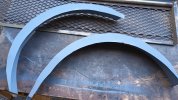
I put the front clip back on the car to finish up the wheel houses and fabricate the bumper brackets, then stood back and looked at it for a bit. The grill opening looked off for some reason, put the measuring tape to it and sure enough it was off center by 1/2". Fixing that now so I can get back to the bumper brackets and wheel houses. Cut, weld, sand and primer then on to the next item on the list.
Last edited:
harbor freightLook at you showing off the fact that you have four of the same clamps. In my assortment, I'm not sure I have two that are alike.
Looks like a good start.
belmateo
Gold Level Sponsor
I was able to finish with the fender liner modifications and they fit nice. The front end is a one piece unit so fitting on and off the car was so much fun! A new driver side plastic liner has been ordered as the one on the car is damaged and would allow water into the wrong places. The latest challange has been sorting out the wiring for the headlights from two separate bulbs to one, attached is the wiring diagram for your viewiing pleasure so you can see what I have to deal with.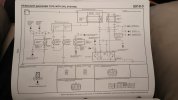

belmateo
Gold Level Sponsor
I had to take a pause on the wiring because it turns out the high beam circuit is also the DRL which sends about 10.66 volts when operating during the day. When the lights are turned on, they stay on and the low beam is now active (separate bulbs). When you flash to pass on put on the high beam the DRL circuit reverses and applies 13.8 to it and the 10.66 becomes a ground. The DRL will either have to be disabled or completely removed, more testing is needed. In the meantime the headlight buckets were pulled out to get them fitted. When trying to figure out which side is which it was clear that they were identical. First thought was why do I have two of the same? Yesterday I stopped by Sunbeam Specialties™ and had Rick get me the headlight bucket gaskets and he handed me two of the same. I asked him "they are not side specific?" Of course you know his reply!
I inquired about the price of one bucket and it was somewhere near $150 with tax as they are sold as a complete unit. Unfortunenately only one of mine is not true and trying to find a used one now.
Other than that, the front end is on the car for good now. New fender liner arrived and is installed, just need to finish up the rear section since the Alpine wheel opening tapers back so some adjusting is needed. Grill is ready to go in once the lighting is sorted out. Bumper fits perfectly! Lower grill opening is done, this will direct air to the intercooler, power steering cooler, A/C condender and radiator.
I am also looking to modify the power steering setup, my options at the moment is to 1) change the pump to an electric hydraulic one 2) Put an electric motor drive on the stock pump 3) change the rack to an EPS unit.
belmateo
Gold Level Sponsor
I think there is a solution for the headlights that might work with one relay per side and I will run the fog lights on a seperate circuit so they can be turned on at anytime the ignition is on.
Using a SPDT 5 pin standard Bosch™ relay, I will wire it according to this and see if it works.
PIN 30 = Hot blue wire from high beam (original)
PIN 85 = Ground
PIN 87 = Low beam (new path)
PIN 87A = High beam (new path)
PIN 86 = Red/Yellow from high beam (original)
Since the Red/Yellow is hot when the low beam is on, that is used as the trigger to complete the circuit for the normally open PIN 87 and open when the high beam is on which will release the relay and direct the power to the normall closed PIN 87A
This has been racking my brain for some time now and it needs to be resolved. LOL
Pins 85 and 86 are the relay or switch
normally closed means that pin 30 and 87a have continuity when the relay is idle
normally open means that pin 87 will ONLY have continuity when the relay is engaged
belmateo
Gold Level Sponsor
All lights resolved as of yesterday. It needed to have the wiring rearranged from above post as follows.
PIN 30 = Hot Blue wire
PIN 85 = R/Y wire (becomes ground when high beams flashed or on)
PIN 86 = Hot Blue wire
PIN 87 = High beam to headlight
PIN 87a = Low beam to headlight
When the headlights are turned on, the current flows from 30 to 87a (normally closed)
When high beam is on, the relay trigger is complete as the ground is applied thus sending power out to pin 87
Now the focus will be on getting the body prepped and sealed before the weather gets too wet.
Aladin Sane
Diamond Level Sponsor
Coming along nicely.
belmateo
Gold Level Sponsor
Got started on the Driver fender and found a small area with way too much body filler that required a bit of sanding to get down to metal. Somehow there was a tear in the metal and a "bump out", cut the area out and replaced with new metal. This was after two days of sanding with 60 grit and two paint jobs and some body repair from previous owners.
Aladin Sane
Diamond Level Sponsor
I now run two angle grinders. One has a cut off wheel, and the other a braided wire wheel.
Aladin Sane
Diamond Level Sponsor
I have one makita, and one HF.
belmateo
Gold Level Sponsor
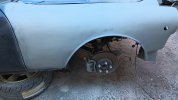
Making good progress on the rear quarters, will have to post some mock up photos. The saddle tanks will actually be at about the same level as the gas tunk over the differential. Planning on having a remote pump draw the fuel out of the saddle tanks into the main one when needed. The rear tires will fill up the opening nicely with NO interference so far and the car will have a nice rake to it.

