• Welcome to the new SAOCA website. Already a member? Simply click Log In/Sign Up up and to the right and use your same username and password from the old site. If you've forgotten your password, please send an email to membership@sunbeamalpine.org for assistance.

    If you're new here, click Log In/Sign Up and enter your information. We'll approve your account as quickly as possible, typically in about 24 hours. If it takes longer, you were probably caught in our spam/scam filter.

    Enjoy.

SV V6 Restoration

Beamin

Platinum Level Sponsor
I'm really puzzled. You should have at least 3/4" and more many be up to 1" full clearance between the fan and the radiator.

How did you have the fan mounted? Any spacers? You mentioned (I believe) the fan had edges turned at an angle of the tips? Were they pointing toward the engine or the radiator??

What is the diameter of the fan blades?
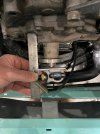
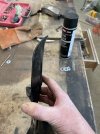
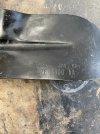
No spacers between the fan and water pump pulley. In fact, I had the machine shop enlarge the center hole in the fan so that it sits flush against the pulley, as the stock center hole was only large enough for the smaller part of the water pump shaft. Fan is 16” tip to tip, P/N D4ZE-8600 AA. Think I got that part number from some of your notes. You can see in the pics that the tips of each blade curve out just a bit. That’s the part that caused the problems for me. I plan on reducing that curl a bit with a hammer and dolly, and maybe grinding an additional 1/4” off, which I think will easily get me 1/2”, if not more, clearance.

ACBF12FF-9FC5-4C1F-8B4F-555FDD50109E.jpeg3DAAC639-FA7D-4020-AE78-1B7E7C84D953.jpegA9DD46DA-AF65-4305-92C6-EFB8452B6866.jpeg
 

Beamin

Platinum Level Sponsor
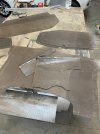
Still waiting on the replacement radiator, so decided it was as good a time as any to start working on the interior. One 4x8 sheet of 1/8” hardboard almost covered all the interior panels. I was patting myself on the back for my careful layout and efficient use of material and was just about to pop the cap on a celebratory beer when I looked over and realized the vertical bench panel was hiding from me and is in desperate need of rework. Oh well. I think I may have a piece of 1/4” plywood in the scrap pile that just might work.

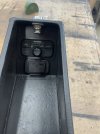
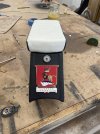
And while we are on the subject of the rear bench, does anyone have any pics of what they’ve done with the horizontal portion they’d like to share? I’m not really liking what I currently have and am looking for some inspiration.00D97012-EAB1-4277-8834-B12CC6AB1ABC.jpeg
 

Beamin

Platinum Level Sponsor
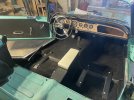
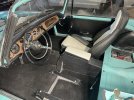
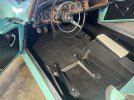
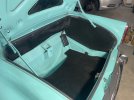
In addition to inhaling way too much contact cement fumes, I spent a good portion of the last couple weeks learning how to operate my daughter’s sewing machine. It was definitely a struggle for the little Singer to punch through carpet, but five bent needles latter, I‘m pretty happy with the results. I’m still thinking through how to finish off the back bench, but that can wait a bit. The re-cored radiator has been sitting in the corner for the last couple weeks patiently waiting for another chance.
 

Attachments

  • 4417FEB3-FAC0-4A66-BF4E-71D4024A1020.jpeg
    4417FEB3-FAC0-4A66-BF4E-71D4024A1020.jpeg
    1.7 MB · Views: 73
  • 237916DE-EA41-4249-8D2F-822A29F1757D.jpeg
    237916DE-EA41-4249-8D2F-822A29F1757D.jpeg
    1.9 MB · Views: 65
  • 81CFD7E8-ADD9-411D-9DCE-3C4B5E158753.jpeg
    81CFD7E8-ADD9-411D-9DCE-3C4B5E158753.jpeg
    1.9 MB · Views: 68
  • EF428DCC-E69C-4A65-92E7-436EBAC61DD7.jpeg
    EF428DCC-E69C-4A65-92E7-436EBAC61DD7.jpeg
    1.2 MB · Views: 70

Beamin

Platinum Level Sponsor
Got the radiator back in. Made some slight modifications to the fan, plus I was able to eke out ~1/8“ of forward movement on the radiator mounting location. I’m comfortable with where it sits now. Went to start it and she doesn’t fire up. Do a little bit of investigating and determine the accelerator pump on the carb isn’t working. Quick trip down to my local Napa for a carb kit and an afternoon spent completely rebuilding it. Got it reinstalled first thing this morning, turned the key, and voila, she comes to life again. You’d think this would be cause for celebration, but….

Almost immediately after starting, I noticed a fairly steady drip of oil from the front end. Wasn’t there before. I only had enough time for a cursory inspection, but it seems to be coming from around the crank pulley. My worry is that the sudden impact of the fan against the radiator tweaked something around the front seal. Unfortunately I probably won’t have time to dig any deeper until next week.

:confused:
 

Opa64

Donation Time
you probably don,t want to hear this but if you absolutely get to a dead end , a good machine shop can shorten the neck on your pump , remachine for the seal and shorten the shaft accordingly. case solved.
 

Beamin

Platinum Level Sponsor
I’m feeling good about the clearance between fan and radiator now. I’ll snap a picture or two and post to see what others think, put there would have to be some substantial flex in the fan or shifting in the motor to cause problems (I think….definitely will be looking for opinions when I get the pictures up).

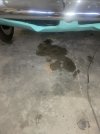
My bigger concern now is the sudden appearance of a substantial oil leak. This is the result of maybe 5 minutes running the engine. It wasn’t even up to temp when I noticed it and shut it down. No such leak existed prior to the fan mishap. I’m a cup of coffee away from heading into the garage to start investigating further.
 

Attachments

  • 9E6D5E28-1DE0-4AD9-BF67-9940461D37E6.jpeg
    9E6D5E28-1DE0-4AD9-BF67-9940461D37E6.jpeg
    1.2 MB · Views: 21

Beamin

Platinum Level Sponsor
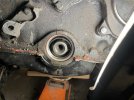
Yep…that’d do it. Not sure if it was the sudden impact of the fan that did it in or if it was already on its last legs, but the front seal appears to have self destructed. Heading out the door to see if a replacement is available locally.
 

Attachments

  • 1DDEF968-DA37-4BB9-8F30-59BC59E442B4.jpeg
    1DDEF968-DA37-4BB9-8F30-59BC59E442B4.jpeg
    2.2 MB · Views: 38

Bill Blue

Platinum Level Sponsor
Are you sure something did not get jammed into the seal? To be a bit more precise, something that was rotating.
Bill
 

Beamin

Platinum Level Sponsor
Are you sure something did not get jammed into the seal? To be a bit more precise, something that was rotating.
Bill
Honestly, I don’t know. I don’t see how something could have gotten past the crank pulley. I would have thought the fan belt would have absorbed most of the energy from the sudden impact, so it seems odd to me that the seal came apart like it did.
 

Beamin

Platinum Level Sponsor
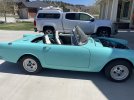
Well, I made it up and down the street without any catastrophic issues. Pretty mean sounding at this point given that I don’t have any exhaust pipes hooked up beyond the headers. Got an appointment with a custom exhaust shop early next week. I definitely need to tweak the carbs and check the timing. The one pseudo significant issue is the interference between the left wheel and lower valance when turning hard to the right. My lower valance is a combination of three separate trashed units that I had lying around and was able to piece together. It was one of my first attempts at sheet metal work. In hindsight, I probably should have chosen some easier pieces to cut my teeth on. So unfortunately, I’m having to take a hammer and dolly to some brand new paint in an effort to reshape things enough to get the necessary clearance. Just one more entry on my list of necessary touchup painting. I wish I would have remembered some of the lessons from my first Sunbeam restoration 20 years ago. If I were to do it all over again, I’d only initially paint the door jambs, interior and engine compartment, then after assembling everything and road testing, I’d go back and paint the exterior. No matter how careful I tried to be, there are lots of chips and dings that need to be addressed, but they can all wait until next winter.
 

Attachments

  • 7ED18A35-4FBF-4D94-8E0B-1B8505B316BF.jpeg
    7ED18A35-4FBF-4D94-8E0B-1B8505B316BF.jpeg
    1.3 MB · Views: 27
  • 4A4A9928-CA11-4852-985F-51FDC7E3B28D.jpeg
    4A4A9928-CA11-4852-985F-51FDC7E3B28D.jpeg
    1.1 MB · Views: 30
Top