-
Welcome to the new SAOCA website. Already a member? Simply click Log In/Sign Up up and to the right and use your same username and password from the old site. If you've forgotten your password, please send an email to membership@sunbeamalpine.org for assistance.
If you're new here, click Log In/Sign Up and enter your information. We'll approve your account as quickly as possible, typically in about 24 hours. If it takes longer, you were probably caught in our spam/scam filter.
Enjoy.
You are using an out of date browser. It may not display this or other websites correctly.
You should upgrade or use an alternative browser.
You should upgrade or use an alternative browser.
RHD LeMans
- Thread starter 65beam
- Start date

65beam
Donation Time
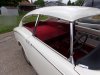
Tail lights and rear wiring harness are done. Now I have to drill holes for the license plate. It had holes for a british plate so they were filled in during the body work. I have to cut the wood spacers to set between the rear valance and the fiberglass section. They are held in by screws thru the openings ( small dark spots) near the bottom of the top unit. I had a hard time convincing Ronnie not to fill these holes. The cars had a foam rubber seal between the top and body so I'll have to install that. The seal filled in between the wood spacers.
Last edited:
65beam
Donation Time
I installed the blocks and foam yesterday so I can't take photos. The blocks are roughly 1 1/2 inch in length, 1 inch wide and 3/4 inch thick. I had to sand a couple to get them to slide in. I have some pieces of the original foam for reference so I used the grey 3/4 inch square foam that is used for insulating around windows and doors of a house. The original stuffThat's very interesting. Always wondered what these holes were for. Were the wooden distance pieces round or square? What rubber foam was used ? Would appreciate if could post more detailed pictures. Many thanks in advance ...
 I took out was rock hard so I'm not sure what they used originally. The foam I used has double face tape on two sides. The same style of foam has been on our red car for at least 30 years so it seems to stay in place. I wanted to have this area filled when the body was restored but the wife said no. Bruney had this area filled in when his blue car was wrecked back in the late 60's, early 70's. Makes for a real nice finished look. I have the top removed on our third car so the blocks are in one of the boxes of parts. I'll try to find them and take a photo and measure them.
Last edited:


65beam
Donation Time
The wood spacers have a hole drilled in the center. I used # 10 stainless steel sheet metal screws with a flat head and slot instead of Phillips head. The screws are 1 1/2 inch long. I cut new blocks and sanded them until they were a tight fit, set them in place and then drilled the steel valance. No nuts on the inside. The blocks appear to be there to keep the over hanging section of the top secured. The booster has under gone a rebuild and refinish of the housing.Great thanks. Would assume the screws go through the wood and the steel valance then - correct? Is there a nut on the other end or are they self tappers ?
Double sided adhesive square foam makes sense. Like your original Clayton Dewandre...

65beam
Donation Time
Noted. Who on your side of the pond is able to refurbish a Clayton Dewandre ? It's even difficult to find somebody in UK. Plus the seals and specifically the diaphragm are almost unobtainium . Sorry for many questions...
A friend of ours was in the Sunbeam parts business here in the states for many years. He had repair kits for these boosters . If you have the right parts anything can be repaired or rebuilt. The wife bought our first LeMans from Tom and we continued to buy parts from him until he retired. John Prittie got the kits that Tom had left. You might be surprised what can be found in our
 bins and cabinets. Just part of our collection of new Beam parts. There's a lot more new parts in the attic. If something breaks or fails I have what I need. The used stuff is in two other buildings.
bernd_st
Bronze Level Sponsor
Wow that's a really impressive NOS parts collection. Seems you are safe for the next century ;-)
John told me that he only has one Clayton Rebuild set left out of Tom's stocks which he needs to keep for himself . Certainly understandable .
If you have a spare one you would part with just let me know. Otherwise I'ld be forced to install the Clayton into my HLM unconnected...
John told me that he only has one Clayton Rebuild set left out of Tom's stocks which he needs to keep for himself . Certainly understandable .
If you have a spare one you would part with just let me know. Otherwise I'ld be forced to install the Clayton into my HLM unconnected...
cdk84
Donation Time
Hi Bob, Hi Jean,
Looks as though your LeMans is progressing wonderfully. Very Happy to see it's looking so good.
I love the color combination of your post-Series Alpine, so can't wait to see how it looks on the Le Mans.
It looks as though you're past the tantalizing point where it looks like a car but still has a lot left to do. That can be the toughest part: it looks like a car and as though it ought to be able to drive 'pretty soon'. Pretty soon has so many shadings!
Hope the home stretch goes easily and smoothly for you.
Best,
David
65beam
Donation Time
David,Hi Bob, Hi Jean,
Looks as though your LeMans is progressing wonderfully. Very Happy to see it's looking so good.
I love the color combination of your post-Series Alpine, so can't wait to see how it looks on the Le Mans.
It looks as though you're past the tantalizing point where it looks like a car but still has a lot left to do. That can be the toughest part: it looks like a car and as though it ought to be able to drive 'pretty soon'. Pretty soon has so many shadings!
Hope the home stretch goes easily and smoothly for you.
Best,
David
One of the many parts that came with the car was a replacement headliner that didn't fit. I'm stalled until the shop gets another made and installed. I can't install the drip rails, windshield and windows until the headliner is done. Once he gets the headliner installed I can finish up the rest of the car.

65beam
Donation Time
I have a lot to do to finish what you see. The carpet under the back cushions is not secured and neither is the support for the seat. I'm working my way to the front of the car.Congratulations - looks terrific. Would love to be at this stage")

65beam
Donation Time
Dan,Looking good! Jean does Great work
You know her and yes, installing this windshield turned into a real chore due to something a previous owner had done so I found a stool and she and the 30 year old got it set in place. He's a tool and die mechanic so he said something about a big hammer solves all problems. It on the car, she's happy and now on to the dash. The wiring harness is in the car.
65beam
Donation Time
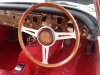
We did a test fit of the dash and steering wheel before assembly. The dash was custom made by the supplier for Sunbeam Specialties using the original LeMans dash for reference. Now to install the instruments, etc. Nisonger has converted the original tach to electronic and work has been done to several other items. I have NOS heater controls but will move the fan switch to the dash to control the two speed fan . I have to make a decision where to mount the Wipac Rallyman switch for the Rootes fog / driving lights. I also have the correct radio mount for the series 2. The wheel is a Les Leston I bought in the U.K. maybe 15 years ago.
. I have to make a decision where to mount the Wipac Rallyman switch for the Rootes fog / driving lights. I also have the correct radio mount for the series 2. The wheel is a Les Leston I bought in the U.K. maybe 15 years ago.