• Welcome to the new SAOCA website. Already a member? Simply click Log In/Sign Up up and to the right and use your same username and password from the old site. If you've forgotten your password, please send an email to membership@sunbeamalpine.org for assistance.

    If you're new here, click Log In/Sign Up and enter your information. We'll approve your account as quickly as possible, typically in about 24 hours. If it takes longer, you were probably caught in our spam/scam filter.

    Enjoy.

finally on the dark side

socorob

Donation Time
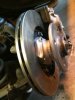
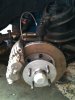
I looked at it with a fresh pair of eyes today and realized it could work if I put the rotor on from the back side. Since the rotor has threaded holes, im able to have the bolt heads towards the outside of the car. The hat clears the spindle by about 1/8 inch. There wouldnt be enough room for bolts if they had to come from the back side. This moved the rotor outboard by about 5/8". Now I have a little over an inch clearance on the lower balljoint too. The caliper adapter looks like it will need to be a 5/8x2x7.5 inch piece of metal that looks like it will be just a flat piece of metal, or really close to flat. Two holes will have to be drilled through for the steering arm bolts, and the 2 holes for the Mazda caliper will need to be tapped. If I would have realized this from the start, I wouldnt have needed to turn the hubs, except to true them up.
 

Attachments

  • rotor revesed.JPG
    rotor revesed.JPG
    17.8 KB · Views: 62

260Alpine

Silver Level Sponsor
Robbie, I knew you could do it! Can't you use the original caliper mount holes instead of the steering arm holes? You can use hardened washers(grade 8) to shim to center caliper to rotor.
 

socorob

Donation Time
On the S2 the steering arm sits on top of one of the caliper mounting arms. A long bolt goes through all of it. The Mazda caliper mounting holes are about 2 inches wider than the alpines.
 

altered

Donation Time
Robbie,

Did you get this fan setup working? I'm interested in possibly going this route.

Trevor.


Today i removed the old fan and test fit the flex a lite scirrocco fan. It fits pperfectly. It exactly coers the finne part of my radiator, and there is about 1/4-3/8" clearance between the shroud and the pulley. I still have to mount it and wire it up. Does anyone know how the thermostat for the fan should work?If my thermostat on the engine is 190 degress,, do I want the fan to come on lower or higher? I would think the fan shouldnt run if the water isnt circulating?
 

socorob

Donation Time
I have the fan mounted, the Saab inline t thermostat mounted and the wires ran to everything. I still haven't mounted the relay or connected the wires up. I jumped onto my brakes so as soon as they're done I'll wire up the fan. I missed an autox yesterday at the new motorsports park in new Orleans but I'm trying to get it all together for the one next month.
 

socorob

Donation Time
I got everythng mounted and plumbed in on the brakes today. The pedal only goes down about 2 inches, so pedal feel is much better than it was before. I still have to put the wheels back on, and wire up the electric fan before I can drive it to find out if ill need a proportioning valve or not.
 

Attachments

  • brake upgrade.jpg
    brake upgrade.jpg
    24.5 KB · Views: 60

socorob

Donation Time
No, this is the Mazda caliper, Nissan 4wd rotor, and adapter ring I had the water cut place in town cut out. Unfortunately the rotor did have to be turned a little on a lathe since I had to reverse how I originally planned to mount it. The ears for the bolts on the rotor were cast on the inside of the rotor so they weren't quite the same thickness. I measured both and the narrowest spot on any of them was like .52, so I turned then so all the ears were .52 thick. The caliper bracket is 1/2 x 2 x 7.5 with about a 1/8 spacer between it and the caliper on the outside and a 1/8 spacer between it and the steering arm on the other side.
 

socorob

Donation Time
http://youtu.be/OxQ_n6W-IYw
Got the car all put back together and got totake it for a test run. I also got to try out the $40 keychain camera I got off ebay. I have a water leak and to sort the fan timing out,then this project will be over.
 

socorob

Donation Time
Thanks, youtube is great, it can keep you entertained for way longer than you want. I took 3 videos with the camera, and am almost finished uploading the 2nd one. The only bad thing about the keychain cameras is you cant really tell what they are seeing. I adjusted it in the 2nd one and got some of the dash too. The good thing is you can mount them with pieces of velcro since they dont weigh anything.
 

socorob

Donation Time
I got to test the 4 link and Mazda brakes out today. I am happy with both of those upgrades, well worth the effort. Now the 2 things holding me back are my driving skills, and the sunbeams front suspension. Anyone know how to make an alpine front suspension handle decently without changing the whole crossmember out?

Here are todays results and a video from my 1st run.

http://www.youtube.com/watch?v=1IyCeJnjoJ0

http://www.delta-scca.org/wordpress/wp-content/uploads/2012/02/krewe_of_kones_raw.htm
 

socorob

Donation Time
Coilover front suspension for the Alpine

I started looking at the front suspension on the alpine yesterday. I think I see an easy way to put coilovers on the front which will give me a better choice of shocks and spring rates, but its not going to do anything to help the alpines antiquated geometry. An improvement is an improvement though, right? For the lower mount all it needs is a part like this. http://www.summitracing.com/parts/SJA-SKDGEB1/?rtype=10
The lower load will be carried in the same place as the existing coil spring is. Im still trying to find measurements on the skyjacker piece as I may luck out and it be a good size to work with, if not ill have to make something that looks very similar. For the upper it looks like any Mustang II coilover kit will work. The only thing I may have to do up top is enlarge the hole where the threaded part of the shock bolts in a little. There are many different shocks and springs to choose from the Mustang II style as the aftermarkt for those is huge.
http://www.speedwaymotors.com/Carre...-Coil-Over-Kit,182.html?parentDisplayId=50624
All I did were quick and dirty measurements but it looks very doable without very much work. The Mustang II shocks bolt on top just like the alpine, And the springs at the top are only slightly larger than the alpines springs, but smaller in diameter than the coil spring insulator, so it should just be a slip in fit.
I also posted the video of the 3rd run from the autox last weekend.

http://youtu.be/Kkr8XZTVijU
 

260Alpine

Silver Level Sponsor
Robbie, Sounds good. You should run full welds where the suspension is just tack welded from the factory also. You could shim the crossmember to change caster also.
 

Series6

Past President
Gold Level Sponsor
Robbie,

1-Dash is beautiful.
2-Image from your camera is best 've seen.
3-Car sounds great and appears to fly.

Thanks for posting the videos.
 

socorob

Donation Time
I do plan on welding it up. Im hoping to take the arms off my parts car and redo those so I can swap it all over in a weekend. I dont know much about front suspension, but what would more castor do? I thought i mainly needed less camber (-).
Thanks Nick, I just cut the dash out of a thin piece of aluminum using the template that was floating around on here. I left space for a radio/gps or whatever in the middle for future use. I dont think my car is that fast. I think its stock on the inside with all the bolt on stuff, but its fast enough to be a lot of fun. I have to say thanks to Jose for this swap.
Anyone want a series 2 engine/transmission/differential before I bring it to the scrap metal place?
 
Top