• Welcome to the new SAOCA website. Already a member? Simply click Log In/Sign Up up and to the right and use your same username and password from the old site. If you've forgotten your password, please send an email to membership@sunbeamalpine.org for assistance.

    If you're new here, click Log In/Sign Up and enter your information. We'll approve your account as quickly as possible, typically in about 24 hours. If it takes longer, you were probably caught in our spam/scam filter.

    Enjoy.

Series V Cylinder Head Questions

Tom H

Platinum Level Sponsor
Jarrid, I agree with you on swept vol, unswept vol, and published stock CR.
I "burretted" a similar near virgin AM3 head 6 yrs ago at 39.2. I used a 60 cc medical Syringe that I calibrated at 40 cc using a precision scale and water at 1 gm per cc. Furthermore using the factory stated 9.2 CR, and resulltant unswept volume of 52.6 cc here's a calculation
deck height 0.018" = 2.4 cc deck height volume
gasket thickness 0.025' and gasket diameter = 3.4" ( slightly larger than bore)= 3.7 cc
Piston dish volume = 7.2 cc (mean beyween 6.9 and 7.5 factory spec)

52.6-2.4-3.7-7.2= 39.3 cc

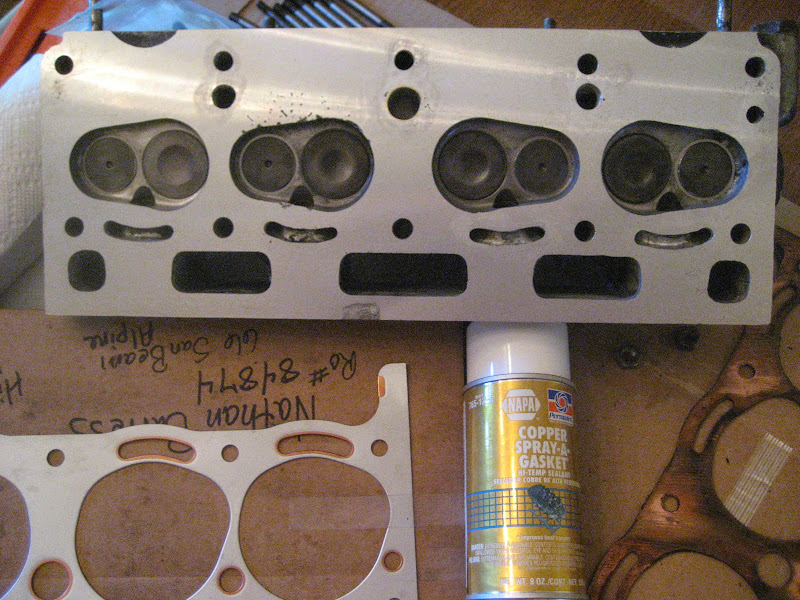
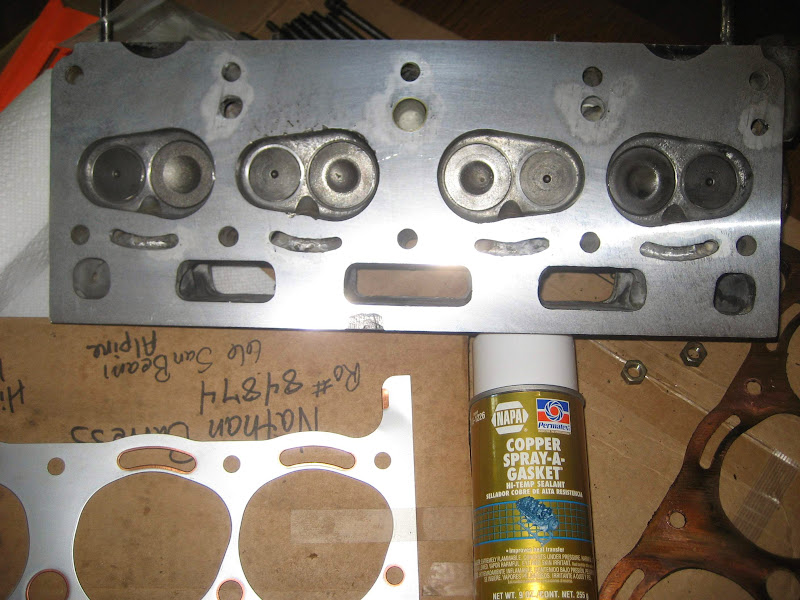
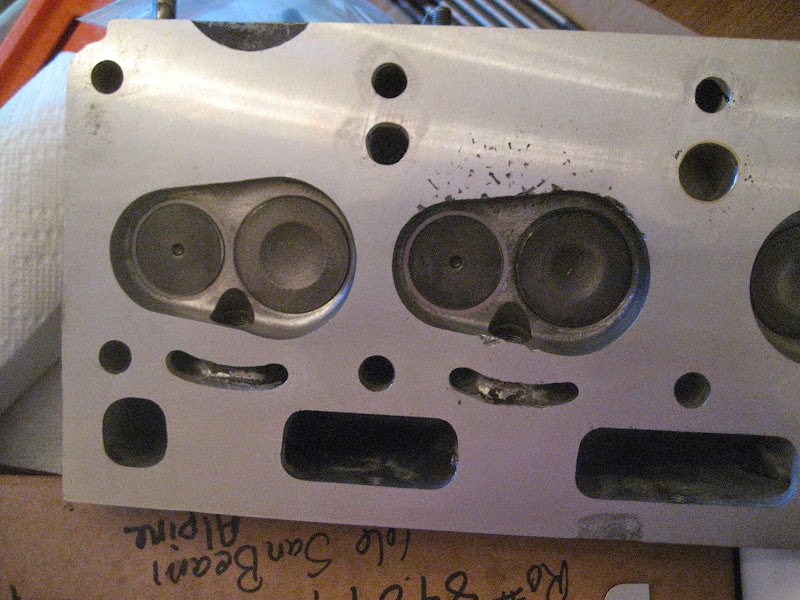
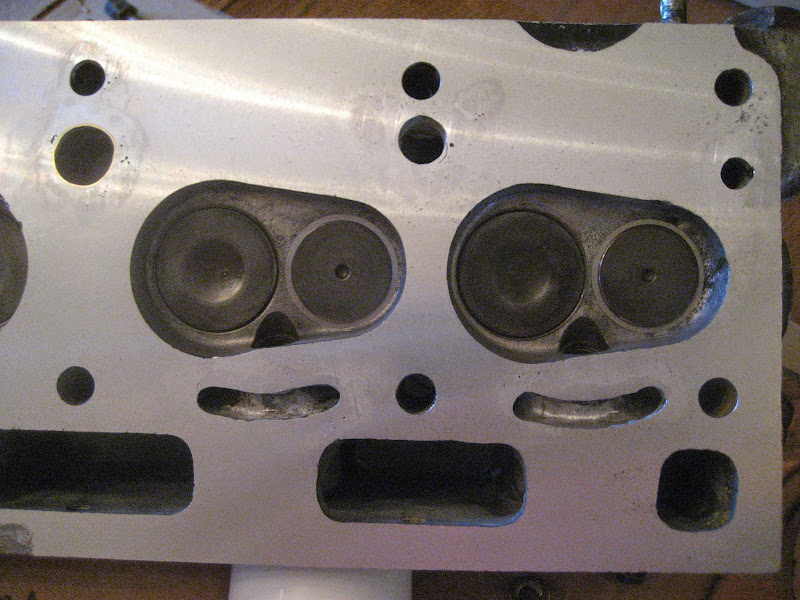
So I have confidence in my "burrett" measurements. And I used the same measurment method after adding the mod and measured 41.4 cc. After I had the head repaired and valves ground I found the vol was 42.4, except that the repaired cyl (re-welding some burned/ corroded area and shaving was 43.5 cc so I had to remove a lot more material from the other 3 chambers to make them even. I suspect that the Vizard mod done on your head may have been done more aggressively and with curved walls more like the stock walls, but not matching the profile in the Vizard dwg. In addition I suspect you had some valve work done which may have set the valves further recessed into the head- as was done on mine. I estimate/ calculate about 1.4 cc added due to the valve work on mine.

In Nathan's case, assuming my estimate of 2.2cc increase from the Vizard mod and loss of 1 cc due to previous and new head (not deck) shaving, that's a net increase of 1.2 cc over stock. resulting in 9.0 CR.

Tom
 
Last edited:

alpine_64

Donation Time
Tom,

I was interested to see what you said regarding the wall profile of the combustion chamber. I was speaking to a friend about this recently while he was doing the modification to his head (still in progress).

I notice many people have bored out the wall as opposed to the straight taper that is in the diagrams. I discussed with him if you could set a dremel etc up on a jig so that it held it at a 45deg angle to keep the angle constant. He said just be careful and slow and take your time.

i guess you could do the upper part with a dremel and then hand sand the lower area with a squared pumice or something similar to get a nice even angle, as opposed to a curve.. then tidy the interface between the wall and the roof of the chamber.
 

Tom H

Platinum Level Sponsor
Michael, Exactamundo! It seems to me that the normal tendency in doing the mod would be to, as you say, "bore out" the wall, into a curved shape similar to the stock wall. Upon seeing the sloped profile as described in the Vizard drawing, I had no problem modeling that shape. I did 95% of the cutting and shaping using a Dremel High Speed Cutter with a straight sided 1/8" dia milling bit, .320" long, with cutting surface on the sides and tip. I believe it's a number 194, although pictures of that tip I see on line look shorter than the tip I used. Using a tip with that fairly long flat side, and holding the tool at an approx 45 deg angle as I cut the head toward the vizard outline marks I had made, really I had little trouble maintaining a smooth slope. Had I used a ball shaped tip I doubt it would have worked so well. I did use a number of round tipped cutting tips and abrasive tips to smooth transitions, but very little material was removed using these. Except, as I noted earlier, when I had to remove more material in Cyl 1,2,3 to match the repaired Cyl 4 volume I did use a round tip cutter to remove material from between the valves, and on the side walls. Cutting the Vizard mod into the head took more "courage" than skill! But maybe I am more "skilled" than some. As your friend noted it's just a matter of being slow and careful, I have been building models - trains, planes, and automobiles, using simple hand tools since I was 6, so maybe it's easier for me than some.

Tom
 

RootesRacer

Donation Time
I may have been a bit liberal in removing the material but I didnt do it open loop.

Having had the benefit of a flow bench while grinding on the chambers, I dont think 2.2cc is going to get you very far flow wise.
The exhuast valve is heavily shrouded and needed a lot of meat removed to improve the flow figures.

BTW, in my experience, I see a typical 50% power loss per % reduction in compression ratio (on relatively modern engines near 9/1 cr).
As such 2.2% CR change would yeild about a 1.1hp loss for a 100hp engine.

Also, going with larger valves had a much more profound impact on the flow figures after the requisite port work.

In the end, its my opinion that if you dont go full tilt while the engine is apart, and up the compression, go for a longer duration cam, port the head and intake ETC, you end up doing a lot of work for very little return.
The whole point to the vizard mod is to gain higher RPM flow and unless the engine is reconfigured to allow volumetric efficiency improvement at a higher RPM, you wont gain much.
Perhaps a bit of torque but not horsepower.
 

Tom H

Platinum Level Sponsor
Jarrid, So now we see why my disagreement with you was done so "respectfully"! I really don't know how much my Vizard mod improved or degraded my engine performance. But I DO have confidence that I followed the Vizard drawing in shaping my combustion chambers and that following that profile adds only about 2.2 cc to the volume. And I do know that shaving the head 11 thou reduces that vol by 1 cc and thus maintains close to the stock CR. I also used the KB grind on the cam and ported the manifold and head. So I see your point that it makes sense to do those additional steps or not bother with the Vizard mod. I do not see a need to go to flat top pistons (decreasing the vol by 7 cc and increasing CR to 10.3) with the Vizard mod.

Depending on how much the head had previously been shaved, it might NEED the Vizard mod to keep the CR from getting too high. In fact the 0.100" thick head gasket (increasing the vol by 6 cc and decreasing CR by about 1) may have been installed just to keep it from pinging. Certainly if it was running OK with the 0.100" gasket, it wouldn't hurt to remove a couple ccs of chamber volume when switching to a standard 0.030 gasket.

Tom
 

Stick

Donation Time
The engine "ran ok" but I've always though it was a bit of a dog. No where near as fast as a 2300lbs 100hp car should have been. I have both a 1500lb bugeye with a stock 1275 making ~65hp, and a 2500lb 106hp civic as reference points. Both of those cars feel significantly faster than the Alpine did, any by the numbers they should have been comparable. I would not assume that the thick headgasket was there by necessity.
 

Tom H

Platinum Level Sponsor
The engine "ran ok" but I've always though it was a bit of a dog
.

Sounds like you are ready to tackle the job. Go for it. For my 1725 I did all the mods I felt were well proven. Chevy rods, that allowed me to increase stroke by 0.10" , bored to 3.248" (that's 82.5 mm, pretty std dia for modern cars and easy to get rings), KB grind (from Delta Cams in Tacoma) on the cam, Vizard mod on the head, custom pistons from Venolia in CA to accommodate the chevy rods and longer stroke and to reduce the dish to maintain 9.2 CR, and a Weber 32/36 carb. But I already needed new pistons and rings anyhow. Doing the Vizard mod and KB cam and porting the head and manifold may bring all the increased performance you want.

Tom
 

RootesRooter

Donation Time
...And they'll already be running cutting heads on the head working on a couple of the coolant crescents anyway so it's just a bit more labor to go ahead and do it all and pick up a bit of power....


Someone's gotta wear the black hat here.

My accountant "Spidey-Sense" kicked in when I read this part. Every post I've read here suggests they did their own work. When I Vizardized my head (on my kitchen table), it took many hours of cutting and measuring.

Even with a pro working on it, I think the "bit more labor" could add up to substantially more hours - at shop rates.

The PO really screwed the pooch on the headwork. What's the bottom end like? If you're still planning to throw it back together and drive it, I'd aim for reliability instead of more HP.
 

alpine_64

Donation Time
Jarrid,

Maybe post some pics of the head you did a while back, the one with interlocked valve seats and large valves and the appropriated Vizard chamber, opened around some areas but not on others to keep the compression up.

Did you ever run that one on the flow bench?
 

Stick

Donation Time
...And they'll already be running cutting heads on the head working on a couple of the coolant crescents anyway so it's just a bit more labor to go ahead and do it all and pick up a bit of power....


Someone's gotta wear the black hat here.

My accountant "Spidey-Sense" kicked in when I read this part. Every post I've read here suggests they did their own work. When I Vizardized my head (on my kitchen table), it took many hours of cutting and measuring.

Even with a pro working on it, I think the "bit more labor" could add up to substantially more hours - at shop rates.

The PO really screwed the pooch on the headwork. What's the bottom end like? If you're still planning to throw it back together and drive it, I'd aim for reliability instead of more HP.

For the shop to do it, it would be at their hourly rate. By the time I dropped in near closing on Friday, the guy who would be doing it was already gone so it will be Monday before they can get back to me with an estimate for the work.

As for the bottom end, I must confess I have not had any experience working on one, so I am not ashamed to say I don't really know what to look for. I did dump some Castrol 20w50 into the cylinders yesterday afternoon, 20 hours later there has been only a slight (~1/4"?) uniform drop in oil level. At this rate, it will be another few days before it works its way down, so I would assume this indicates the rings are in good shape? As for the rest, I could drop the oil pan and have a look, but I don't know what I'd be looking for to be honest.
 

RootesRacer

Donation Time
Jarrid, So now we see why my disagreement with you was done so "respectfully"!
Tom

Not sure what you are saying here, I dont disagree with you too often.
After all, who would correct my math errors? ;)

I'm of the opinion though that anything done to an engine should be done in such a way that you have no doubts that it did the job when you are done.
As such I would not spend a $10 or 15 minutes of my time for anything less than a 10% gain in something. My "butt dyno" is +/-10% so I fear I wouldnt be able to validate anything less than 10% gain.
 

RootesRacer

Donation Time
Jarrid,

Maybe post some pics of the head you did a while back, the one with interlocked valve seats and large valves and the appropriated Vizard chamber, opened around some areas but not on others to keep the compression up.

Did you ever run that one on the flow bench?

I'll have to see what I can dig up. It has been quite a while.

This was the head that started off in the tested "semi vizard/holbay" config and then got the big @#$% valves.

The best $$$ to flow ratios came from the valves though.
 

Tom H

Platinum Level Sponsor
Jarrid, My "respect" comment was a compliment. Your response showed that your efforts at engine mods are based on a much more knowledgeable approach. My efforts have been carefully done based on what others have done. I do not have the tools or ability to flow test and have not measured the HP. But I am good at math and am good at what measurements I DO make and am careful in doing what mods I do make. I am confdent that the vizard mod, done per the Vizard dwg, while it does decrease the CR , that effect can be reduced with head milling. But your tests may well show that more aggressive chamber cutting than the Vizard dwg shows may be neccessary to be effective. I'm sure we have given Stick a lot to consider.

Maybe we can connect when I pass thru CO in Sept.

Best Regards

Tom
 

Stick

Donation Time
Got the head back from the machine shop today:

IMG_3662.JPG


IMG_3661.JPG


IMG_3664.JPG


IMG_3666.JPG


Sure looks a lot different than when it went in: https://lh6.googleusercontent.com/-PA2AdV7YlxI/UdqmYmGJixI/AAAAAAAATug/FHViT7VO4xo/s800/IMG_3643.JPG


Welded, decked, thimble/diverter installed, new valve seats, and hydrostatic pressure test. When they got into it they discovered one intake valve was bent (I'm going to go out on a limb and guess it came from #2), and 3 of the 4 exhaust valves were almost to a sharp point around the edges, too thin to use. Went with all 4 new exhaust valves, new stem seals, and 1 new intake valve (the other 3 were just fine I'm told). Ended up out the door just shy of $500 all said and done, plus the cost of the 5 valves I provided. A bit more than I expected, but probably not unreasonable.

As you can see, I decided against the Vizard mod, at least for the time being. Going to try it this way and only do Vizard if I have pinging (and octane booster isn't feasable) and/or end up working on the bottom end for some reason. If that happens, I'll entertain flat tops, chevy rods, etc etc and do the Vizard too. In the meantime, for the way we'll use the car, having the low end torque and compression seems more important.

Quick question on the gasket spray - Did I get the right stuff? Permatex Copper Spray-a-Gasket. Can looks slightly different than the stuff they had at the shop, but I think it is the NAPA branding, the instructions read the same. Any suggestion for how many coats for the gasket?

Thanks again, as always, you guys are a great help.

Nathan
 

Tom H

Platinum Level Sponsor
Nathan, Looks good. I notice that what looked like "dents" in the #2 chamber are actually there. It looks a lot like my #4 after a piece of piston ring broke off and rattled around in the chamber. In my case, after the head was cleaned up it looked about same as yours and has had no problems.

BUT, you need to be sure that this problem, whatever caused those dents, has been resolved prior to you getting the car. I guess if the top of Piston #2 does not have similar dents then the problem has been resolved earlier.

I suggest you measure the depth of the "wear bars" to estimate how much it has been shaved since original so you can get an idea of the CR you can expect.

And yes, that looks like the correct spray sealant.

Tom
 

RootesRacer

Donation Time
You should probably CC a chamber, it looks like its been decked pretty heavy (center casting of the "wear" bar indicators shows little left).

You may need to compensate for the loss in chamber volume or your compression may be high.
 

Stick

Donation Time
Tom - I had the same thoughts on #2. Piston is covered heavily in carbon, but no signs of impact such as is in the head. Will try to clean it up a bit for a better look. No derbies visible on or around the piston, nor scoring in the cylinders, although I will turn the engine by hand to get a better look before proceeding. Additionally, the cylinders all held oil very well, 20w50 was dropping ~1/4" every 24 hours (rough guess) so I think the rings are complete and seated well. The guy who restored the car had 2 sunbeams, and I think maybe even an extra engine, and quote "Took the best of everything for this car" so I'm not even 100% sure this head was originally paired with this block. I also don't know why the car was originally parked, it sat in someone's yard for 20 some years before this guy dragged it home and fixed it up.

Rootes - I will pick up a 50cc syringe and a sheet of plexiglass and give that a shot, I am curious myself.
 

George Coleman

Gold Level Sponsor
Just a note: I would rethink the copper spray just say'n. In over fourty years I have never needed on the head but the manifolds yes. Good luck:cool:
 

Stick

Donation Time
I understand it may not be strictly necessary, I've replaced a head on my motorcycle without it and been fine too. But, both the machine shop and a few people on here said to use it, and I figure it can't hurt? Besides, the can is $10, if it helps even a little, it's worth it.
 
Top