• Welcome to the new SAOCA website. Already a member? Simply click Log In/Sign Up up and to the right and use your same username and password from the old site. If you've forgotten your password, please send an email to membership@sunbeamalpine.org for assistance.

    If you're new here, click Log In/Sign Up and enter your information. We'll approve your account as quickly as possible, typically in about 24 hours. If it takes longer, you were probably caught in our spam/scam filter.

    Enjoy.

Series V Cylinder Head Questions

Stick

Donation Time
Picked up my first Sunbeam over the winter, a 1966 SV for my wife. Since not long after we got it, the temp gauge would occasionally read a bit high at speed on longer trips. Nothing extreme, but definitely a bit abnormal. I was suspecting a sticking thermostat or malfunctioning sending unit. In any case, my wife got the idea that the gauge was broken, and ignored it while driving home from work on a warm day. She got home complaining the car kept dying at stop signs and downshifting, so went out and jumped in the car. It fired right up, but the temp gauge was pegged full hot. Pulled it the 15' into the garage and shut it down. Turns out, she had driven it that way for 15-20 miles on the highway :eek:

Long story short, replaced the thermostat the next morning hoping that was it. Tested the old one in a pan of water on the stove, it appeared to open fully as it should. The car was down roughly 3/4 of a gallon on coolant. Put in new T-stat since I already bought it, topped up, and crossed my fingers. Car wouldn't start. It has always started. Worse, it didn't sound like it was trying. It would weakly pop on one cyl, then be dead until that one came up again. Crap. Out comes the compression gauge, 30-100-30-30. Guess that explains that! Unfortunately, I didn't check the compression on the car when we bought it (before we bought it would have been smart!) so I don't know how healthy it was before. It ran well so I guess I didn't worry about it. In any case, obviously it was quite a lot better than it is now.

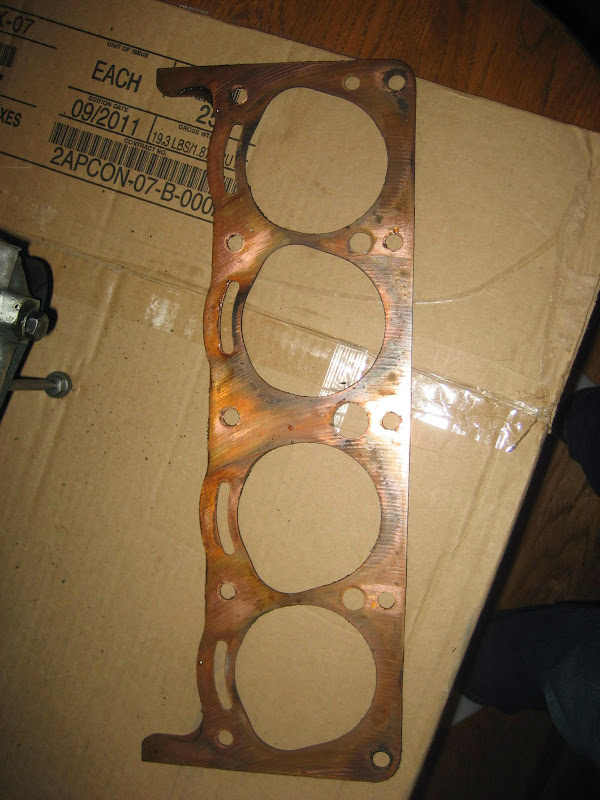
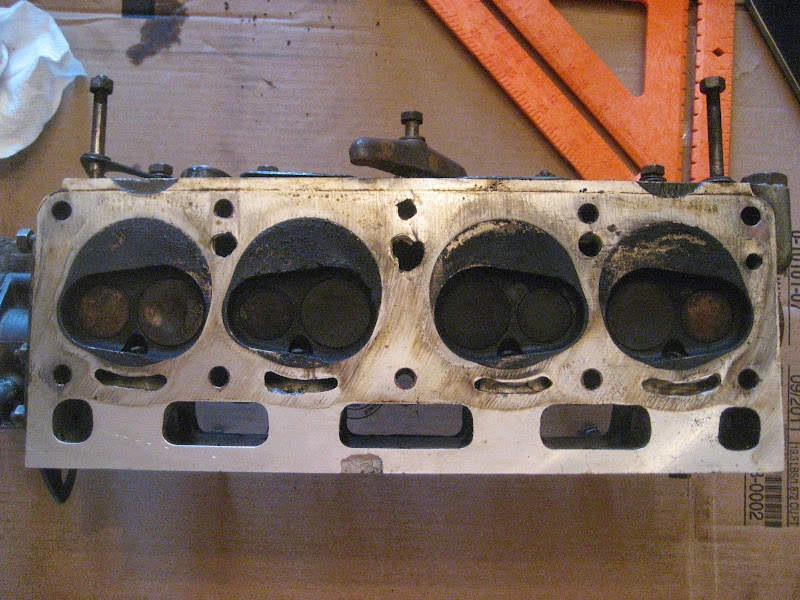
So, I've pulled the head, there was a REALLY thick copper head gasket on the engine. My plan is to take it to a machine shop and have them see if it is warped, and re-plane it as needed. It is not visibly warped, and there are wear indicators left on both sides, so I hope the head can be saved.

Backstory out of the way, I have a couple questions.

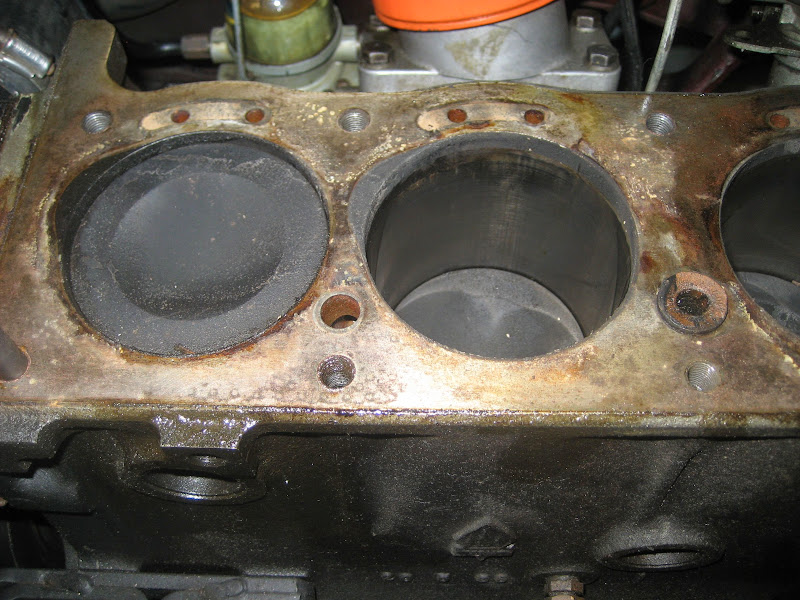
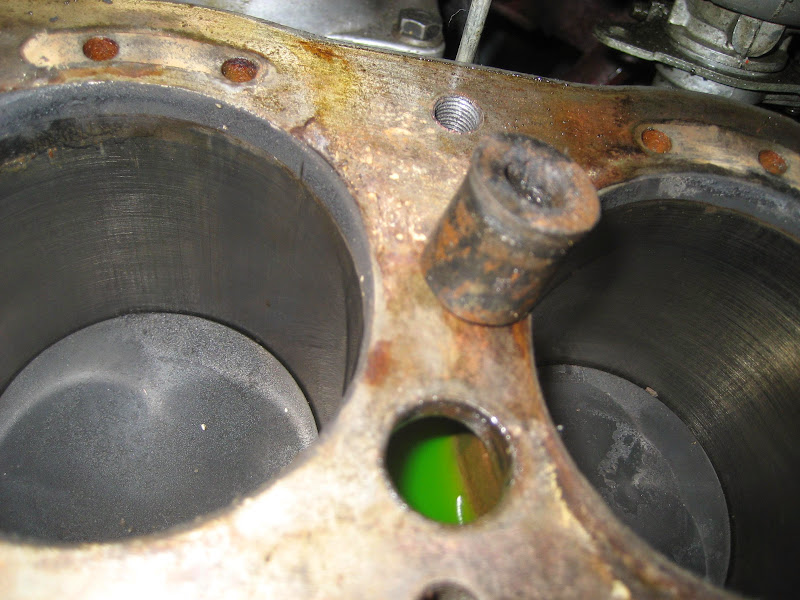
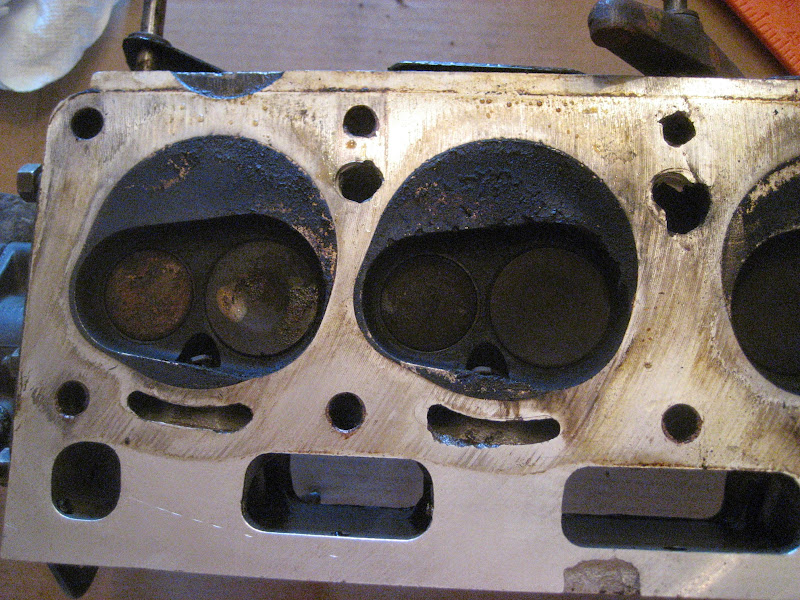
There are a few places that appear to be damaged in the center passages. All the pictures I can find online of Alpine heads these are clean edged, so clearly this is not a normal side effect of casting. Is this damage typical? and what are the likely causes? Is it even a problem?

Looking at the coolant passages, there seems to be some material missing especially on the two nearest the thermostat housing. Was this due to corrosion? Does the current condition necessitate a repair?

Just looking for a general idea of how to proceed here, dealing with this kind of thing is new to me.

Also, what should I get for a new head gasket, any retailers to gravitate towards or avoid? I want to replace the tappet gasket, valve cover gasket, and thermostat gaskets too while I have it apart I would imagine.

IMG_3643.JPG


IMG_3649.JPG


IMG_3650.JPG


Many Thanks,
Nathan
 
Last edited:

RootesRooter

Donation Time
The middle hole where the flow restrictor goes looks by far the worst. It needs being built up and re-drilled. The crescents around each cylinder appear to be marginal but usable.

The valves, especially the intakes, look recessed. At only 30psi in 3 cylinders, I'd pull the pistons for a look-see. Don't usually see Alpine head gaskets blown all the way from front to back. Sounds like the head bolts weren't even close to spec torque.
 

Tom H

Platinum Level Sponsor
Confirming Rootes comments. It seems strange to lose compression in 3 of 4 cyl.

Those crescents look OK, but unusual. They look like someone used a tool to open them up a bit. All the heads I have seen (6?) the crescents were much more symetrical and even.

The middle water passage normally includes a thimble sized diverter/ restrictor. I think they are stil available from Sunbeam Specialties :
http://rootes.com/

And that's where I suggest you get your head gasket.

I would guess that the reason that middle water passage is so ragged is that someone damaged the area trying to remove that diverter.

Also note it is not unusual for these engines to overheat, but most of the time it's due to sitting in traffic or idling. It's not uncommon for the head to warp a bit when overheated. Solutions are recore the radiator with an extra row, and/ or add an electric fan. Lost of posts about both these solutions on this site. But not under "Factor Original". That section is mainly for folks trying to maintain superb "original" detail, color of bolts , etc. Most of us just trying to keep 'em running , even with small mods like new carbs, etc , use the "Stock" section.

I would expect that a machine shop could weld up that bustedmiddle ater passage and drill it for the restrictor. Then shave it as little as possible to flatten. The common gasket for these is a copper/ steel sandwich.

Tom
 
Last edited:

Stick

Donation Time
Apologies if this ended up in the incorrect forum, perhaps the "Stock" Alpine would have been a better category, I had trouble deciding. Mods feel free to move to where it is most appropriate.


I think improper torquing makes a lot of sense. Another thing that may contribute is this car was armature but lovingly restored in 2008. He claims to have rebuilt the motor, and taken the best from several cars. But, he apparently only drove it ~500 miles or so over the next 4+ years. Short trips to area car shows and little else. From what I've been reading here, re-torquing the head at 500 and 1,000 miles seems to be a common recommendation. Even if it was torqued proper in the first place, I think it is safe to say that follow up never happened.

In any case, I just measured the head gasket that came off the car. It is a full 0.1" of solid copper.
IMG_3659.JPG


Here you can see the condition of the cylinders, and what I initially thought to be a washer hanging out above the block in that center passage. Upon actually grabbing it, it was quite obviously NOT a washer but some kind of rubber plug.
IMG_3655.JPG


This is the plug pulled out of the center hole. I assume this is where the "thimble" was supposed to be? This appears to be nothing more than a piece of rubber hose :confused:
IMG_3656.JPG


Am I understanding you guys correctly in that there should be a thimble restrictor installed in the head itself? If so, is there anything on the block side? I hate to ask, but how big is that hole in the block side supposed to be? I measure it at a shade over 3/4" diameter which seems really big, and quite a lot bigger than on the head. The rubber seems out of place in that application, I sure hope the block wasn't modified to accommodate it.
 

Alpine 1789

SAOCA President
Diamond Level Sponsor
Given the work you head needs - I am no expert, but that center passage looks scary - you might want to think about 1) using someone who is familiar with Alpine heads and/or 2) trying to source a better core to start with. I can't help you with #2, but this might help you re: #1: http://www.sunbeamalpine.org/forum/showthread.php?t=16707 I am not suggesting you have your head modified like I did - my engine is also modified - but someone like Lee Mintz would know exactly what to do with the ragged hole in the center. You can also see what it should look like in the photos attached to the above discussion.

Good luck! You have come to the right place to find the information you need to get it running again and keep it running.
 

alpine_64

Donation Time
If the head got fried, which i think we can assume it did with a run on the freeway while boiling, have the head checked for hardness.. if the aluminum gets heated it actually can damage it and make it susceptible to further issues.

The water passages need some welding and re-drilling and as mentioned the valve seats wll need replacing as they look to have been recessed. If you have to rebuild the head look into the vizard modifications that you can do to the combustion chambers to help improve flow and drop the compression a little, useful if you have to skim it or it has been skimmed a bit) though your wear bars look ok.
 

RootesRacer

Donation Time
HG fire ring failure on #2 and #3.

You can see it on the overheated copper gasket.

Lack of re-torque sounds probable.

EDIT: Oops just reread the picture posted above.

You cant seal a solid copper head gasket without hylomar and/or metal o-ringing the block or deck.

Engine builder fail...
 
Last edited:

Tom H

Platinum Level Sponsor
Wow, 0.100" gasket. My guess is that this was custom made to keep the compression ratio from getting too high resulting from shaving the head. Standard gasket is about 0.030". I suspect that thick a gasket is overkill for that purpose. My Engine calculator spread sheet I developed while rebuilding my engine shows that, with all other things being equal, every 10 thou shaved on the head decreases the chamber volume about .88 cc and increases the CR by about 0.15 above the stock 9.2. I wish I had measured the "wear bars" on my head, but I estimate that on a new head the depth of the bars are 0.065" , so you can estimate the amt the head has been shaved, but it looks to me that the head has been shaved no where near 0.070' that would require a 0.100" gasket. Maybe someone else can state what the original wear bar depth was. Furthermore, as Rootes noted, it looks like you have significant valve recession. Assuming recession of 0.030" on the valves would add about 1.4 cc to the comb chamber , lowering the CR about 0.2. So you can probably use a standard gasket.

As Alpine 64 suggests, doing a valve seat replacement and then a vizard mod would get the CR to a good point, probably around stock.

Regarding the water passage hole, the hole in the block looks normal, comparing to pics of my block. But the rubber plug is puzzling. My guess is that PO thought the diverter in the head was a plug and thus replaced it with a plug in the block.

Last comments: the #2 piston top looks like it does not have the dish. Or is that just due to reflections in the pic? And the #2 combustion chamber in the head looks like it has a few sharp "dents" in it. That's what mine looked like when a piece of ring broke off into the chanber. Are those marks really there or is it just carbon deposits?

Tom
 
Last edited:

Stick

Donation Time
I'm pretty sure the super thick gasket was just because he thought a thick gasket was a good idea in general. I've heard that from a few old timers around here for whatever reason. I can't imagine a standard gasket wouldn't work fine, so long as the pistons don't get into the valves? Running a higher octane if needed would not be a downside as far as I'm concerned.

As for the #2 piston and combustion chamber, I'll have to take a closer look when I get home. I'm pretty sure all the pistons were dished, I think it could just be lighting in the pictures. I'll check it out when I get home from work. I do have more pictures and higher resolution here - https://picasaweb.google.com/114374...&authkey=Gv1sRgCLW4lqXa5smsMA&feat=directlink It is pretty much my photo log so I can remember how everything goes back together as I go along, but any picture can be seen in more detail there.


As for how to proceed, I think for me that depends in a large part on what was the root cause of the problems. If the combination of the solid copper headgasket, lack of cold re-torquing after driving a few hundred miles, and the improper configuration of the center coolant passage explain both the running hot and ultimate failure, I can't see the benefit of sending off to have the whole head rebuilt. Of course, the real question is, was something else a contributing factor? and I don't really have an answer to that. The valves seem to be sealing just fine, flipped the head upside down and filled the cavity with water, no detectable seepage at all after sitting a couple hours.

What I'm thinking at this point is to proceed as follows, any input is welcome:
1. Order new stock HG (copper + steel sandwich type), thimble, and assorted gaskets from Sunbeam Specialties
2. Have head checked for flatness against a known flat surface
3. Have them check it for hardness (what exactly is involved in doing this anyway?)
4. Assuming everything checks out to this point, have material added to center passage, drilled to accommodate thimble, and do a minimal resurface of the head to true up the repair.
5. Throw everything back together, hopefully in time to be able to take the car on a 600 mile round trip to the Vintage Festival at Road America in a little over a week if everything goes just perfect? Optimistic, perhaps unwise, but not impossible. :D

I know the head could benefit from work, but if it will work as is (center passage aside) I think I'd rather give it a shot and just keep an eye on things for a while. Worst case, I have to take it all apart again, send the head off, and I'm out some time and a headgasket. If it comes to that, then I may look to have some additional performance improvements done to the head at that time, but what we use the car for it really isn't a priority.

So, worth a shot?
 

Nickodell

Donation Time
1: Did you measure the CR the proper way - HT lead disconnected, throttle fully open?

2: I suspect that running so long with coolant so low, and what was left boiling, might have ground down rings and/or cylinder bores, which would cause a low CR. Have you tried pouring some engine oil into the cylinders to see if it runs into the sump quickly?
 

RootesRooter

Donation Time
....5. Throw everything back together, hopefully in time to be able to take the car on a 600 mile round trip to the Vintage Festival at Road America in a little over a week if everything goes just perfect? Optimistic, perhaps unwise, but not impossible....


You have a machine shop that will do your headwork in less than a week?

There's a whole bunch of reasons not to attempt a 600-mile round trip (e.g. unknown condition of rings, pistons, bearings, etc following major overheating), but if you're gonna go for it, consider buying the 300-mile towing insurance plan.
 

Stick

Donation Time
Nickodell - Not sure what you mean by "disconnect the HT leads", but we disconnected the leads to the coil, pulled the plugs, and did it at WOT. I'll dump some oil in the cylinders when I get home, but they actually look pretty good.

RootesRooter - Ran down and talked to the guy over lunch, having it done by this weekend probably won't happen, looking at right at a week. Won't take them long to do, but he has a few things in front of me that he can't bump.

As for the trip... I had really hoped to have the head back in time to put the car back together this weekend, then drive the car as much as possible all week to make sure everything is OK. I figure if I can get 2-300 miles under various conditions and everything checks out, give it a go. All depends when I can actually get it done, but it is something to shoot for. I'm the type of person who needs a goal or I end up putting things off :D
 

Tom H

Platinum Level Sponsor
Stick, your plan sounds about right to me. Note that even at stock CR of 9.2 the Alpine pretty much needs max octane you can buy conveniently. But I am estimating that yur CR is not a whole lot higher than stock, even with a std gasket.

But have a back up plan for getting home!

Tom
 

Nickodell

Donation Time
Nickodell - Not sure what you mean by "disconnect the HT leads", but we disconnected the leads to the coil, pulled the plugs, and did it at WOT. I'll dump some oil in the cylinders when I get home, but they actually look pretty good.

I actually wrote "HT lead," not leads. I.e. from coil to distrib. Disconnecting the LT lead to the coil is just as good.
 

P. Scofield

Bronze Level Sponsor
I am guessing that plug was an attempt to control the flow of coolant into that enlarged passage in the head. This really should be built back up if possible as it's getting pretty close to the edge of the Valve chamber. The head looks good everywhere else.

Good luck.

P
 

Stick

Donation Time
A quick update and a couple more questions.

The machine shop got a chance to look at the head today. The head is warped, twisted, but not too bad. They will have to remove no more than 6 thou, but probably only 5 and possibly even get by with just 4. Just an estimate at this point based on some flat stock and feeler gauges. Seems to be plenty safe to take that little material off. I thought because of what happened I could have ended up with way more warping than that.

Also, you guys are correct on the valve recession. The shop highly recommends a valve job, and popped a valve out to show me. Fortunately, the exhaust valve he pulled looked OK, hopefully the other valves are as well. He showed me one from a bin that had really been mashed up. The intake seats look OK, but may as well do them all since the cost difference is minimal to do them as well. I'm thinking it really is best to just get it all done at one time, so valve job it is! For the welding, re-surfacing, and valve job they are estimating $300-$350 plus valve seat parts cost. I'm not familiar with what typical rates are, but that did not sound unreasonable to me?

After looking into the vizard mod more, is there really a reason NOT to do this? (I am not concerned with originality in this respect). Now that I really understand what it is, it makes a lot of sense. And they'll already be running cutting heads on the head working on a couple of the coolant crescents anyway so it's just a bit more labor to go ahead and do it all and pick up a bit of power.

Also, the headgasket and "thimble" diverter came today, but I can't tell for sure which way it is supposed to be installed? I've looked in the service manual but can't find mention of it or a diagram that shows it installed, maybe I am just not looking in the right spot. In any case, does the thimble go up into the head? Or down from the head into the block? I assume the widest point of the thimble goes towards the HG either way. Is there a proper orientation of the "jet" slot or does it not matter and just act as a restrictor?


Any other mods I should seriously consider since I will have the head completely apart? This shop does not do porting/polishing, but it didn't look to me like there would be any significant gains to be had from it anyway.

Nathan
 

alpine_64

Donation Time
Nathan,

There is no reason not to do the Vizard modification. As for other things:
* modern spec hardened valve seats for unleaded petrol.
* 3 Angle valve grind (though many shops will now do 5 for the same money)
* Polish the exhaust ports to a high shine.
* Polish the intakes (not to a mirror) smooth out the area where the inlet turns into the chamber and also deshroud the valve. Follow pic below.

On your head, dd they test the hardness of it.. the alloy heads are not that high a grade of alloy, if they get hot enough to warp it can effect the meteorology of the head thy can do a test to make sure that its still acceptable.
 

Attachments

  • SIISTG_head mods.jpg
    SIISTG_head mods.jpg
    59.9 KB · Views: 42

RootesRacer

Donation Time
Rethink the vizard chamber mod until you consider if going from 9.2/1 compression down to about 8.2/1 compression ratio is OK.

The vizard mod is usually done with a change in pistons from dished to flat tops.

The vizard mod will increase the high end breathing of the head but less so than the loss in thermal efficiency from the 1 point compression loss.

YMMV
 

Tom H

Platinum Level Sponsor
I respectfully disagree with RootesRacer about the Vizard mod and its affect on CR. My calculatiion and my experience in doing the Vizard mod show only 2.2 cc added to the combustion chamber if you do the mod correctly. The proper profile of the walls of the chamber are a straight, approx 45 deg slope.

The stock head had chamber vol of 39.2cc Assuming the head already has 6 thou shaved and you add another 5 thou, that will reduce the volume about 1 cc from stock. Installing new valve seats will bring the valves back to original height, and adding the vizard mod will a result in chamber vol of 40.4 , yielding a CR of 9.0.

And if the head has previously been shaved 6 thou more than the above estimate, you'd have a CR of 9.1.

Regarding the cost for the head work, the price seems reasonable. 6 yrs ago I had similar welding, shaving, and just 2 seats replaced for $320.

Regarding the thimble, it should be insterted into the head, with the base flush with the surface of the head and with the "nozzle" slot facing inward.

If you want my "engine calculator" spreadsheet to help in calculating CR etc, send me an e-mail (click on my name at left and select "send an e-mail.." )

Tom
 
Last edited:

RootesRacer

Donation Time
Not sure where you got to 39.2cc for stock SV.

I "burretted" a virgin AM3 head years ago at 37.
This was with new valves and good unworn seats.
It had the "correct" n9y plugs installed, which is quite relevant.
I'd say the head had probably less than 20k miles.

That same head ended at 42cc for what passed for the Vizard mod.
The head flowed very well, better than 30% higher flow rate at the same pressure drop.

Swept = 431cc (1724/4)
CR=9.2=(431+x)/x
Where x = total unswept volume.

Based on 9.2/1 published and 431 swept CCs, the unswept volume must be 52.6ccs.
If we hold everything the same except the 5cc volume increase, we will be at 57.6cc and a new compression ratio of 8.48/1.

A 2.2cc increase will still net a 8.86/1 cr all things the same.

Sure decking the motor will lose some chamber volume, but not 2.2cc worth, let alone 5cc I think you will see getting the desired flow improvement that Vizard intended.

Again YMMV
 
Top