• Welcome to the new SAOCA website. Already a member? Simply click Log In/Sign Up up and to the right and use your same username and password from the old site. If you've forgotten your password, please send an email to membership@sunbeamalpine.org for assistance.

    If you're new here, click Log In/Sign Up and enter your information. We'll approve your account as quickly as possible, typically in about 24 hours. If it takes longer, you were probably caught in our spam/scam filter.

    Enjoy.

Series V Cylinder Head Questions

Stick

Donation Time
Got my head marked up last night, plan is to start cutting on it tonight. As I think someone mentioned, the template in the pdf doesn't print off to exactly the right size. In my case, I found it was 1/4" too small measuring longways across the combustion chamber vs the actual measurement (Something like 3-1/4" on the head, vs 3" on the diagram if memory serves). My friend and I were brainstorming ways to blow up the image so it would print at a true 1:1 scale, and then how we were going to cut and consistently position a template on the head to mark it up. He had something of an epiphany... why not simply use a projector and project the image onto the head?

2013-08-06%25281%2529.jpg


2013-08-06%25280%2529.jpg


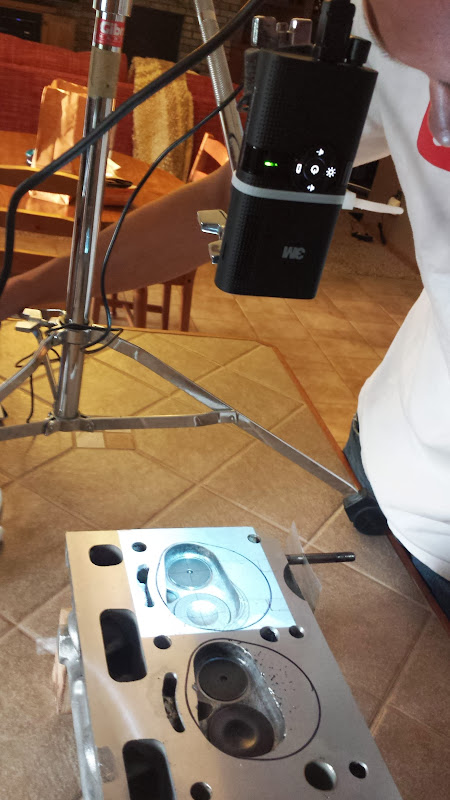
There is no need to fabricate a template, as you can simply trace the lines you want directly onto the surface. Scaling becomes a non-issue as you can adjust the distance of the projector to the head for any scale you need. This is even simpler if you are using a tablet or smartphone as the source, because you can make the very small adjustments to zoom and position using a pinch on the touchscreen. We found to be easier than making fine adjustments to the projector stand or moving the head, but used a combination of both. We used an iPad as a source, but any smartphone or tablet with a video out could do the same thing with the touchscreen, or computer/laptop and size/position the image as needed with a mouse.

The image on the iPad being sent to the projector -
2013-08-06%25282%2529.jpg


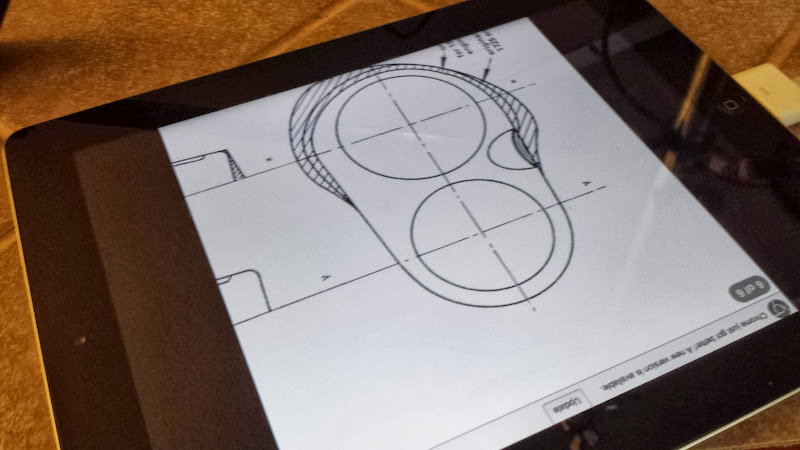
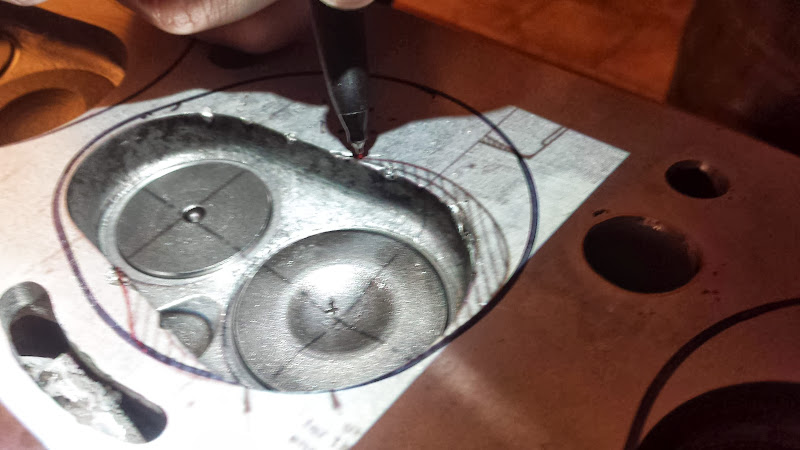
headgasket trace was done with a normal sharpie in black, I am tracing the Vizard lines with a fine-point red. All the rest is projected from the PDF.
2013-08-06%25285%2529.jpg


Only hiccup we hit was we didn't realize the image would need to be not only flipped, but mirrored as well in order to do the other half of the head. That is one downside of this method, as a physical template you could just flip over. It is very easy to do it in software though with most any image editor.


Things needed:
- projector (pocket type worked very well!)
- source to hook to the projector (tablet, smartphone, or computer)
- mount for the projector (I went with a boom stand from a drum set I have laying around, plus a zip tie)
- a way to mirror the image, any simple image editor should be able to do this

Probably not worth running out and buying a projector for, but if you have access to one it's a pretty slick solution. The one we used is a pocket sized one my friend uses for presentations on the road and can be had for around $200. I see no reason a larger one couldn't be used, so long as your stand was suitable to mount it.
 

alpine_64

Donation Time
That's an ingenious way to go about it!

the normal way is to make one our of plastic, metal or a hard card. holes for valves.. and seat them:

head_shape_1_5.jpg


cylinder%20head%20pattern.jpg
 

Tom H

Platinum Level Sponsor
That's how I did mine. First I printed the dwg out and then used a copier with different magnification settings to adjust its size until the center to center distances of the valves matched the actual dimension. Then I made a plastic template with holes for the valve stems to hold the template in proper position.

Tom
 

RootesRacer

Donation Time
Michael,

Those coltec chambers look pretty good BTW.
Love to know the finished volume.

That chamber design may even be able to break .50bhp per lb/hr gasoline fuel, an indicator of thermal efficiency (a mediocre efficiency by todays std).
 

alpine_64

Donation Time
Jarrid, i remember chatting to a guy here who had been doing heads like that for his racing customers.. he called it his "hemi head mod" they were uite large chambers.... he did tell me the volume.. IIRC it was in the vicinity of 45-50cc.. but we are talking a conversation more than 10 years ago.. i remember the look of the head and where i was .. but the exact specs are beyond my recall.. i guess i could always ring him and ask.. he probably still has the templates.
 

RootesRacer

Donation Time
Jarrid, i remember chatting to a guy here who had been doing heads like that for his racing customers.. he called it his "hemi head mod" they were uite large chambers.... he did tell me the volume.. IIRC it was in the vicinity of 45-50cc.. but we are talking a conversation more than 10 years ago.. i remember the look of the head and where i was .. but the exact specs are beyond my recall.. i guess i could always ring him and ask.. he probably still has the templates.

I'd hardly call that a hemi chamber, much more reminiscent of a wedge since the valves fall at an angle to the deck.
Its a far cry better chamber config than stock though.
I have another virgin head I may do something like that with if I ever get a friend with a CNC mill.:D
 

Gitnrusty

Donation Time
Enjoyed reading thus thread but most of it is beyond me...My intelligence/skill level is maxed out at ballpeen hammer and chisel level.
Interesting tho'.
 

Stick

Donation Time
When lashing the valves, I found that two of the adjuster screws and nuts had threads that were badly damaged. I was not able to get them tightened down properly since the thinner head gasket lowered the head to where the nut is into the damaged threads. Is there a known equivalent part to the rocker adjuster stud and nut used on the alpine that I may have better luck finding locally? They don't look that special for what they are, but hard to say from just looking.

I know they are available from SS I just hate to have to wait all week on the mailman!
 

Stick

Donation Time
I do have a tap/die set, but the one stud is in really really bad shape. I can't even separate the nut from the stud (either direction) without putting it in something like a vice. And if I did manage to remove it without stripping something completely, I don't think I'd trust what was left even after cleaning it up with a die. The other stud is salvageable, but probably easier/better to replace since I have to buy anyway.
 

Stick

Donation Time
Well, you guys may be interested to know, the rockers studs seem to be no longer available. Sunbeam Specialties has it in their catalog but has stocked out, has no idea when (or even if) they'll order up another batch made. Classic Sunbeam doesn't carry that part. I did find an ebay seller (classicsworkshop) that makes a roller rocker setup, and mentions at the bottom of the advert they can make modern adjustment screws and lock nuts for their setup if you wish. Seems to imply that you can use the stock ones, so maybe they are interchangeable? Not really sure where else to look for a ready made part :confused:


Anyway. I went ahead and removed the nuts from the damaged studs. It took a bench vice and an impact screwdriver + mallet to do the job, and they still put up a hell of a fight...

20130819_190208.jpg


The left screw ended up just stripping out the nut completely, but not before the impact screwdriver flared the top of the stud to the point it wouldn't pass through the nut. Had to pop it through with a punch. The right nut hung around and threaded all the way out, completely rounding off the threads as it went.

The tops of the set screws weren't in great shape before... but the impact stretched them even farther. These studs seem to have been made of some pretty soft stuff.

20130819_190429.jpg


I am not interested in trying to salvage either of these studs from this condition, and 4 or so others on the car don't thread like they should (although not NEAR as bad as these two were), so I really need a whole new set.


The good news is, my good friend knows a retired tool and dye maker who is like a grandfather to him. He still has a well stocked garage and took a look at it for us. The studs are 5/16-24 thread, 1-3/8" long, with a 5/32 radius. His recommendation is to buy some 5/16-24 set screws, and have the radius put on the end, then counter-sync the recess for the oil. Sounds like a simple operation (for a guy with his skill-set anyway), and I like the idea of working with a set screw instead of the flathead for adjusting the valve lash.


So, if all else fails, I guess I can go that route. Do people often need set screws? If SS isn't going to carry them anymore, and I have to make some, may not be too much additional hassle to make a bunch? Assuming other people than myself would like a set-screw type fastener, not original, but very easy to work with.


Nathan
 

Tom H

Platinum Level Sponsor
Nathan, Sounds like a lot of trouble to make new ones. Why not just use some used ones. I'm sure I have several. Let me know and I'll go out to the garage and grab a couple off a spare head.

Tom
 

Nickodell

Donation Time
When lashing the valves, I found that two of the adjuster screws and nuts had threads that were badly damaged. I was not able to get them tightened down properly since the thinner head gasket lowered the head to where the nut is into the damaged threads. Is there a known equivalent part to the rocker adjuster stud and nut used on the alpine that I may have better luck finding locally? They don't look that special for what they are, but hard to say from just looking.

I know they are available from SS I just hate to have to wait all week on the mailman!

This may be of no use, but back in the 60s I owned an MG TD. Its engine was purposely built with a cylinder head capable of a lot of machining to increase the CR, which I did. Because this altered not only the tappet clearance (valve lash to Yanks) but the geometry also, so I obtained some soft alumin(i)um sheet the same gauge as the metal removed from the head, cut pieces the same shape as the base of the rocker gallery supports and installed them under these to restore both clearance and geometry.

I don't know if it would work on a 'pine; there may be lube channels in the supports or something.
 

bmohr

Gold Level Sponsor
Hi Nathan,

Congrats on having one of the most popular posts on the site. Using the projector on the head was ingenious. Sorry to hear about the adjuster threads. Looks like Tom and Nick have some ideas to get you past that predicament. If you do decide to have some adjusters made, I'd probably be in for a set if the price isn't too steep.
 

RootesRacer

Donation Time
You dont want to make these.

The ball end needs to be very hard, meaning heat treat then tempering so the stud doesnt snap.
 

Stick

Donation Time
You dont want to make these.

The ball end needs to be very hard, meaning heat treat then tempering so the stud doesnt snap.

The tops of the studs were certainly very soft. Maybe just the round (bottom) end was hardened? It may be possible to start with something like a grade 8 bolt, but I don't know how that would compare in terms of hardness. I don't suppose the hardness is something there is a known spec for?

The place in the UK is closed already, I may try them in the morning and see what they have and what it would take to get it across the pond. Or, as Tom suggested, buy some from a member to get by, but that is a short term solution, if nobody makes any they will quickly become scarce I would think?
 

livfree46

Donation Time
New here!

I am new to the club. I just purchased a 63 Alpine and looking to find out some more about it, its value, possible buyers, that sort of stuff. Can someone point me in the direction to start conversation with members?? Thanks
 

RootesRooter

Donation Time
I am new to the club. I just purchased a 63 Alpine and looking to find out some more about it, its value, possible buyers, that sort of stuff. Can someone point me in the direction to start conversation with members?? Thanks


Best way to start a new-owner conversation is to create a new thread in the "Stock" Alpine section.

I'm a little confused. You just bought it but you want info on possible buyers?
 

chazza

Donation Time
...is to buy some 5/16-24 set screws, and have the radius put on the end, then counter-sync the recess for the oil. Sounds like a simple operation (for a guy with his skill-set anyway), and I like the idea of working with a set screw instead of the flathead for adjusting the valve lash.

Nathan

It sounds like a good idea to me and I would do it myself.

Grade 8 screws will be hardenable with an oxy set and quenching, followed by tempering, but the point to note is that only the ball end should be heat treated. It may well be; however; that the screw will need no hardening at all, as the reason that it is a high-tensile screw, is partly to do with the fact that it has already been heat-treated.

If you Google for screw manufacturers, you should be able to find out the hardness of the screws when they are made,

Cheers Charlie
 
Top