• Welcome to the new SAOCA website. Already a member? Simply click Log In/Sign Up up and to the right and use your same username and password from the old site. If you've forgotten your password, please send an email to membership@sunbeamalpine.org for assistance.

    If you're new here, click Log In/Sign Up and enter your information. We'll approve your account as quickly as possible, typically in about 24 hours. If it takes longer, you were probably caught in our spam/scam filter.

    Enjoy.

X frame repair sections.

Chad

Gold Level Sponsor
Yes, Before! In the stage you are at presently, it appears the structure will easily be out of form and it you replace any or all of the undercarriage without aligning the doors and the other areas that "must" line up such and the hard top to the trunk hinges, windshield to soft top, you may have a disaster on your hands
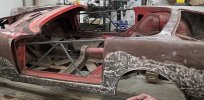
In the pic, you can see the door opening truss I’ve added.

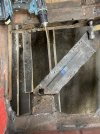
Here’s a better pic:
 

Attachments

  • IMG_2264.jpeg
    IMG_2264.jpeg
    614.3 KB · Views: 37

DanR

Diamond Level Sponsor
Thanks for that comment, I had not seen the truss. Did you perchance make cross braces from the left side front to the right side rear and vice verser? That is critical in most cases.

Unfortunately some of our Sunbeams have a lot of rust in the most critical areas due to lack of drainage.

Tim R has some excellent video on many areas of concern, one especially is on draining the moisture and trash that collectsin the subframe.

I have seen many of the Alpines in much worse shape than yours repaired safetly and put back on the road. Keep at it and keep us informed,
 
Last edited:

Chad

Gold Level Sponsor
Thanks for that comment, I had not seen the truss. Did you perchance make cross braces from the left side front to the right side rear and vice verser? That is critical in most cases.
No, I’m trying to keep access open to the interior for now. Before adding new structure, I’ll definitely brace and measure the chassis for twist.

I’m trying to schedule the chassis to get vapor blasted next week, so right now I’m just wanting to cut away the stuff that hides the other bad stuff, so I can start with a clean(er) slate.
 

Chad

Gold Level Sponsor
With better light (or maybe just not looking through a dusty face shield…), I saw about 3/4 of the spot weld dimples and drilled them out. The edges stitches need to be aggressively cut away and through, and the spot welds from the floor also weld the plate to the lower arm. Swinging a hammer in the tight space is a further “challenge”.

Bonus: I’ve now found the 5th mouse abode so far.
 

Attachments

  • IMG_5077.jpeg
    IMG_5077.jpeg
    1.7 MB · Views: 42
  • IMG_5078.jpeg
    IMG_5078.jpeg
    1.7 MB · Views: 42

DanR

Diamond Level Sponsor
Chad, you may count it a bonus now, but thinking about it you will see the point I have made about drainage points in the Sunbeam.

I know you are kidding about the rat nest find. I have found all sorts of "things" in some of the Alpines that I have dealt with:) 
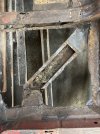
All of that crude is what helps to destroy perfectly good metal. It is this rust that makes for a busy day.

Hope you stay with your project. Lots of fellows quit because it seems an overwhelming task. Finishing the project helps with the SAOCA Motto: "Keep'em-on-the-Road"
 

studmobile

Diamond Level Sponsor
Chad, you may count it a bonus now, but thinking about it you will see the point I have made about drainage points in the Sunbeam.

I know you are kidding about the rat nest find. I have found a ll sorts of "things" in some of the Alpines that I have dealt with:) All of that crude is what helps to destroy perfectly good metal. It is this rust tahat makes for a busy day.

Hope you stay with your project. Lots of fellows quit because it seems an overwhelming task. Finishing the project helps with the SAOCA Motto: "Keep'em-on-the-Road"
If the X frame members are reasonably intact, is it reasonable to drill the sides for 3/4-1" holes, and use these for access, then plug with a rubber plug? This would allow for inspection, vacuuming, and coating prior to plugging with the plug. And of course then put in drainage holes.
 

Tim R

Silver Level Sponsor
These are the videos on draining the body that are mentioned above. Well worth doing this, I've seen cars that have had fortunes spent on them needing full restoration within 10 years because they didn't drain the body and it just rusted out again.
Tim R


bernd_st

Bronze Level Sponsor
Quite an interesting thread. I'm about to Isolate a near rust free X-frame from a donor S2. Only a bit dented on the passenger side front outrigger, but otherwise near perfect. Need the bits for my MkIa Tiger. Have a look (my private after work garage party today ;-):

IMG_1480.jpgIMG_1488.jpg
 
Last edited:

DanR

Diamond Level Sponsor
Bernd, you have a very nice undercarriage there to deal with. I also have an early Series I - II undercarriage in excellent condition, including some new panels.

It is in dry storage and protected, Just hanging on to it for some future need. One prior owner was planning to do an Alger but gave that idea up and sold the whole Alpine to a friend in Atlanta that built a tubular frame and placed the body on it after adding an LS.
 

bernd_st

Bronze Level Sponsor
Indeed. Quite a rare condition. Body originates from US, but can't tell from where exactly. No papers whatsoever. Seems not California so perhaps from East coast. Driver side sills rotten, but could pull out a passenger side non rotten middle sill. Rare enough. See the picture:

IMG_1432.jpg

Actually a very big, dirty & smelly job to cut a body apart. Unbelievably complicated construction Rootes/ Pressed steel did specifically around the early trunk platform and the spring mounts. Anyway next step is to clean up the bottom pan/cruciform from underseal...
 
Last edited:

DanR

Diamond Level Sponsor
Here is a picture of a page from the Alpine Guide showing specific components of the X-frame.

I have made annotations hopefully to identify individual pieces.

X-Frame from Alpine Guide  20231119_204758.jpg
 

DanR

Diamond Level Sponsor
In the POST above, the annotations "Right hand side and Left hand side" are the components I have had fabricated as replacement panels for our Alpine and Tigers that have encountered rusted out portions of the CROSSBRACE Assy ("X" - frame).
 

DanR

Diamond Level Sponsor
The cost per replacement panel(s) are as follows: Two (2) CROSSBRACE / "X" Frame panels - right hand side or left hand side $190 per set of panels - Both sides $ 370 plus shipping.
 

RichardL

Bronze Level Sponsor
The cost per replacement panel(s) are as follows: Two (2) CROSSBRACE / "X" Frame panels - right hand side or left hand side $190 per set of panels - Both sides $ 370 plus shipping.
Good to know thanks for developing this. I’m a ways off from frame restoration but might come in handy down the road
 

RichardL

Bronze Level Sponsor
Quite an interesting thread. I'm about to Isolate a near rust free X-frame from a donor S2. Only a bit dented on the passenger side front outrigger, but otherwise near perfect. Need the bits for my MkIa Tiger. Have a look (my private after work garage party today ;-):

View attachment 30297View attachment 30298
Great pics! Can you post more sometime? Interesting to see detail off the car. Maybe some full plan views from top and sides.
 

Bill Blue

Platinum Level Sponsor
Richard, I recommend upgrading your future to "now". Dan has received a few sets of these and I'm sure plans/wants to continue to supply them. But it is a complex world and there are any number of reasons Dan will not be able to offer them in the future. If you will need them, better get them now. For starters. Dan has a local friend/supplier that can, and is willing, to use his high tech shop to make short runs for Dan at a very attractive cost. Guys like that are in short supply.

Bill ( absolutely not connected with this project)
 

dansun22

Silver Level Sponsor
In the pictures I posted above: The X-Frame in our Sunbeams have a tendency to rust out because there is basically no place for draining water or foreign matter. As a result the residue collects and holds/retaining moisture. Slowly, but surely rust forms and our Sunbeams frame becomes weakened. Just take a good look at a couple of the PIC's above for proof!!

I have one Alpine that I am doing extensive repairs to the X-Frame (pictured above) and another that surely needs the same. I am becoming weary of this type of repair. Too many of our Sunbeams wind up in the scrap yard just because of this type of rust damage.

I do not know of any fabricator making replacement components for this sort of repair. Anyone have a suggestion as to a source? I do not particularly enjoy the idea of me having to create the panels.

I will be cutting up a parts car soon with a good frame and will let you know.
I need the frame arms for series 3. Have you any?
 
Top