I talked to Brad Babb maybe two weeks ago didn't seem to have anything for sale! also Doug Jennings bought a building in Dayton with another guy ( according to the rumors) Dougie junior shows up sometimes on the Sunbeam Tiger Facebook page!Have you tried the Tiger Auto guys? I know they moved to the vicinity of Tennessee a couple years ago, and scrapped a lot of stuff before they left Dayton, but you may still be able to establish contact. Brad Babb might know info, maybe? Perhaps they saved and moved something like that, or could tell you what scrapyard in Dayton ended up with the body shells.

-
Welcome to the new SAOCA website. Already a member? Simply click Log In/Sign Up up and to the right and use your same username and password from the old site. If you've forgotten your password, please send an email to membership@sunbeamalpine.org for assistance.
If you're new here, click Log In/Sign Up and enter your information. We'll approve your account as quickly as possible, typically in about 24 hours. If it takes longer, you were probably caught in our spam/scam filter.
Enjoy.
You are using an out of date browser. It may not display this or other websites correctly.
You should upgrade or use an alternative browser.
You should upgrade or use an alternative browser.
Sunbeam 2000 build
- Thread starter belmateo
- Start date
65beam
Donation Time
Doug and Jill moved to Bellbrook on the southeast side of Dayton. He's in farming country. He has an eight car garage at the house and still does suspension work, etc but no body work. Phone number is the same and I set up the answering machine for him so leave a message. He'll call back. Left over parts are stored in another place in Dayton. He recently worked 90 hours on Jean's Harrington.I talked to Brad Babb maybe two weeks ago didn't seem to have anything for sale! also Doug Jennings bought a building in Dayton with another guy ( according to the rumors) Dougie junior shows up sometimes on the Sunbeam Tiger Facebook page!

Attachments

65beam
Donation Time
Joel,I talked to Brad Babb maybe two weeks ago didn't seem to have anything for sale! also Doug Jennings bought a building in Dayton with another guy ( according to the rumors) Dougie junior shows up sometimes on the Sunbeam Tiger Facebook page!
Dougie ,wife and kid now live in Tenn.
Well there ya go all the news!Joel,
Dougie ,wife and kid now live in Tenn.
There is a vent tube that go's between the tanks that equalizes the level so both tanks fill, gets routed inside the hinge panel so to speak.Question for the experts. When you fill up with gas, do both tanks fill completely?
DanR
Diamond Level Sponsor
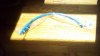
Here are a few PIC's that may be of help in determining the routing and a couple components for fitting the tanks.
Notice my vent tube is outside of the frame work where they are normally routed.
A word of caution: Please utilize proper tubing for gas lines.
The filler hose should have the breather hose connection made into it.
Notice my vent tube is outside of the frame work where they are normally routed.
A word of caution: Please utilize proper tubing for gas lines.
The filler hose should have the breather hose connection made into it.
Attachments
-
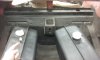 Alpine Saddle Tanks - Left has breather tube connection 20180912_123503.jpg155.6 KB · Views: 66
 -
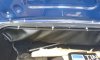 Alpine Saddle Tanks - breather tube from the connection on the left tank 20180912_123658.jpg172 KB · Views: 65
 -
 Alpine Saddle Tanks - Routing of breather tube - different angle 20180912_124003.jpg142 KB · Views: 66
belmateo
Gold Level Sponsor
DanR,
Those pictures are very helpful, Thank You!
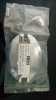
I ordered a fuel hose and bung from Summitracing.com on Tuesday and got it Wednesday, will be installing this on top of the tank that is in the car now. The vent nipple on the left tank I will have to install to match my hose size. As far as the right tank, it will be vented just under the cap on the filler pipe.
Those pictures are very helpful, Thank You!
I ordered a fuel hose and bung from Summitracing.com on Tuesday and got it Wednesday, will be installing this on top of the tank that is in the car now. The vent nipple on the left tank I will have to install to match my hose size. As far as the right tank, it will be vented just under the cap on the filler pipe.
Attachments


")
belmateo
Gold Level Sponsor
DanR
Good catch, I have not installed that yet, as a matter of fact when I reopened the cap opening I saw that the factory made on provision for drainage and there was sign of water "pooling" in the low spot of the opening. Already have the parts to install one that will drain behind the rear tire.
Good catch, I have not installed that yet, as a matter of fact when I reopened the cap opening I saw that the factory made on provision for drainage and there was sign of water "pooling" in the low spot of the opening. Already have the parts to install one that will drain behind the rear tire.
belmateo
Gold Level Sponsor
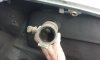
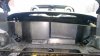
Things have slowed down since I had to have surgery on my hand, but I was still able to get the Driver's side Fuel Tank modified and mocked up for installation. The original sending unit hole was replaced with the EVAP cartridge and the outlet was moved to the front to tie into the center gas tank. The passenger side will require more work since it will need some room for the filler pipe that is a bit longer but it does have the vent hose attachements which is a plus. Picture attached
belmateo
Gold Level Sponsor
Hand is recovering nicely, trying to breal down the scar tissue. Still working on attaching the quarter panels and Saddle fuel tanks. The passener side has become quite a challenge and taking longer than I thought. Once I have it done and checked for leaks it will be cleaned with Muriatic acid and sealed. On a side note the fuel filler compartment now has a drain to the outside.