• Welcome to the new SAOCA website. Already a member? Simply click Log In/Sign Up up and to the right and use your same username and password from the old site. If you've forgotten your password, please send an email to membership@sunbeamalpine.org for assistance.

    If you're new here, click Log In/Sign Up and enter your information. We'll approve your account as quickly as possible, typically in about 24 hours. If it takes longer, you were probably caught in our spam/scam filter.

    Enjoy.

How to replace SIV Alpine windshield rubber?

DenJr67

Donation Time
Thanks !

Thanks for this post !

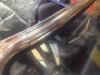
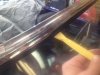
I today just needed to install my stainless trim and ran into trouble with the windscreen gasket and the way it fits , would you take a look ?

I cant get the rubber to lap over the bottom of the windshield trim , it just doesn't fit right unless i push it up with the tool , it wont stay.

the glass and rubber are V.B. sourced and I will hold my opinion to myself at this point
 

Attachments

  • image1 (11).JPG
    image1 (11).JPG
    33 KB · Views: 84
  • image2 (5).JPG
    image2 (5).JPG
    34.8 KB · Views: 77
Last edited:

jfcroni

Donation Time
I have the same problem with a VB gasket. I'm getting an SS replacement...

But, the gasket I have seems to curl back into the gasket recess in the frame... instead of lapping over the gap between gasket and frame. So, when I try to install the trim, it won't slide into the slit completely. I think the gasket curling back into the gap is the problem.

Let me know if you solved the problem... where did you get you're gasket?
 

DenJr67

Donation Time
The SS gasket fit much better , the VB body to windscreen frame fit fine for me but i did replace it with the SS gasket also.

The SS windscreen to frame gasket fit good and covered all the trim correctly

I think using the SS body to frame gasket was a good decision also because it was softer and also seemed a little larger.

It was quite a bitch getting the lower trim stainless trapped under both rubber lips but i used the soapy water and some plastic trim removal tools from harvor freight store and help from my wife ,
The end result was well worth the time to replace the rubbers


Now for the "a" pillar rubbers from SS , they work but are the ugliest part of our car...
 

jfcroni

Donation Time
Wow... what a difference - the SS gasket went in like butter! The VB gasket went into the garbage....
 

jfcroni

Donation Time
I'm installing the windshield frame to the body today. I dry-fitted last night.... and have a few questions. I cut the dash pad within an 1/8" (longer, that the frame... so it goes under a bit - I did not shave it yet. Does the frame to body gasket go all the way to each end of the frame??? no trimming - just fit to the end of the frame?

Seems I'll have to trim the inside bead at the center bolt?

I have the holes done... any more tips?
 

DenJr67

Donation Time
I did cut the body to frame gasket and left 3/4 an inch long past from the frame , I trimmed it after the installation and adjustments to fit perfectly
 

Acollin

Donation Time
I found that trimming the body to windshield frame not much to consider given where you say you are ( happy with hole placement).

I would encourage you to use the plumber's putty under that gasket. I picked some up at my local ace hardware. Get the rolled FLAT stuff! Leaking was not that much of a consideration for me, but it seemed to take out any oddness or inconsistency where the two surfaces meet--- like an ad I have seen on TV for denture adhesive. With firmness and flexibility --It conforms to area between the two surfaces.

The trimming / scraping of that dash pad will be necessary and can be tricky. I centered mine pretty well and found it to be about 1/2 inch too long-- 1/4 per side. The trimming here allowed me to fold and wrap each end. Do plenty of dry fitting before gluing.

Good luck-- For me it was a bit unnerving, but worked out fine-- I went real slow.
Andrew
 
Top