• Welcome to the new SAOCA website. Already a member? Simply click Log In/Sign Up up and to the right and use your same username and password from the old site. If you've forgotten your password, please send an email to membership@sunbeamalpine.org for assistance.

    If you're new here, click Log In/Sign Up and enter your information. We'll approve your account as quickly as possible, typically in about 24 hours. If it takes longer, you were probably caught in our spam/scam filter.

    Enjoy.

Hood will not open!

volvoguys

Diamond Level Sponsor
Quote: "Have you determined that the pull rod is disconnected from the latch"?

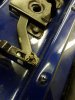
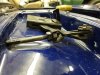
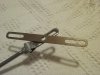
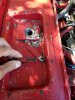
The early hood rods have two springs, one lo-tension on the rod itself near the dash and the other in the latch that's bolted on the pan under the hood. Before you go any further, I suggest you remove the two 5/16" head bolts that hold the rod bracket under the dash. If, once loose, you still feel spring tension (from the pan latch) then the rod is most certainly still attached under the hood. If not, and the rod slops around, it's disconnected.

And a disconnected rod won't pull out from under the dash unless the rod is actually broken or the slide and its square nut have somehow come free from the threaded end of the rod (highly unlikely).

Mark ….. volvoguys
 

DanR

Diamond Level Sponsor
I recently saw a friends Alpine that had been jerry-rigged. It had the rod type pull but the "slider" as I call it ( See Drawing Item 91) was bent and the spot welds had come loose, a PO had drilled a small hole and then screwed the slider back together with the screw feed from the bottom upward. The nut was on top and very loose. A s matter of fact was about to fall off which then would have allowed the screw to fall out from the bottom.... Guess what would have then become a grand surprise to the owner. Same thing as we are discussing here:)
index.php


I believe it is totally unnecessary to have a bunch of wires in reserve.

If you have an early series Alpine the rod will be sufficient, just keep it well lubricated and maintained.

However, should you be so fortunate as to own a SV Alpine wire release, the Miracle of Chrysler, then it is highly recommended you obtain the "Rod" style release. Or perhaps add a couple of the extra precautions mentioned here.....

Having watched an Alpine catch fire and burn because the Bonnet could not be opened is disheartening.

That is the reason I have the Bonnet release rod for "all" my Alpines.

1st PIC the connections under the bonnet - note the cotter pin
2nd PIC the nuts utilized. In this PIC the jam nut is OK But the nut inside the "Slider" is a Hex..... not the SQUARE NUT that should be there!!!

The slider is formed very tightly around the square nut to keep it from turning.

3rd PIC Is the Slider I had made as a replacement for the original, it is laser cut and formed with the Square nut.
4th PIC Is the finished product.

I will not say it "can't happen" but I see no need what-so-ever for a wire.

An after thought, a number of years ago I found a pamphlet I believe it came from the UK SAOC, entitled, "THE ALPINE GUIDE" that is most valuable to minor details that included the Bonnet adjustment
 

Attachments

  • Alpine Bonnet Release connection - cotter pin       20190912_095434.jpg
    Alpine Bonnet Release connection - cotter pin 20190912_095434.jpg
    335.5 KB · Views: 65
  • Alpine Bonnet Release conncetions            20190912_095346.jpg
    Alpine Bonnet Release conncetions 20190912_095346.jpg
    328.3 KB · Views: 63
  • 20161016_200906.jpg
    20161016_200906.jpg
    529.8 KB · Views: 60
  • 20160630_202432.jpg
    20160630_202432.jpg
    213 KB · Views: 61

Tim R

Silver Level Sponsor
I appreciate that it shouldn't be necessary to have safety wires to release the hood but so many people have had this problem over the years that I find it reassuring to know that I can release it without using the pull handle if ever I need to.

Tim R

If anyone wants to see how we install the safety wires, here is one we fitted earlier today (inspired to do so by this thread!)


Jimjordan2

Donation Time
Woody, you seem to have gotten lost in all this. One thing about the photos and all is; Possibly you will be able to see where you are pushing and prodding to attempt to open your Bonnet.
Please let us know.
And if Toyanvil is anywhere close to you, he's the guy you want by your side helping.
 

DanR

Diamond Level Sponsor
Here is a page from the SAOC - The Alpine Guide that discusses the Bonnet release. I have found this publication helpful.
 

Attachments

  • SAOC - The ALpine Guide- Bonnet Release      20190912_223910.jpg
    SAOC - The ALpine Guide- Bonnet Release 20190912_223910.jpg
    334 KB · Views: 31

beamdream

Gold Level Sponsor
I recently saw a friends Alpine that had been jerry-rigged. It had the rod type pull but the "slider" as I call it ( See Drawing Item 91) was bent and the spot welds had come loose, a PO had drilled a small hole and then screwed the slider back together with the screw feed from the bottom upward. The nut was on top and very loose. A s matter of fact was about to fall off which then would have allowed the screw to fall out from the bottom.... Guess what would have then become a grand surprise to the owner. Same thing as we are discussing here:)
index.php


I believe it is totally unnecessary to have a bunch of wires in reserve.

If you have an early series Alpine the rod will be sufficient, just keep it well lubricated and maintained.

However, should you be so fortunate as to own a SV Alpine wire release, the Miracle of Chrysler, then it is highly recommended you obtain the "Rod" style release. Or perhaps add a couple of the extra precautions mentioned here.....

Having watch an Alpine catch fire and burn because the Bonnet could not be opened is disheartening.

That is the reason I have the Bonnet release rod for "all" my Alpines.

1st PIC the connections under the bonnet - note the cotter pin
2nd PIC the nuts utilized. In this PIC the jam nut is OK But the nut inside the "Slider" is a Hex..... not the SQUARE NUT that should be there!!!

The slider is formed very tightly around the square nut to keep it from turning.

3rd PIC Is the Slider as finish laser cut and formed with the Square nut.
4th PIC Is the finished product.

I will not say it "can't happen" but I see no need what-so-ever for a wire.

An after thought, a number of years ago I found a pamphlet I believe it came from the UK SAOC, entitled, "THE ALPINE GUIDE" that is most valuable to minor details that included the Bonnet adjustment


Not sure about the "totally unnecessary" comment for any of them. My scenario was self inflicted, nevertheless if I had installed a backup cable prior it would have saved me a lot of work; I had the "male" part of the mechanism break away from the bonnet and subsequently welded in a new support piece, in doing so I didn't pay enough attention to centering the cone with the latching mechanism, when I shut the bonnet the cone was just enough off centre that the pull rod wouldn't open the latch far enough and there I was with a bonnet that wouldn't open, had there been a cable I believe I could have pulled the latch just that little bit further to release.

So its probably also worth emphasising, that if at any time, you move the latching mechanism, make sure you have the male piece centred before closing the bonnet; next time round I placed a bit of tape across the opening and a dab of paint on the cone then eased the bonnet down to leave a mark on the tape, ensuring it was centred before I went ahead and closed it.
 

DanR

Diamond Level Sponsor
So its probably also worth emphasising, that if at any time, you move the latching mechanism, make sure you have the male piece centred before closing the bonnet; next time round I placed a bit of tape across the opening and a dab of paint on the cone then eased the bonnet down to leave a mark on the tape, ensuring it was centred before I went ahead and closed it.


Beam, You are making the very point ..... Proper adjustment!
 

woodybap

Silver Level Sponsor
I got the old girl finally to remove her bonnet at 1:38 p.m. PDT on Friday September 13, 2019. A date and time to go down in history. Following many suggestions from the forum, I took off the hinges [a formidable task in itself]. Then I lined all of the bonnet and body edges with duct tape. The secondary latch would not release despite quite a tussle with the hood. Attacking the latch from the sides and front did not work. Even though I could reach it from there with piano wire and a long flat blade screwdriver, I was unable to get any pressure on it. The winning approach was from the windshield side. The connection between the rod end and the latch release had failed. I opened the bonnet as far as I could and was able to get the foot long piece from a metal framing square against the latch lever. Several sharp taps on the 12" bar succeeded in pushing the latch lever forward enough for it to release and bingo! The whole messy issue was caused because the connection between the rod through the firewall and the latch lever had failed.
 

Attachments

  • Broken Latch .jpg
    Broken Latch .jpg
    312.1 KB · Views: 64

loose_electron

Donation Time
The whole messy issue was caused because the connection between the rod through the firewall and the latch lever had failed.

Congratulations!

I suspect that will be very high up on the list of things to fix. Hopefully the damage elsewhere was minimal.

Get the tape off the paint pretty quick before the adhesive does further damage to the paint.
 

Tim R

Silver Level Sponsor
Woody I am really pleased for you well done. Was it the vertical pin that had come out of the lever arm (where the hole is visible)?
 

beamdream

Gold Level Sponsor
I got the old girl finally to remove her bonnet at 1:38 p.m. PDT on Friday September 13, 2019. A date and time to go down in history. Following many suggestions from the forum, I took off the hinges [a formidable task in itself]. Then I lined all of the bonnet and body edges with duct tape. The secondary latch would not release despite quite a tussle with the hood. Attacking the latch from the sides and front did not work. Even though I could reach it from there with piano wire and a long flat blade screwdriver, I was unable to get any pressure on it. The winning approach was from the windshield side. The connection between the rod end and the latch release had failed. I opened the bonnet as far as I could and was able to get the foot long piece from a metal framing square against the latch lever. Several sharp taps on the 12" bar succeeded in pushing the latch lever forward enough for it to release and bingo! The whole messy issue was caused because the connection between the rod through the firewall and the latch lever had failed.

Never doubted for a minute that you couldn't do it
 
Top