• Welcome to the new SAOCA website. Already a member? Simply click Log In/Sign Up up and to the right and use your same username and password from the old site. If you've forgotten your password, please send an email to membership@sunbeamalpine.org for assistance.

    If you're new here, click Log In/Sign Up and enter your information. We'll approve your account as quickly as possible, typically in about 24 hours. If it takes longer, you were probably caught in our spam/scam filter.

    Enjoy.

DuraPine II

Bill Blue

Platinum Level Sponsor
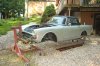
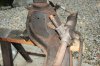
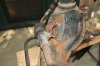
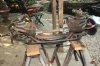
The project is getting underway. DanR delivered the replacement shell Monday. We got it mounted on the rotisserie as there are a few issue to be addressed on the bottom side. It appears the first project is to redesign/remount the rack and pinion steering. It appears to be very wrong.

No pics at this time. I became totally frustrated taking, storing and posting pictures. The posting bit was a problem too far. Regardless of where I "dropped" the photo, it would land wherever the computer gods directed it. Usually in the text portion of the post. When that happened the post would be too long and would not load. That problem has been totally eliminated. Photos now load automatically into the correct spot! So maybe time to resume taking pictures. We will see.

Bill
 

Fergusonic

Donation Time
Glad to hear the project is on it's forward way and anxious to see the pictures as you go along. If the Grade School kids weren't going back to school one of them could take the pics, shuffle them around in the computer, and magically move them to here!...... they are soooo much more brilliant when it comes to the computers! Oh well. As Ward Bond used to say " Wagons Hoooooo"
 

DanR

Diamond Level Sponsor
Here are a few PIC's of Bill's DuraPine after stripping down for the trip to Sunny South Carolina.20200805_190814.jpg 20200805_190826.jpg 20200805_190833.jpg 20200805_190843.jpg 20200805_190914.jpg 20200805_190628.jpg

Here are a few PIC's of the rolling shell that will make the DuraPine II
20200731_180815.jpg 20200731_180828.jpg
 

Bill Blue

Platinum Level Sponsor
Okay, some very busy photos. Sorry 'bout that, but that is the best I can o right now. At least I think we can work the system and document the build.

Bill
 

Attachments

  • IMG_6523.JPG
    IMG_6523.JPG
    153.5 KB · Views: 138
  • IMG_6628.JPG
    IMG_6628.JPG
    404.6 KB · Views: 141
  • IMG_6627.JPG
    IMG_6627.JPG
    276.2 KB · Views: 142
  • IMG_6626.JPG
    IMG_6626.JPG
    205.3 KB · Views: 141
  • IMG_6625.JPG
    IMG_6625.JPG
    331.3 KB · Views: 142

Aladin Sane

Diamond Level Sponsor
I see what you mean about the steering rack mount.

I am ok with a little wildlife photography sneaking into the forum.
 

260Alpine

Silver Level Sponsor
Bill, You need the longer MGB steering arms. I like Aladin's setup. The MGB mounts are strong if welded properly, I'd still add gussets like I show in Aladin's thread.
 
Last edited:

Bill Blue

Platinum Level Sponsor
Bill, You need the longer MGB steering arms. I like Aladin's setup. The MGB mounts are strong if welded properly, I'd still add gussets like I show in Aladin's thread.
Jim, I know nothing about this part of the project. What has to be done to use them?
Bill
 

Aladin Sane

Diamond Level Sponsor
20191221_120158.jpg fyi, here are the mounts on my project.20191221_120152.jpg

I have not dropped the crossmember to weld in any gussets yet.
 

Bill Blue

Platinum Level Sponsor

260Alpine

Silver Level Sponsor
Bill, They are front steer. They are a little longer than the Tiger Arms. Helps ackerman 3 degrees to neutral. They are flipped and swapped to have the tie rod end the same as the Tiger. With the higher mount that Aladin uses you would need the tie rod end pointing down to prevent too much angle and bump steer. You want the tie rod to be parallel with the lower A arm at road height. Looking from the top you want the rack as far back as you can get it.
 

Barry

Diamond Level Sponsor
My arms are dead ringers for the MG arms in article. I had not noticed the spacer, thought it was an integral part of the arm.
Bill


Bill,

The steering arms on my S-V front suspension are essentially straight with no curved sections like those shown in post #15 and the distance from the hole for the tie-rod joint to the closest mounting hole is about 4-1/2".

The pictures I have show that the factory Tiger steering arms are also essentially straight with no curved sections like those shown in post #15.

If the steering arms on your "new" car are curved like the ones shown in post # 15, I don't think they are S-V or Tiger pieces.

Never say never, but I don't see any way to use reversed Series Alpine steering arms on a front steer setup.

HTH
 
Last edited:

Bill Blue

Platinum Level Sponsor
Barry, how were the Alpine steering arm holes measured? Center to center or near edge to near edge?
Bill
 

Barry

Diamond Level Sponsor
Barry, how were the Alpine steering arm holes measured? Center to center or near edge to near edge?
Bill


Bill,

Sorry, I should have said center-to-center. The reason I said "about" is that the hole for the tie-rod joint is vertical, the steering arm mounting holes are horizontal and the steering arm is angled relative to the mounting holes.
 
Last edited:

husky drvr

Platinum Level Sponsor
img003crop.jpg

out of WSM 124 for Alpines I through IV - doubt that V is different but you would need to check part numbers
 
Top