
-
Welcome to the new SAOCA website. Already a member? Simply click Log In/Sign Up up and to the right and use your same username and password from the old site. If you've forgotten your password, please send an email to membership@sunbeamalpine.org for assistance.
If you're new here, click Log In/Sign Up and enter your information. We'll approve your account as quickly as possible, typically in about 24 hours. If it takes longer, you were probably caught in our spam/scam filter.
Enjoy.
You are using an out of date browser. It may not display this or other websites correctly.
You should upgrade or use an alternative browser.
You should upgrade or use an alternative browser.
Body work, Prime and Paint
- Thread starter kmathis
- Start date
kmathis
Donation Time
Well, I took a pretty good look at that bulk head prior to disassembling the car and that area was not too crowded, so I guess I will know once I put the dash in.
Kevin: I didn't chrome the hinge bolts, they are zinc plated from SS, I guess. Didn't you put yours on the bulkhead? how did that work out as far as clearance goes, once your dash was in?
Did I mention that I really like this wiring harness??? I really do.
A couple of freinds and I are trying to wire a Chevelle using a Painless Wiring Harness, and they should change the name to PITA Wiring.
Kevin: I didn't chrome the hinge bolts,
they are zinc plated from SS, I guess. Didn't you put yours on the bulkhead? how did that work out as far as clearance goes, once your dash was in?Did I mention that I really like this wiring harness??? I really do.
A couple of freinds and I are trying to wire a Chevelle using a Painless Wiring Harness, and they should change the name to PITA Wiring.
birdfan56
Platinum Level Sponsor
fun with wiring
yes, i did mount mine in the same location...it doesn't seem to be too great an issue with clearance so far, but i am not using stock gauges or exact placement either. I used a haywire harness which seems to have worked out pretty well and came well-labeled (a GOOD thing).
yes, i did mount mine in the same location...it doesn't seem to be too great an issue with clearance so far, but i am not using stock gauges or exact placement either. I used a haywire harness which seems to have worked out pretty well and came well-labeled (a GOOD thing).
kmathis
Donation Time
Update
Well, I finally got the car out of the garage today...not quite ready for prime time yet, but at least it is legal to drive...except for the windshield wipers; Oh well.
I have some dyna-mat to install on the floors; carpet; hood latch; sort out an electrical issue with my wiper motor; a few details like that.
So, hang in there, those that are trying to get to this point...it will be 1 year Christmas eve, that I started with this project. I am pretty satisfied with the way it is turning out...up close, I am not sure I will win any awards, and I don't think Chip Foose has any worries, but for a do-it-yourselfer, it is pretty darn good.
https://www.dropbox.com/sh/994s6mb1oxstjip/JfWp_2JOmo
Well, I finally got the car out of the garage today...not quite ready for prime time yet, but at least it is legal to drive...except for the windshield wipers; Oh well.
I have some dyna-mat to install on the floors; carpet; hood latch; sort out an electrical issue with my wiper motor; a few details like that.
So, hang in there, those that are trying to get to this point...it will be 1 year Christmas eve, that I started with this project.
I am pretty satisfied with the way it is turning out...up close, I am not sure I will win any awards, and I don't think Chip Foose has any worries, but for a do-it-yourselfer, it is pretty darn good.https://www.dropbox.com/sh/994s6mb1oxstjip/JfWp_2JOmo
Chuck Ingram
Donation Time
It looks really great Kelley
Only problem is how not to be driving it all the time.It will be one heck of alot of fun.
Only problem is how not to be driving it all the time.It will be one heck of alot of fun.
DanR
Diamond Level Sponsor
Nice Vehicle!
kmathis
You should be satisfied! It looks very nice!
As I took time to view your five (5) PIC's, I noticed a pretty chubby box that has a "door" attached.
I did that for my '67 SV.
I made a new walnut dash and added the Chubby Box door all in walnut.
Now, I am trying to locate a "Knob and latch" that I can utilize to make the project complete.
Just wondering where your's came from? Was it original?
Any suggestions!
Happy Touring,
kmathis
Donation Time
Thanks, you guys; as I have stated before, this is the first time I ever did anything like this, and I am amazed at how long it takes, even though you work on it some everyday, and almost every weekend, it just takes a lot of time to do all of the details, and I still have more to do. However, now that it is drivable, it is going to be more fun to do the details and still get to have fun driving the car.
And, BTW; this V6 hauls a$$, I almost forgot how quick this thing is.
And, BTW; this V6 hauls a$$, I almost forgot how quick this thing is.
alpine_64
Donation Time
The car looks great, though wondering if you need some higher profile tyres to fill out the wheel arches a little.
Just wondering, I see all the V6 conversions with the exhausts running along the sills, I understand on a straight forward conversion, where its just an mechanical installation why people do that, but if people are doing body work, do they consider using the repro Tiger frame pass throughs so they can run the exhausts down the underside of the car?
Just wondering, I see all the V6 conversions with the exhausts running along the sills, I understand on a straight forward conversion, where its just an mechanical installation why people do that, but if people are doing body work, do they consider using the repro Tiger frame pass throughs so they can run the exhausts down the underside of the car?
consider using the repro Tiger frame pass throughs so they can run the exhausts down the underside of the car?
Can you give some more information on these? Who sell etc.
alpine_64
Donation Time
Can you give some more information on these? Who sell etc.
I htink SS carries some these days, Randy Willett has some and yo see them on ebay from time to time in USA and UK. They are essentially a sectio that is cut out od the leading 2 arms of the X frame under the car and they replaced with these parts that have an exhaust pass through, then there are 2 that go in the rear with a small recess to allow a little more clearance for the pipes (you can probably get away without those)
some on ebay at the moment:
http://www.ebay.com/itm/Sunbeam-Tiger-Exhaust-Cut-Out-/180744310678

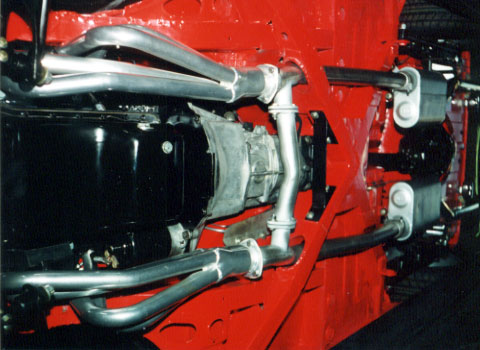
and a picture of a tiger system (though it has enlarged front pass throughs):
When I first started work on my V6, someone here gave me a procedure for creating a cut through without using these. I would credit the originator, but no longer remember who it was. Basically, you first drill a hole straight through the cross member at the appropriate spot using a 12" long drill bit. It takes some work to get the holes in the right spot, and as I recall, I drilled smaller holes on each side, then used the larger bit to be sure the guide hole (you will see why I called it that in a second) was at the correct angle. I have forgotten the bit size of the 12" bit, but it is the same size as used on a standard bi-metal hole saw (I think it is 3/8"). You put this bit in the hole saw in place of the original bit, and then use the hole saw to cut a hole straight through the cross member. The size of the hole is up to you, but you size it based on the large diameter exhaust pipe that will eventually go through the hole. I think I used a 3 1/4" hole saw and whatever exhaust size matched that OD. I just bought a foot of it from a muffler shop for a couple of bucks. If I had it to do over again, I would have gone with a slightly larger pipe.
Cutting the hole at an angle (the saw is basically running parallel to the car's length, but that puts it at a sharp angle relative to the cross member) is easier said than done, but it is doable because the 3/8" holes keeps the hole saw properly lined up. One saw lasted both cuts, but I broke multiple drill bits in the process. Those 12" bits get expensive and about half way through I realized that there was really no need for an actual bit once the guide hole was drilled and switched over to just 3/8" bar stock. While the hole saw is round, the resulting hole is oblong due to the way it cuts on the angle. (a note of caution: I used a standard depth saw, which wasn't deep enough for the angled cut. I had to stop about half way through and cut away part of the plug to allow the cut to finish. It would have been much easier if I could have gotten a deep hole saw.)
Once you are through both sides, you "slide" the exhaust pipe through the hole, cut it to the proper angles and weld it in place. I put slide in quotes because my cuts weren't perfectly lined up (due, I believe, to the problem I mentioned earlier with the saw not being deep enough to cut in one pass) and I had to pound the hell out of the pipe to get it in place. But, when all was said and done, it made for a very nice exhaust pass through. Someday, when I get the car back from the body shop, I hope to pass an exhaust pipe though it!