• Welcome to the new SAOCA website. Already a member? Simply click Log In/Sign Up up and to the right and use your same username and password from the old site. If you've forgotten your password, please send an email to membership@sunbeamalpine.org for assistance.

    If you're new here, click Log In/Sign Up and enter your information. We'll approve your account as quickly as possible, typically in about 24 hours. If it takes longer, you were probably caught in our spam/scam filter.

    Enjoy.

S-V A-Pillar trim and weatherstipping

bashby

Donation Time
On my Series V I have the SS windshield trim, SS A-Pillar trim and weatherstripping. What attachment/order methods do they go on? The windshield trim is I understand, doI rivit the windshield trim in place then the A-pillar weatherstripping and trim or ??? photos would be great too.
 

sunbby

Past SAOCA President
Donation Time
I have some pics of my windshield project that might help, unfortunately they're a little out of order on my webshots album (click on one of the pics to go to the album).

I don't know if it's correct but here's what I did:
1st installed the ss-trim (the frame was off the car). Then I riveted the a-pillar trim to the frame (still off the car and after putting a home made "gasket" between the trim and the frame). Then the weather strip screwed on when the frame was on the car.

Here is a before pic showing the weather strip screws:


Then a pic of the rivets:


Here's a pic of the ss-trim going on:
 

bashby

Donation Time
Is this correct and...

One side fit fairly well -used a C-clamp but it all aligned as shown in the 4-photos I am concerned that the windshield seal is not under the trim piece just after the corner as shown in the photo. The other side has been an RPA and it appears that both pieces seem to be too long and the alignment is really poor is this normal? I assume the the bottom-side (to the scuttle or cowl) is more important to be aligned as the gasket seal relies on it. Is this true?
 
Last edited:

George Coleman

Gold Level Sponsor
Lots of soapy water and if you can find one there is a plastic tool that will help with this but it will go together. The top center chrome and bottom center chrome need to go on first then work each side post chrome in one at a time, it can be done but be careful as you work the lower corners, this is were the tool comes in, you can use some stiff flat plastic like a plastic puddy blade. Good luck:cool:
 

Bill Blue

Platinum Level Sponsor
Goop hand cleaner is a great rubber lubricant. I found the fit on my stainless to be pitiful. But it has stayed on and passes the "looks okay at 50 ft when driving by at night" test.

Bill
 

bashby

Donation Time
Done!

1-tube of windshield sealer, 1-qt of Naptha, 1-qt of Denatured Alcohol, 1-box of nitrile gloves, 3-rolls of shop towels and 8-hours of frustration and then reward... it is done the windshield and trim pieces are installed!
 

dtbaker61

Donation Time
Lots of soapy water and if you can find one there is a plastic tool that will help with this but it will go together.

I haven't had to do this 'yet', but in past similar projects with gasket installation I have found the 'wire pulling lubricant' available at electrical supply places works great and is pretty easy to clean up afterward. Its a clear slippery almost KY jelly type stuff.
 

SRQJeff

Bronze Level Sponsor
weather strip

Here is a before pic showing the weather strip screws:


I checked out the photos. Is the weather strip in the one showing the screws the correct/original type? I'm trying to figure out if I have the right item in my box of stuff. I have nothing that looks like yours, but I have two V-shaped molded things that I think are WS53, "windshield frame to door wing window seal" in the SS catalog. But they look like they're molded to that shape for a reason (although I can't imagine where they would fit). I could probably cut off a strip that would serve the purpose, but I hate to chop up items that cost $40/pair.

:confused:
 

mattinoz

Donation Time
WS53 should have the metal stiffeners in the rubber. These screw to the outer windscreen SS channel over the inner SS piece which is riveted to the frame. So the order is, inner SS piece riveted to frame followed by outer SS piece which is held in place by the screws which attached WS53. WE53 should extend down around the corner and finish against the door hinge post.
That's how I understand how these pieces go together so I hope it helps
 

SRQJeff

Bronze Level Sponsor
OK, I got the stainless steel trim in place, but the part with the screw holes doesn't go flush up against the windshield frame. It's close to 1/8 inch away. Is there supposed to be empty space there, or some sealant or something? It's as if the top and bottom trim pieces are a little too long. But they are the original pieces, and it's the original frame, so that can't be.
 

SRQJeff

Bronze Level Sponsor
What is this? Is this part of the seal? It looks like metal.
 

Attachments

  • post&seals.jpg
    post&seals.jpg
    29.4 KB · Views: 51

SRQJeff

Bronze Level Sponsor
IMG_1033.JPG


Here's what the A-post would look like if I install the weatherstripping I have on hand. Somehow, it just doesn't look right, or very much like what other people's pics show.
 

sunbby

Past SAOCA President
Donation Time
Here's what the A-post would look like if I install the weatherstripping I have on hand. Somehow, it just doesn't look right, or very much like what other people's pics show.

I am no expert, but I think you what you have displayed is correct. Note, I am not 100% sure my pictures are the original stuff, but I to me the bit you pointed to earlier is the same as your weatherstripping, it's just mine was really old and the inside part has been flattened out by the door closing.
 

AlsPine

Donation Time
That is the correct way to install that replacement strip.
Use a bit of RTV between the strip and the frame to seal it.
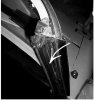
Another trick is to put the head of the screw under the top layer of rubber so the screw head is on top of the metal strip inside. Using a small screwdriver, pull the upper layer of rubber over the screw head so it doesn't show. Do this before installing the strip.
Run the screws all the way in, then pull the rubber over the head of the screw. The rubber will stretch and pop over the screw head.
When you install the strip, you can stick the screwdriver through the top layer hole of rubber and tighten the screw.
I went to my local ACE hardware store and bought stainless Philips head screws for this as the blade type screws are harder to use in this application.
The reason for putting the screw heads under the top layer of rubber is 1) it looks cleaner with the screws covered and 2) the top layer of the seal is not distorted by the screw head which would have a tendency to pull up the inner and outer edge of the weather strip when tightened down.
When I installed the weather strip, I started by installing all of the screws in the strip and covering the heads with the outer layer of rubber. Then I installed the first bottom screw right after where the strip bends to go underneath the door jam.
Then with the vertical part of the strip hanging down, I squeeze a bead of black RTV down each side of the strip about 1/8" in from the edge and put a good blob of RTV around the bend where it goes under.
Now pull and stretch the strip up until the top screw aligns to the hole and grab a few turns, but don't screw it all the way down then get the rest of the screws started. Working from bottom to top run the screws the rest of the way down.
If some of the black RTV squeezes out to the front edge, you can use a paper towel to wipe the excess off. I take a small piece of paper towel and fold it several times to get a sharp corner, then use the corner to wipe up the excess RTV.
Let the RTV set for 24hrs before closing the door.
When you shut the door, in most cases the weather strip inside part of the strip will try to fold under the wing window vertical edge. Pry it out so it lies on the inside of the wing window then close the door.
After a day or two with the door shut, the strip should have a "set" to it and stay in that position. If it doesn't, then try heating the strip up with a heat gun then close the door again and let it try to take a set.
Be careful that you don't melt the rubber with too much heat.

Good luck with your project.

Just an FYI,
I have owned Alpines and Tigers since 1968.
My first alpine was a red series 2.
Got rid of it, and bought another series 2 which I still have.
Then I bought a Tiger which was stolen.
Bought another Tiger for $800 witch was a bit beaten up, (back then they were cheep!)
Got rid of it in '71 and bought another MK1A for $1200 which I still have.
Bought a series V back in the '80s to use for commuting. I still have it also.
Most recently I bought a series 3 GT witch I plan to restore after I finish my complete restoration on the MK1A
I have a series IV which is retired for parts and a rear clip of a series V
Yes, too many projects, not enough time.
After completing the MK1A, the series 3 is next, then the white series II then the V.
Glad that I am retired!, ....hope I make it to the series II !
 

SRQJeff

Bronze Level Sponsor
Ah, makes sense. Thanks a ton for the detailed answer. It's a big help.

This was my mom's car from early 1968 until I talked her out of it in about '74. I've been meaning to do the restoration for about 15 years now and am finally going to git 'er dun. Hope to get it on the road in a month or so. My problem is that it has been disassembled for so long that I don't remember how a lot of the stuff looked. But I have a parts car that has helped a lot.

Jeff:D
 

AlsPine

Donation Time
Hi Jeff,
Glad to help.
Another thing that you should do is strip the floorboards clean of the tar paper covering and get down to bare metal. The indentations in the floorboards are filled with a fiber jute which holds moisture and causes the floorboards to rust out.
Take the time to remove the tar paper and clean out the indentations, it is worth the effort in the long run.
Most likely you will find a lot of pitting or rust on the floorboard just under the brake and clutch master cylinders from years of brake fluid leaking from them and collecting in the carpet and on the floorboard.
Paint everything with POR15 rust stop / block, then use a product called rattletrap sound deadening mat which has foil on one side and a sticky tar material on the other that sticks down to the floor and fill the indentations. You could use just about anything that you think that would block the moisture from settling in the valleys though, but the rattle trap works fine for this.
If you have any other ??, just post them.
Most everyone here can help with any ?? that you have.
Have fun with your project!
Al
 
Top