• Welcome to the new SAOCA website. Already a member? Simply click Log In/Sign Up up and to the right and use your same username and password from the old site. If you've forgotten your password, please send an email to membership@sunbeamalpine.org for assistance.

    If you're new here, click Log In/Sign Up and enter your information. We'll approve your account as quickly as possible, typically in about 24 hours. If it takes longer, you were probably caught in our spam/scam filter.

    Enjoy.

Removing rear spring bush in chassis

greenbeam

Platinum Level Sponsor
Hi all,
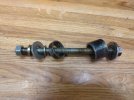
Is there a tried and proven method to remove the rear spring bush in the chassis on series 3-5 Alpines?

I've searched the forums and found the tales of woe, but not seen a good how-to on the topic. Even the ever-helpful Sunbeam Alpine Channel on YouTube only tackles the bushes in the springs, not the ones in the chassis.

I have fuel tanks and lines in the car, so the method of using a naked flame isn't really an appealing option.

I've seen one suggestion to drill out the rubber then use a saw to cut the outer tube, but even then the poster mangled the new bush trying to fit it.

I'm sure there are plenty of people that have done this job.

Thanks,
Paul.
 

Mike O'D

Gold Level Sponsor
I bought new ones with the intention of replacing them. Looked like a real job to get them out and originals looked ok, so I left them in. Literally the only parts I didn't replace or refurbish.
 

Eleven

Platinum Level Sponsor
I bought new ones with the intention of replacing them. Looked like a real job to get them out and originals looked ok, so I left them in. Literally the only parts I didn't replace or refurbish.
Me too Mike. I had the tanks out and thought about using heat but my son and I agreed that burning the car and the garage down that day was a bad plan. I changed everything but those. I feel your frustration!
 

Tim R

Silver Level Sponsor
Paul,
If you can avoid changing the in-chassis bushes (especially if the car is built up) then it is worth avoiding it. If yours are shot and you absolutely need to change them you can rig up a set up where you use a stout piece of stud and a thick washer the exact size of the bush outer. You need to have a piece of tube inside the boot that the stud runs through and then as you wind down on the nut you will pull the bush through into the boot. There is a big 'BUT' that goes with this and that is that the bushes are often very tightly fitted and have virtually welded themselves in place and being unable to heat the area up restricts your options. This photo shows what it looks like from underneath and hopefully you can see what I mean about pulling it into the boot with a length of stud. You might get lucky but the drilling through the rubber and then cutting the outer sleeve with a hacksaw blade approach is often the only way to get the bush out. Fitting the new bush shouldn't be a problem, just wind it in with the length of stud and washer approach.
Good luck. Tim R
 

Attachments

  • P1110811.JPG
    P1110811.JPG
    504.9 KB · Views: 43

junkman

Gold Level Sponsor
Also, a serious air hammer can be used to knock out the center then fold the outer metal skin inward allowing removal. Same thing with control arm bushings.
 

greenbeam

Platinum Level Sponsor
Thanks all,
So I think the order is:
1. Thick washer matching OD of the bush with a threaded rod and tube in the boot to pull the bush through. If the threaded rod strips or washer bends:
2. Hole saw or air hammer to drill/knock out the rubber and centre tube, then hacksaw through the outer tube to remove it.

I'll see what the bush looks like when I get it all apart. Have a couple of other jobs to finish before I start this one.
Cheers,
Paul.
 

JSLoeffl

Gold Level Sponsor
Agree with Tim R mostly,
My car is built up mostly except new exterior paint job. It is not as bad as you think. I did mine when I changed all the other bushings etc on the rear suspension. Why leave 50+ years old rubber in 2 spots just cuz it may appear difficult.
I changed mine by drilling out the rubber with a drill bit (multiple holes) to separate the inner and outer shells. Then hacksaw cut on outer shell to peel it out. I tried the threaded rod method first, but all it did was collapse the outer shell.
I did though use the threaded rod method to install the new ones using a special recessed piece of thick-walled pipe & flat washer I made that would capture the outer shell and the inner shell as pressing points to pull the new bushing into the frame, and a short piece of thin-walled pipe with an ID just big enough for the outer shell of the bush to pull into on the opposite side of the frame. New Bush was pulled into the frame from the Boot side due to lack of space on the outboard side of frame.
The recess on the thick-walled pipe was about 1/8" which is the approximate measurement that the outer shell sticks out of the frame when centered.
Special note, use extreme high-pressure grease on your threaded rod, and it will not strip out.

Left side: 7/16" nut, 7/16" flat washer, 7/16" fender washer, 7/16" flat washer with OD to match ID of thick-walled pipe, thick-walled pipe with 1/8" recess. Center: 7" long 7/16" UNC threaded rod stock. Right side: thin-walled pipe, 7/16" fender washer, 7/16" flat washer, and 7/16" nut.
If you don't get the idea, PM me and I'll get out a caliper and give exact dimensions or make sketches of each piece.
 

Attachments

  • Spring Bush Tool.jpg
    Spring Bush Tool.jpg
    1 MB · Views: 25
Last edited:

JSLoeffl

Gold Level Sponsor
Paul,
If you can avoid changing the in-chassis bushes (especially if the car is built up) then it is worth avoiding it. If yours are shot and you absolutely need to change them you can rig up a set up where you use a stout piece of stud and a thick washer the exact size of the bush outer. You need to have a piece of tube inside the boot that the stud runs through and then as you wind down on the nut you will pull the bush through into the boot. There is a big 'BUT' that goes with this and that is that the bushes are often very tightly fitted and have virtually welded themselves in place and being unable to heat the area up restricts your options. This photo shows what it looks like from underneath and hopefully you can see what I mean about pulling it into the boot with a length of stud. You might get lucky but the drilling through the rubber and then cutting the outer sleeve with a hacksaw blade approach is often the only way to get the bush out. Fitting the new bush shouldn't be a problem, just wind it in with the length of stud and washer approach.
Good luck. Tim R
Tim,
That picture is worth a thousand!!
Looks like one hell of a nice bottom-up restoration going on or past tense went on. 39 Carnival Red
My 67 was originally Carnival Red, but when I did a restoration in 1981 it had almost faded to more of an Orange than Red.
I had it changed to 122 Signal Red but I think my painter got the code slightly off a couple shades. Looks more of a maroon than a deep dark red.
I'm doing a second partial restore on it now (not a complete bottom up) but am going with the newer style paint process (base coat/clear coat) since staying 100% OEM doesn't seem to matter much anymore. It still will be close in color to the Signal Red as I am going with Chevy Cajun Red tintcoat.
Again nice job on what I see.........cheers
 
Last edited:

greenbeam

Platinum Level Sponsor
Agree with Tim R mostly,
My car is built up mostly except new exterior paint job. It is not as bad as you think. I did mine when I changed all the other bushings etc on the rear suspension. Why leave 50+ years old rubber in 2 spots just cuz it may appear difficult.
I changed mine by drilling out the rubber with a drill bit (multiple holes) to separate the inner and outer shells. Then hacksaw cut on outer shell to peel it out. I tried the threaded rod method first, but all it did was collapse the outer shell.
I did though use the threaded rod method to install the new ones using a special recessed piece of thick-walled pipe & flat washer I made that would capture the outer shell and the inner shell as pressing points to pull the new bushing into the frame, and a short piece of thin-walled pipe with an ID just big enough for the outer shell of the bush to pull into on the opposite side of the frame. New Bush was pulled into the frame from the Boot side due to lack of space on the outboard side of frame.
The recess on the thick-walled pipe was about 1/8" which is the approximate measurement that the outer shell sticks out of the frame when centered.
Special note, use extreme high-pressure grease on your threaded rod, and it will not strip out.

Left side: 7/16" nut, 7/16" flat washer, 7/16" fender washer, 7/16" flat washer with OD to match ID of thick-walled pipe, thick-walled pipe with 1/8" recess. Center: 7" long 7/16" UNC threaded rod stock. Right side: thin-walled pipe, 7/16" fender washer, 7/16" flat washer, and 7/16" nut.
If you don't get the idea, PM me and I'll get out a caliper and give exact dimensions or make sketches of each piece.
Thanks Joey, this is exactly the type of information I was looking for. The details on the pieces of pipe are very useful. Good tip about using grease on the threaded rod too.

Thanks very much for taking the time to describe it all too.
Cheers,
Paul.
 
Top