• Welcome to the new SAOCA website. Already a member? Simply click Log In/Sign Up up and to the right and use your same username and password from the old site. If you've forgotten your password, please send an email to membership@sunbeamalpine.org for assistance.

    If you're new here, click Log In/Sign Up and enter your information. We'll approve your account as quickly as possible, typically in about 24 hours. If it takes longer, you were probably caught in our spam/scam filter.

    Enjoy.

Convertible Top Metal Covers

SoCal'beaming

Donation Time
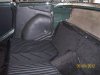
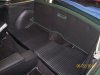
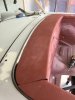
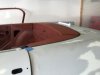
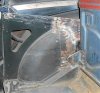
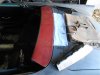
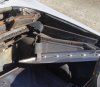
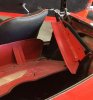
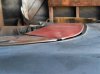
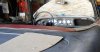
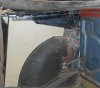
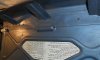
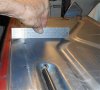
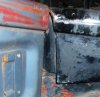
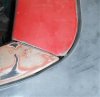
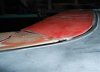
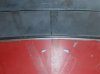
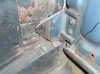
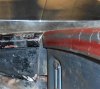
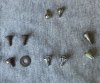
I'm in the process of finishing what a P.O./'s started and never finished. It's converting the open area for the conv. top from that soft cover to the 3 hard covers. I have all of the hardware and some decent pic.s of some of the mounting areas but no detailed ones. If any one has good detailed photo's of all the mounting points or a restoration in progress that would be great. This is a 67' SV and all parts are from a 65' and S.S.'s .... I'll post some pic.s as to where I'm at ....... I'm sure this has been done before? ... any hints from those in the know?

...... Thanks! ..... David
 

65beam

Donation Time
covers

Photos of my series 4 during the restoration.
 

Attachments

  • 107_0568.jpg
    107_0568.jpg
    81.5 KB · Views: 68
  • 107_0595.jpg
    107_0595.jpg
    63 KB · Views: 62

P. Scofield

Bronze Level Sponsor
Although I really prefer the look of the hard cover, I've never seen anyone go that direction on a Late series. GT to soft cover yes, but you are asking for a lot of work if your car was not previously a GT.

You will have to remove the hard panel that was added for the late series storage, requiring some careful spot weld surgery. I've removed 3 of these for resale and it's a lot of work. Of course, if you are not trying to save it, much less work. I am not sure if the later cars still had the lower bungs for the large center door hinges on each side. If not, you will have to add some. I can tell you that fitting the door so it looks correct and level is some work. If you need to add these mounting points you will need to do a careful mock-up, as this may save you from changing factory measurements. I just did final fitment of mine and was forced to breck the welds on the gussets in the rear to get it level. That factory was incorrect on many of these, there were generally low buy 1/2" or more.

First picture is before. Note it closes 3/4" low. Hinges here are adjusted to maximum reach.
 

Attachments

  • IMG_0466.JPG
    IMG_0466.JPG
    16.7 KB · Views: 53

P. Scofield

Bronze Level Sponsor
After fitment. Note burn marks from welds inside. Support gussets were altered.
 

Attachments

  • IMG_0475.jpeg
    IMG_0475.jpeg
    18.7 KB · Views: 48

SoCal'beaming

Donation Time
Thanks Bob ... But I have most of those already ... I need some close ups of the mounting points, the 2 for the center and the 2 rearward mounts on the side covers with nothing obstructing the brackets/nutserts as I'll have to form them from whats left of the stock back section. Paul ... this was already started so there was only a small section of the back panel left on both sides. I've had all the panels up and dry fitted and they all sit relatively well. Here's what I have to work with .... for me ... some great close-ups of those sections with nothing but the bare skin would sure help. Paul that last photo's needs your attention. George ... That's all I'm trying to do ... will see?

.... Thanks for what you've posted ..... it all will help

.... David
 

Attachments

  • today 009.jpg
    today 009.jpg
    42.4 KB · Views: 46
  • today 012.jpg
    today 012.jpg
    40.6 KB · Views: 42

SoCal'beaming

Donation Time
These are some of the photo's I'll be trying to work from... not what I'm working on. ..... These are gleaned from google ... There are specific things that need to be added/ removed as well for the upholstery to work . Most of the pic.s I have of these area are not shot close enough and when enlarged they pixelate so there not detailed enough. .. So any good photo's would help.

Thanks again ..... David
 

Attachments

  • SIII.jpg
    SIII.jpg
    73.4 KB · Views: 47
  • 1.jpg
    1.jpg
    30.3 KB · Views: 46

Warren

Bronze Level Sponsor
Come see mine

I'm in Torrance and there's a nice free show at Rock Ola jukebox factory tomorrow.
 

P. Scofield

Bronze Level Sponsor
I can get you those shots this weekend when I get back to Las Vegas. That car is still and shell and easy to do for you.
Sorry about the last picture, I've never had trouble listing from Photobucket before.

These are some of the photo's I'll be trying to work from... not what I'm working on. ..... These are gleaned from google ... There are specific things that need to be added/ removed as well for the upholstery to work . Most of the pic.s I have of these area are not shot close enough and when enlarged they pixelate so there not detailed enough. .. So any good photo's would help.

Thanks again ..... David
 

SoCal'beaming

Donation Time
Thanks Warren for the offer ... No can do this weekend.

Paul .. That would be great!! .... Since there are no center section "bungs" on either side to attached it those will need to be added .. photo's of that whole attaching area and hardware would be ideal .... I guess I'll have a little room for adjusting it this way. I've been wondering if I should set the side panels first and then the center section or visa-versa? ...

..... David
 

SoCal'beaming

Donation Time
Thanks Dan .... Forgot about that vid .... I worked on the existing panels/brackets that were left from the back panel this afternoon and got them fairly close to what I have in photos for that rearward mount. I've put them all together with just some tension on all the mounting points, I haven't drilled any holes yet ... still need to do some adjusting... Is this about as good as I can expect with fitment? (pic,s) .... still need those photos of the 2 center section mounting area's. Thanks all!!

...... David
 

Attachments

  • hrdcvrs 012.jpg
    hrdcvrs 012.jpg
    25.1 KB · Views: 42
  • hrdcvrs 015.jpg
    hrdcvrs 015.jpg
    33.5 KB · Views: 42
  • hrdcvrs 014.jpg
    hrdcvrs 014.jpg
    33.9 KB · Views: 36
  • hrdcvrs 001.jpg
    hrdcvrs 001.jpg
    27.2 KB · Views: 41
  • hrdcvrs 016.jpg
    hrdcvrs 016.jpg
    34.9 KB · Views: 43

DanR

Diamond Level Sponsor
I think you are getting there. Looks good to me....I have a '65 SIV with covers. They have never been abused and are in good shape.... maybe I can get you some PIC's and provide some measurements.

I'll give it a try later today,

DanR
 

DanR

Diamond Level Sponsor
Measurements for pivot Pins/Bolts

David, I just got you some measurements from my Unmolested '65 SIV ST.

Send me you E-mail and I will send you about 6-8 PIC's of measurements that should make you happy.

DanR
 

SoCal'beaming

Donation Time
Thanks so much Dan ... email sent .... I noticed this today and have a bad feeling this is why that center section doesn't want to snug up. It looks to me that the top of it might have been sat on(?) at some point and it looks like the bend is along the gusset line? making the center length bent down .. which is where it seems to be hitting. ..... here's some pic.s ... I have nothing to compare it to ... maybe that's how it's suppose to be?

... David
 

Attachments

  • hdcvrs3 018.jpg
    hdcvrs3 018.jpg
    25.9 KB · Views: 38
  • hdcvrs3 011.jpg
    hdcvrs3 011.jpg
    37 KB · Views: 37
  • hdcvrs3 020.jpg
    hdcvrs3 020.jpg
    34.4 KB · Views: 38

DanR

Diamond Level Sponsor
David, The wrinkle sure looks to be the culprit.

If you sent an e-mail, (tiger 2 dan at gmail dot com ) I have not received as of 7:50PM EST

DanR
 

SoCal'beaming

Donation Time
Sorry 'bout that Dan .... must have sent it to someone else or the wrong email address. I was beat yesterday (long honey do list day:D) .... Just sent another!

..... David
 

DanR

Diamond Level Sponsor
David, Just sent you two batches of PIC's on my '65 SIV ST (unmolested) Color code 70 Maroon Alpine.

First batch has 5 pic's in sequence 1 thru 5 of the left side (Driver USA). All measurements are taken from the "pivot" pins.

The second batch is of three also in sequence of the right hand side (Passenger USA).

Let me know if these are adequate and if you need more or better ones...
 
Last edited:

SoCal'beaming

Donation Time
Thanks again Dan for taking the time and trouble to do that! It gave me some reference points to go by, here's what I have .. all on center- from ball pivot to center section mounting bolt 15 1/4" both. ... center section mounting bolt to rear seat belt mounting hole/bolt pass. side 5 1/8" dr.s 5" ... center section mounting bolt to seat edge 14 3/8" pass. side 14 1/4" dr.s ... I think the 1/2 to 3/4" difference from mine to yours is what Paul Scofield mentioned he found(quote- I just did final fitment of mine and was forced to breck the welds on the gussets in the rear to get it level. That factory was incorrect on many of these, there were generally low buy 1/2" or more.First picture is before. Note it closes 3/4" low. Hinges here are adjusted to maximum reach) .. Mine are adjusted all the way down with a 1/8" shim under the hinge. There isn't much adjustment I can make as the side covers have a predetermined shape and fit .. granted I'm not working with factory mounting points except the ball pivots so I have wiggle room but moving the bottom mounting point up to where it should be would necessitate breaking welds at this point, not happening on this one! so I'll have to compromise a little. The first pic is one of those compromises where the lines in the corner are off that 1/2-3/4" from top to bottom. I dollied that wrinkle out fairly well last night and the top of the center section fits so much better now. I'm wondering where ideally it should fit .. just covering that aluminum strip(allowing for the tops fabric) or slightly on that rubber seal that runs the length? What does the face of that center section hinge bung/nutserts look like .. round and stacked with a friction washer under the hinge?(last pic.) Hard pic to get unless its off. Here's some pic.s so far. Thanks again for the help and guidance all!

...... David
 

Attachments

  • hrdcvrs4 005.jpg
    hrdcvrs4 005.jpg
    30.5 KB · Views: 20
  • hrdcvrs4 001.jpg
    hrdcvrs4 001.jpg
    25.2 KB · Views: 18
  • hrdcvrs4 002.jpg
    hrdcvrs4 002.jpg
    35.4 KB · Views: 15
  • hrdcvrs4 007.jpg
    hrdcvrs4 007.jpg
    29.5 KB · Views: 16
  • hrdcvrs4 003.jpg
    hrdcvrs4 003.jpg
    55.8 KB · Views: 17
Last edited:

SoCal'beaming

Donation Time
Here's a couple more pic.s ... 1st. one is looking down on the center section, the chalk line is where the orig. SV seat back was.... 'bout a 1/2- 3/4" diff. so the seat back now is more straight up and down instead of kicked back. 2nd. is another shot of that corner area and the odd angle and 3rd. from the back ... and some of the hardware that came with this rescue.

.... David
 

Attachments

  • hdcvrs5 001.jpg
    hdcvrs5 001.jpg
    17.1 KB · Views: 16
  • hdcvrs5 002.jpg
    hdcvrs5 002.jpg
    37.7 KB · Views: 17
  • hdcvrs5 006.jpg
    hdcvrs5 006.jpg
    17.2 KB · Views: 17
  • hdcvrs5 004.jpg
    hdcvrs5 004.jpg
    95.1 KB · Views: 18
Top