• Welcome to the new SAOCA website. Already a member? Simply click Log In/Sign Up up and to the right and use your same username and password from the old site. If you've forgotten your password, please send an email to membership@sunbeamalpine.org for assistance.

    If you're new here, click Log In/Sign Up and enter your information. We'll approve your account as quickly as possible, typically in about 24 hours. If it takes longer, you were probably caught in our spam/scam filter.

    Enjoy.

Carburetor confusion - Stromberg - 150 CD

Britboy

Donation Time
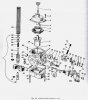
I purchased my67 Alpine SV a few years back and have never been truly happy with the way it runs at low speed. The dual Strombergs run rich. I have faithfully followed the instructions in the owner's manual as well as more detailed advice in the Haynes Workshop Manual on carburetor settings and adjustment. Both instruct to turn the jet adjustment screw, for each carb, until the jet itself touches the bottom of the air valve piston - then back it off a couple of turns. (There's a bunch of additional steps after this of course).
I have turned that screw until the thread bottoms out and there is no sign of any jet making contact with the piston (on either carb). It seems that no matter where I choose to leave the adjustment screw, the engine runs about the same - rich. There's a bit of black smoke on start up, the spark plugs are blackened and though she runs great at speed, the engine stalls at low RPM when warmed up.
I recently purchased a rebuild kit for each carb but frankly don't know that this will solve my problem.
Any ideas out these in Alpineland??
Much appreciate any advice.
 

beamdream

Gold Level Sponsor
Just wondering when you say no sign of the jet as to what you're adjusting.

Without trying to offend, when you lift the piston up, you should be looking at a brass tube (jet) at the bottom of the venturi, as you screw the adjuster from below, the tube (jet) should rise into the venturi throat and even raise the piston a little as the adjuster thread bottoms out. At this point you are at the maximum lean position and the piston needle should not bind in the jet as you lift and drop the piston.

Can you achieve any of this ?
 

Britboy

Donation Time
Just wondering when you say no sign of the jet as to what you're adjusting.

Without trying to offend, when you lift the piston up, you should be looking at a brass tube (jet) at the bottom of the venturi, as you screw the adjuster from below, the tube (jet) should rise into the venturi throat and even raise the piston a little as the adjuster thread bottoms out. At this point you are at the maximum lean position and the piston needle should not bind in the jet as you lift and drop the piston.

Can you achieve any of this ?

No offense taken beamdream. 'appreciate you taking the time to respond.
When I lift the piston up, there is no brass tube at the bottom of the venture. As I screw the adjuster upward, there is no sign of a tube(jet) being raised. When I drop the piston, it simply clanks on the venture housing. There is no binding of the needle.
Is it possible the jet is jammed lower in the throat and can't be shifted by the adjuster?
Could the PO have inadvertently adjusted the jet bushing retainer screw?
Has anyone ever experienced something like this with their car?
 

hartmandm

Moderator
Diamond Level Sponsor
Are you sure about having original Stromberg CD150 carbs? Do you see a 3059F part number on the front carb (see photo)?

Alpine Capture 005 stromberg part num.JPG Alpine Capture 006 strombergs.JPG

Sounds like you need to remove the jet to see what is / isn't there. Here's a document that has a view of the CD150 internals:
http://mhartman.net/files/sunbeam/Stromberg carbs service bulletin.pdf

WSM 145 section C has additional internal views of the CD150.

I should be able to pull the jet from a spare set of CD150s I have if you need to do a comparison.

Mike
 

CRBASIN

Donation Time
Mr Brit,

I too had problems getting my engine to run properly. I found the WSM instructions difficult to follow, especially the initial carb settings as mentioned above. One of my problems was a vacuum leak at the intake manifold.

After fixing the leak, I was able to adjust the carbs by balancing and then setting the mixture. I used some tools given to me by my cousin and uncle, including a flow meter and a color tune. The color tune, if you've never seen one, is a spark plug with a glass center. You adjust the mixture based on the color of the flame. I wrote about it in Sunbeam blog in two posts, Cool Tools and Tuning by CO.... Both entries are about 1/3 up from the bottom.
 

beamdream

Gold Level Sponsor
Referring to Mikes illustration, you need to focus on items 19 (jet orifice) 29 (metering needle) 12 (jet assembly) and 13 (jet adjust screw).

The paragraphs Jet Centralisation and Procedure explain the relationship in getting needle and jet orifice in the right position and this sets the correct mixture ratios from start up to full throttle.

Like Mike I wonder if you are missing some bits, however I doubt it would run at all if any of the jet assembly was missing
 

Jay Laifman

Donation Time
I'll give a few words to describe the brass tube. It is the HOLE that the needle goes down into. IIRC you should see two. The outer brass hole with a wide ID, then a smaller brass hole that fits inside the outer one. The wider one should be flush with the bottom surface of the throat where the piston comes down to rest. The narrower one is the one that adjusts when you turn the bottom of it under the float bowl.
 

Britboy

Donation Time
Thanks to everyone for the advice and suggestions. I WILL get to the bottom of this and let you know how it turns out.
One (actually two) final (for now) question. Does the jet move up and down the same distance as the adjustment screw? And does the jet turn as does the adjustment screw?
Thanks
 

beamdream

Gold Level Sponsor
Q 1. whilst the jet and adjuster are two seperate pieces they essentially move as one, as you screw the adjuster nut up it pushes the jet up; as I recall there is a spring between the adjuster and jet so as you unscrew the nut the jet moves down (richer)

Q2. no the jet is simply a hollow tube so does not turn.

Might I suggest that if you unscrew the jet assembly nut (12) at the bottom, you can remove the entire jet assembly as a unit (note the order of component assemby as you remove it, there are washers o rings etc) having done this you can see what you are working with.
 

Britboy

Donation Time
I have, on both carbs, removed the jet adjustment screw (13 not 12), and I get one threaded piece of brass. No springs, washers, jet, etc. Do I not need to remove the jet bushing retainer screw to get at the jet and associated bits?
 

Britboy

Donation Time
I'll give a few words to describe the brass tube. It is the HOLE that the needle goes down into. IIRC you should see two. The outer brass hole with a wide ID, then a smaller brass hole that fits inside the outer one. The wider one should be flush with the bottom surface of the throat where the piston comes down to rest. The narrower one is the one that adjusts when you turn the bottom of it under the float bowl.
I'm obviously no expert on these things BUT, is not the inner ring I see in your photo the jet centering bush rather than the jet itself?
 

Tom H

Platinum Level Sponsor
Britboy, You say you removed item 13, not 12. Why not do what Beamdream suggested and remove item 12. It seems you do not understand that he suggested unscrewing item 12 and THEN you will see the washers, springs, etc. (INCLUDING the Jet centering bush). Remove the assembly carefully. It's been a while since I took apart my Strombergs, but from reading the WSM and the WSM drawing I am 95% sure that the " jet bush retaining screw" IS item 12 in Mike's drawing. That big assembly that holds the jet. The top of that item pinches the bush against the cast carb body when tightened. The centering procedure has you loosen that item 12 just a bit to allow the jet bushing to move around, then you drop the piston and its tapered rod to center the bush and then tighten the assembly (Item 12) , making sure the the tapered rod is still free.
Edited to change all the Item "13" to Item "12:. Had gotten them crossed up!
 
Last edited:

beamdream

Gold Level Sponsor
OK so this might help a little, items 50 - 59 inclusive are the jet assy. if you undo the nut at item 53 the whole assembly will come out the bottom of the float bowl, careful as you go here because the items are stacked on top of each other so items 55 thru 59 are like likely to fall out.

Assuming you have all these pieces then reassembly is a reverse of the removal process

The critical issue when you are tuning, is the centralising of items 54 thru 59, to allow the needle item 8 (fixed to the piston 7) to rise and fall freely in 54 (jet orifice). If you follow the instructions in the previous post this is achieved by repeatedly lifting the piston/needle assembly as you screw up the nut on 53, carrying with it (jet orifice) 54, if it binds back off, raise and drop the piston/needle until its free and then continue screwing up 53 till it can go no further. In doing this you will have centralised 54 around 8, jet orifice and needle . Adjusting the mixture is now a matter of screwing 50 up or down (within 53) thus moving the jet closer or further from the needle; as the needle is tapered, upwards adjustment is leaner and vice versa.
 

Attachments

  • cd150.jpg
    cd150.jpg
    170.1 KB · Views: 42

Britboy

Donation Time
OK so this might help a little, items 50 - 59 inclusive are the jet assy. if you undo the nut at item 53 the whole assembly will come out the bottom of the float bowl, careful as you go here because the items are stacked on top of each other so items 55 thru 59 are like likely to fall out.

Assuming you have all these pieces then reassembly is a reverse of the removal process

The critical issue when you are tuning, is the centralising of items 54 thru 59, to allow the needle item 8 (fixed to the piston 7) to rise and fall freely in 54 (jet orifice). If you follow the instructions in the previous post this is achieved by repeatedly lifting the piston/needle assembly as you screw up the nut on 53, carrying with it (jet orifice) 54, if it binds back off, raise and drop the piston/needle until its free and then continue screwing up 53 till it can go no further. In doing this you will have centralised 54 around 8, jet orifice and needle . Adjusting the mixture is now a matter of screwing 50 up or down (within 53) thus moving the jet closer or further from the needle; as the needle is tapered, upwards adjustment is leaner and vice versa.
Thanks beamdream. I'll let you know how it turns out.
 

RootesRooter

Donation Time
Jay, do you have an "after" photo, showing the jet elevated after tightening the adjustment screw all the way?
Britboy, one word of caution: if your throttle shafts and/or bushings are worn enough, you will still run rich regardless of jet adjustments.
 

Britboy

Donation Time
Jay, do you have an "after" photo, showing the jet elevated after tightening the adjustment screw all the way?
Britboy, one word of caution: if your throttle shafts and/or bushings are worn enough, you will still run rich regardless of jet adjustments.
This would be very helpful. Again, with both my carbs, when the adjustment screw is tightened all the way, I see no sign of a jet elevated. What I see is what's seen in Jay's photo.
 

Hodee

Donation Time
Are you sure about having original Stromberg CD150 carbs? Do you see a 3059F part number on the front carb (see photo)?

View attachment 9662 View attachment 9663

Sounds like you need to remove the jet to see what is / isn't there. Here's a document that has a view of the CD150 internals:
http://mhartman.net/files/sunbeam/Stromberg carbs service bulletin.pdf

WSM 145 section C has additional internal views of the CD150.

I should be able to pull the jet from a spare set of CD150s I have if you need to do a comparison.

Mike
Wow! How in the world do you get carbs to be that clean!?
 

hartmandm

Moderator
Diamond Level Sponsor
Wish I knew the process. I sent my carbs to Jeff @ Paltech Technologies for rebuild and cleaning. Jeff claims to use a secret micro polishing process. Check out his web site. http://paltech1.com/

Mike
 
Top