• Welcome to the new SAOCA website. Already a member? Simply click Log In/Sign Up up and to the right and use your same username and password from the old site. If you've forgotten your password, please send an email to membership@sunbeamalpine.org for assistance.

    If you're new here, click Log In/Sign Up and enter your information. We'll approve your account as quickly as possible, typically in about 24 hours. If it takes longer, you were probably caught in our spam/scam filter.

    Enjoy.

2.8 progress

SIVAllan

Gold Level Sponsor
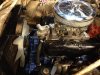
Finally the 2.8 engine and Mustang t-5 tranny plus modified radiator are in place in the Series 1.

Accordingly, the "v6 Jose" conversion has gone to the next step.

I'm still a little unsatisfied with the fan blade proximity to the crankshaft bolt on one side and the radiator on the other but there is clearance, assuming the plastic fan blade doesn't flex.

I didn't trim the fan blade but used spacers to push it towards the radiator. This made clearance a little tighter.

Now to start hooking stuff up and figuring out how to get a driveshaft made.

I'm leaving the Series 1 Alpine rear axle in place for now so maybe an Alpine driveshaft can be shortened and a T-5 front yoke added.

I'm also considering the use of a cable to work the clutch.

For now, I'm leaving the car positive ground with a regulator and generator. Once everything is working ok, Ill switch to a negative ground alternator setup.

I'm totally amazed that the conversion is happening. I'm not particularly handy and have never attempted anything like this.
 

Attachments

  • v6 in place.jpg
    v6 in place.jpg
    66.4 KB · Views: 140

Alpine66

Donation Time
Good progress,

As far as the driveshaft, there's a place on 41 Cobb parkway just south of Barrett parkway that will make the driveshaft for you.
Have done 3 for me with no problems.

Measure from the seal on the back of the trans to the center of the rear axle ujoint. They will automatically reduce that measurement to allow for the shaft yoke to move into the trans as the rear axle moves up during driving.

If you already have a good yoke and shaft, save money by bringing them with.

They used my alpine driveshaft and installed the GM yoke, balanced and painted it.
Think it was $170 or so can't remember. Last one with the cougar was more because they had to supply s new yoke.
 

SIVAllan

Gold Level Sponsor
Good progress,

As far as the driveshaft, there's a place on 41 Cobb parkway just south of Barrett parkway that will make the driveshaft for you.
Have done 3 for me with no problems.

Measure from the seal on the back of the trans to the center of the rear axle ujoint. They will automatically reduce that measurement to allow for the shaft yoke to move into the trans as the rear axle moves up during driving.

If you already have a good yoke and shaft, save money by bringing them with.

They used my alpine driveshaft and installed the GM yoke, balanced and painted it.
Think it was $170 or so can't remember. Last one with the cougar was more because they had to supply s new yoke.

Thanks. I have an Alpine driveshaft to use and just need the front yoke to fit the T-5.

Do you have a name for the shop on 41?
 

Bill Blue

Platinum Level Sponsor
Allan, I had about 1/4" clearance between the Volvo fan and the radiator with both the Pinto and Ranger Duratec engines. The only problem I had was when the radiator overflow hose came loose and got caught between the rad and fan blade. Damned hard on radiators.

Bill
 

SIVAllan

Gold Level Sponsor
Allan, I had about 1/4" clearance between the Volvo fan and the radiator with both the Pinto and Ranger Duratec engines. The only problem I had was when the radiator overflow hose came loose and got caught between the rad and fan blade. Damned hard on radiators.

Bill

Thanks Bill, I'll tighten the clamps :)

I may move the engine back ~1/32" before I'm done or
trim the fan a little.

But for now, it's time to hook up the several items.
 

V6 JOSE

Donation Time
Hi Allan,

The Volvo fan will not flex, so you can run it pretty close to the radiator. You are pretty well limited to how far back you can place the engine, as the header on the passenger side will hit the steering arm when it swings past the header. I recommend a minimum of .060" clearance to the steeering arm.
 

SIVAllan

Gold Level Sponsor
Thanks, Jose.

I chose not to trim the fan blade and used a spacer in front of the pulley to move the fan blade forward past the crankshaft bolt head.

This moved the fan blade forward past the position used by folks who simply trim the fan blade, and decreased the distance to the radiator.

Nothing hits anything but the clearances are tight.

Assuming no flex in the plastic Volvo fan blade, everything is fine.

OTOH a small amount of increase in the clearances wouldn't hurt but are only achievable by shifting the engine back a small amount, but not into the clearance area you mention for the steering arm on the passenger side.
 

SIVAllan

Gold Level Sponsor
I thought there was a thread on 2.8 header bolts but am not very good at searching the Forum.

I understand that various options are available for header bolts with a small enough head to fit the tight spaces for header bolts.

If an option already discussed works for you - go for it.

I wanted to stick with metric and tried several before finding mail-order at Jegs:

-header bolts - 10M x 1.5 x 22MM long

These metric bolts have a small 3/8" hex head.

I'm including a pair of pictures of Header bolts that I've tried including one of the small header bolt with the others and one with it by itself.
 

Attachments

  • IMG_0835.jpg
    IMG_0835.jpg
    46.7 KB · Views: 88
  • IMG_0834.jpg
    IMG_0834.jpg
    44.8 KB · Views: 86

DanR

Diamond Level Sponsor
Allan, I use the metric hex head also. Bought them from FASTENALL.

Where did you get yours? They look very much like the ones I grind the shoulder to fit in a few close places.

DanR
 
Last edited:

V6 JOSE

Donation Time
Hi Allan,

The small headed bolt that is pictured with the ruler, is what you shoulduse. The others will not work very well.
 

SIVAllan

Gold Level Sponsor
Allan

I am also doing a V6 conversation on a Ser I. What kind of radiator did you use.

John in Colorado

Hi John,

I am using the stock radiator.

I moved the feet up 7mm to lower the radiator slightly so that it fits flush against the chassis and made a little more room available.

A prior owner had the radiator 3 cored, unless they came that way from the factory.

I'll add a radiator cap fitting to the top radiator hose.

I'll also add a removable plug to the top of the radiator to be able to bleed away any trapped air.

I'll try and post some pictures.
 

SIVAllan

Gold Level Sponsor
Allan

I am also doing a V6 conversation on a Ser I. What kind of radiator did you use.

John in Colorado
The early series radiators are markedly different from late series radiators.

The instructions floating around for modifying late series radiators aren't too helpful for early series radiators, other than pointing to locations for inlet/outlet radiator necks.

But even that has a twist as the early series radiators have their tanks on either side, not top and bottom like the late series radiators. This restricts the relocation of the lower neck.

If you use a Series 1 radiator you may want to lower it slightly so that the radiator fits inside the front valance area and opens up valuable space for the fan blade.

To reposition the radiator lower, I had a radiator shop modify the location of the feet. They were shifted up about 7mm to lower the radiator.

The feet were also shifted to be flush with the front face of the radiator. This also helped to make space for the fan blade.
 

Attachments

  • Photo.jpg
    Photo.jpg
    33.1 KB · Views: 78
Last edited:

V6 JOSE

Donation Time
Hi John,

I am using the stock radiator.

I moved the feet up 7mm to lower the radiator slightly so that it fits flush against the chassis and made a little more room available.

A prior owner had the radiator 3 cored, unless they came that way from the factory.

I'll add a radiator cap fitting to the top radiator hose.

I'll also add a removable plug to the top of the radiator to be able to bleed away any trapped air.

I'll try and post some pictures.

Hi Allan,

The early radiators are cross flow, where the water flows from the driver´s side, to the passenger side. The later Series radiators are down flow as most radiators are. The early radfiators used a top tank that was bolted the the engine, so if you are going to use one, you´ll need to place a radiator cap adapter in the top hose, so you can fill the system.

All the stock Alpine radiators came with a three core radiator, but there just aren´t enough tubes and fins to be able to cool the little V6. That is the reason you need to put a heavu duty three row core in your stock frame, so the engine will cool. With one of these radiators and a Volvo fan, you can drive it in any trafic condition (stop and go trafic) or ambient temperature.

I have never had an overheating problem, even when driving in L.A. trafic, with temps in the high 90s to low 100s.
 

SIVAllan

Gold Level Sponsor
Hi Jose,

It's great to get the issues for early series into the same thread as documentation for the early series radiator conversions isn't complete.

Placement of the radiator is a little more involved unless one trims the fan blade.

But if one prefers to not trim the fan blade, the radiator can be moved outwards a good distance by reducing the length of the radiator "feet."

After getting the radiator placed where it needs to be, the need for an inline filler is near to the top of the list of remaining steps.

These inline fillers plus radiator cap come in a version that can connect to an overflow tank.

Summit and probably a great many places offer these items.

Here's a link to an inline filler as an example:

http://www.summitracing.com/parts/mor-63745/overview/

Another issue is the diameter of the fuel line.

I'll try and post comparison pictures later, showing the difference in diameter between the fuel line from the factory for Alpine 4 cylinder engines, and the fuel line from the factory for a v8 Sunbeam engine.

Perhaps the factory line is suitable for many v6 engine builds.
 

SIVAllan

Gold Level Sponsor
Hi Al,

The stock fuel line will be adequate for the V6; even a hopped up one.

Thanks Jose,

That pipe is hard to measure with a tape measure, but appears to be either 1/4" or 3/16" in diameter.

Summit offers rolled metal fuel tubing in both those sizes.
 

Fordtootsie

Donation Time
Well after two days of learning curve, I got the engine in the Ser I for the first time to start the fitting process. But I have a few questions?

1 How many John Deer flywheels does it take to make the 2.8 engine and trans go vertical?
2 I think that it must be necessary to go beyond 90 degrees vertical to get the engine with trans to go in from the top.
3 Is three lifting devices enough to make the car accept the engine?
4 Even through the car is on a stand that can be rotated why isn't that enough freedom of movement to stab an engine and trans.
5 Are you sure that there is enough room for the U-joint?

I have decided to use a Ser V radiator in my Ser I. I hope it fits. Time will tell!

Just a few questions for those who have already worked it all out. Tomorrow I may have a few more.


John in Colorado
 
Top