• Welcome to the new SAOCA website. Already a member? Simply click Log In/Sign Up up and to the right and use your same username and password from the old site. If you've forgotten your password, please send an email to membership@sunbeamalpine.org for assistance.

    If you're new here, click Log In/Sign Up and enter your information. We'll approve your account as quickly as possible, typically in about 24 hours. If it takes longer, you were probably caught in our spam/scam filter.

    Enjoy.

Series V with Generator

gwhitf2927

Gold Level Sponsor
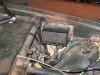
My Series V came to me with a generator. The generator is bad so I want to replace it with an alternator. Apparently the generator had been installed on the car by a previous owner. It is connected to a Lucas RB340 voltage regulator. Looking at the wiring I have three brown wires attached to spades on voltage regulator (at the B terminals). One goes directly to the solenoid starter switch. The other two are connected to a single spade connector and disappear into the wiring harness.

My questions are:

1) Where do these wires go?

2) How do I connect the alternator?

3) In trying to trace the wires I discovered a thick black wire that runs from the engine compartment through the firewall. It is not connected to anything in the engine bay. Any idea what this wire is.

Any help would be greatly appreciated.
 

mikephillips

Donation Time
I'm a little hesitate to guess on the brown wires since I can't see what someone might have done. Originally the series V would have had 3 brown wires running off the starter solenoid to the alternator, alternator relay and the fuse block #1 terminal. I'm guessing those are the ones you're seeing. The black wire is probably an addition by a prior owner. Black in the Lucas scheme is used for grounds and I've never run across and original large black wire running into the cockpit. Grounds tend to be smaller gauge wires.

As for going back to an alternator, the search function should bring up a number of threads on installing a single wire one and show what parts store ones guys have been using.
 

sunbby

Past SAOCA President
Donation Time
a picture would be helpful.

The only factory large black wire through the firewall is the battery cable, which should connect to the solenoid. When you say large black wire, how large? Through which hole is it routed through the firewall?
 

Tom H

Platinum Level Sponsor
Gary, I see in some earlier post by you that you mentioned your "SIV radiator". Also some earlier posts by you about your rear brakes seemed to indicate they were not SV brakes. And your description of the two brown wires into a single spade connector sound like SIV wiring to me. Are you sure you have a SV? What is the VIN number? It seems quite odd that someone would change a SV to a generator. It's not uncommon to have a SV engine in a SIV. Decades ago I had a SIV and swapped in a SV motor and kept the SIV generator and wiring.

Tom
 

gwhitf2927

Gold Level Sponsor
Tom,

Attached are pictures of the alpine. If its is not a Series V can you tell me what it is. By the way I have a series four parts car.
 

Attachments

  • IMG_1690.jpg
    IMG_1690.jpg
    50.9 KB · Views: 66
  • IMG_1692.jpg
    IMG_1692.jpg
    59.5 KB · Views: 80
  • IMG_1691.jpg
    IMG_1691.jpg
    65.6 KB · Views: 72

Tom H

Platinum Level Sponsor
Gary, yes, it's a Series V. No metal "doors" over the soft top storage.

Still fairly easy to connect the alternator. Not too difficult to figure out the wiring, but any advise we give via e-mail without actually seeing and testing and checking the actual wires can be fraught with issues not knowing what changes have been made.

Still it's not that tough, assuming you chose an Alt with built in regulator.

Almost surely the brown wires are as original, which means they are directly connected to the battery, and should be all branched from the heavy battery cable connected to the solenoid.

Does this Alpine have an ammeter installed?

We can go from there.

Have you searched this site and found articles on Converting to an Alternator? Have you decided what ALt to use?

Tom
 

gwhitf2927

Gold Level Sponsor
Tom,

Planning on using a GM 10SI alternator (3-wire). Having a problem getting the alternator lined up with the water pump and crank pulleys as my mounting bracket is too short. Will probably modify the bracket or make a new one. Wiring seems simple but I need to ponder on this a little further.
 

Tom H

Platinum Level Sponsor
I assume the bracket in place now fits the generator. You should get a SV bracket. Should be easy to get - ask on the wanted forum. The SV bracket typically will line up when used with a Hitachi 14231 (for a 1980 Datsun 720) .

Some people have had to elongate the holes that attach the bracket to the block, but most have not needed to.

Here''s a link to an article on doing the conversion, but it shows the ammeter wired wrong:

http://www.team.net/www/rootes/sunbeam/alpine/mk1-5/techtips/altconv.html

Tom
 

Paul A

Alpine Registry Curator
Platinum Level Sponsor
It is an easy fix. Get a double pulley for the alternator. I have been using one for nearly 30 years. With the double pulley you can make minor adjustments if needed to refine the alignment. Send me a message if you want/need further guidance. palmjeld@yahoo.com or else here on the forum.

Tom,

Planning on using a GM 10SI alternator (3-wire). Having a problem getting the alternator lined up with the water pump and crank pulleys as my mounting bracket is too short. Will probably modify the bracket or make a new one. Wiring seems simple but I need to ponder on this a little further.
 

DanR

Diamond Level Sponsor
Gary,

For positive proof on the car you have, look on the cowling under the Hood in the engine compartment for a "Data" plate.

Series 3, IV and V Alpines differ quite a lot from the early cars. While there are slight differences in data tags between the three, they all basically share the same basic format and location. For this reason I am grouping them all together. I will explain some of the small details found between the different series. The picture shown to the left is from an Embassy black Series 3. Note the new design on the data tag, as well as it's new location. This tag can be found on the right hand side of the scuttle, along with the SAL number and a separate tag fro the recommended fluids and timing specs. The recommended fluids tag was omitted from the Series V. The SAL number replaces the Body Number found on the Series I and most Series II's. I believe it served the same purpose as the body number and it identifies the Sunbeam Assembly Line for production. The data tag still contains the Chassis or Serial number, as well as the paint code. These tags were steel on Series 3 Alpines and later were manufactured from aluminum on Series IV's and V's. To identify an Alpine by Serial number follow this basic rule: Series 3 begins with B92, Series IV with B94, and Series V begins with B395. No Series 3 , IV or V Alpines ever had a Chassis or Serial number stamped directly on the body or frame... anywhere on the car. This practice was stopped with the Series II for unknown reasons as explained above.
 
Top