DenJr67
Donation Time
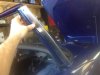
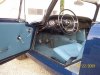
I am prepping the A pillar drip stainless drip rails to go onto the car, they were dented and crushed from some stupid side wind deflectors clamped onto them, I have hammerd and dollied them , filed them , and wet sanded them in prep to polish. I am almost finished.
I have a question about mounting these drip rails , I have noticed 4 factory looking deburred holes spaced at 4 1/4" and 7 randomly drilled holes in both sides. The windshield frame is also swiss cheezed from the previous owners rivet attempts. At this point I am unsure of how many rivets it actually takes to hold it all together or how the weatherstrip is attatched or how it covers this area. If the area is visible I plan to tig weld up the unused holes.
Can anyone offer advice or a photo of a completed A pillar area with the weatherstip installed ?
Thanks in advance,
Dennis