
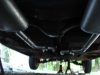
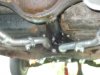
Well, the job I dreaded most is done. The exhaust.
Actually it's only mocked up. But all the pieces are fabricated to complete the exhaust. I have to make a few "adjustments" before I weld it togther. I will use two clamps on each side so that the system can be disassembled. But there are 12 pieced on each side, including the muffler.
I had thought about buying a pipe bender but decided to purchase several bends so that I could try different configurations more easily. I choose to place the mufflers behind the rear wheels. Since they would be lower if they were behind the seats, placing them behind the wheel has the advantage that the wheel may ride up over any rise giving the muffler a better advantage.
And cutting a 3" hole in the crossmember was not fun. I trimmed off the excess on the tube Sunday and got a face full of fillings.
I only had to have one 30 degree bend made up at Midas($20). The others are all stock 20, 45, and 90. I had also purchased 10' of 2" pipe from NAPA for , I think, 60$. About 2' is left over.
A few photo are attached. Not the best, but you'll get the idea.
")