• Welcome to the new SAOCA website. Already a member? Simply click Log In/Sign Up up and to the right and use your same username and password from the old site. If you've forgotten your password, please send an email to membership@sunbeamalpine.org for assistance.

    If you're new here, click Log In/Sign Up and enter your information. We'll approve your account as quickly as possible, typically in about 24 hours. If it takes longer, you were probably caught in our spam/scam filter.

    Enjoy.

SV Soft Top Frame

artic cat

Donation Time
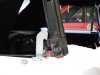
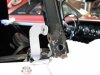
I am having a problem with my soft top frame. I just got the car and the top had large gaps, between the window and the frame, at the lower rear of the windows. the upper braces at the windshield were under great stress as well. I removed the frame from the pivot brackets (at the lower rear of the window) that allow the top to raise and lower. when the top is held in place with out the connection, the top lines up with the window just fine.
I raised the bracket with out the frame attached and it has the opposite angle as the window.
when I had this problem back in the seventies with one of these I rigged a long bolt that would not allow the pivot to come all the way forward and would become stressed and allow for window to frame alignment.

am I missing a part?
is something installed wrong?
do I need a bigger hammer?

I would like to do it right this time, instead of rigging it. any suggestions to get the bracket to come all the way forward, aligned with the window, and the frame not be stressed would be appreciated.

thanks
Steve
 

Attachments

  • Dscf0174small.jpg
    Dscf0174small.jpg
    33.1 KB · Views: 94
  • Dscf0175small.jpg
    Dscf0175small.jpg
    44.4 KB · Views: 87

kmathis

Donation Time
Is it the same on both sides? My soft top frame had similar gaps so I removed the frame and removed the pivot hinges to discover that one of them had been bent real bad. I disassembled the hinge and heated it up and bent it to match the good one. I will attach a picture. The one on the left is the good one. I then discovered that the frame itself was bent up pretty bad like someone had grabbed the top near the wind screen and pulled it up about a foot causing the frame to be real stressed when securing it at the windscreen frame. By making a comparison from one side to the other I was able to heat and reform the frame to match the good side. This solved the problem and my frame now fits around the windows good and the pivot hinges come all the way forward. After forty plus years who knows what our cars have been through. hope this helps.

Kelly
 

Tom H

Platinum Level Sponsor
You are not missing any parts. This is a weak link in the Alpine top design. The pivot bracket and the bolt through the frame get bent out of shape as the top is put up and down. You need to rebend the tab where the bolt goes through to achieve a better match to the window shape. And note that the bolt must be retained using a nylock nut because the frame must pivot on that bolt as the pivot bracket rotates up and down. Note that the part of the frame where the pivot bracket tucks into has a "cam" shape that moves the arm of the pivot bracket inward as the top goes down. And as it moves inward the vertical part of the frame must pivot on that bolt.

See this earlier thread where I tried to explain to someone about the same problem you are having:
http://www.sunbeamalpine.org/forum/showthread.php?t=10497

It takes a good bit of messin' and cussin' and bendin'

But it CAN be fixed.

And then be very careful as you raise and lower the top or you will again bend the bolt tab on the pivot bracket.

Tom
 

artic cat

Donation Time
yes it is the same on both sides. I should say similar.
do you have that picture from the other side so I can see the shape of the bend. mine had been dissembled and painted before I got the car, they may have modified the bend.
thought I'd give a shout out just in case there was an accepted solution, I suppose fabrication (as usual) will be the answer. like you have suggested I will use heat (bigger hammer) and get the angle just right.

you are certainly right about bending, with the frame straight, and symmetrical and connected to the pivots all the way forward at the angle they are. the windshield pins are just about touching the dash. by the time you pull them to the height of the pin holes the pivot has slightly retracted causing a gap at the bottom of the side window and the pins are at least an inch from the pin holes at the windshield. if you force the pins forward and into the holes the frame stresses and bends, as a result the frame profile no longer matches the side window profile...

I sure would like to see a non modified frame and pivot, even a good parts diagram with the two in the same shot. the cd manule I got off of e-bay seems to be missing that section. it seems that SV manules and parts list are rare. if any body knows of a good one let me know.
 

mikephillips

Donation Time
I personally do it this way. Set the frame in place not quite against the window, since you need to allow for the weatherstrip about a 1/4 inch. Also not right on top of the B post cap, it need room to clear ot when folding, another 1/4 inch or so. With the frame in that position raise the pivot arms up against the frame. The ears on the arms need to lie flat against the frame and line up with the bolt hole, bend as necessary. Then install the top, or readjust the sides as necessary. I think the design intends for those pivot arms and ears to be bent to achieve a good fit. The problem is that with the years of use they get bent away from optimum position and the frame loosens up and won't hold tight, or as tight as a 60 convertible gets, against the window anymore. The real fix would be NOS pivot assemblies and top frame taking wear out of the equation.
 

Tom H

Platinum Level Sponsor
Mike , Good description of how to determine the right shape of the pivot arm and the "ear" (or "tab" as I call it).

But I am puzzled a bit by your last comment:
"The real fix would be NOS pivot assemblies and top frame taking wear out of the equation. "

Do you see any wear or misshaping of the top frame? My judgement is that 90% to 100% of the problem is in the pivot arm, especially the ear. And a NOS piece would only last until a few ups and downs of the top. I had this problem in 1966 with a 2 year old SIV. Better would be a slight modification to the original, to strengthen the arm. It seems strange that the ear apparently bends in a different plane than the last bend on the arm. The bolt and attachment to the frame seems to provide great leverage to this ear. Trying to unbend it, back to the original shape with vice and vice-grips, etc is a bear. I think I ended up temporarily bolting some steel bar to the ear to give me the same leverage to reshape it. And it is interesting to see the photos Kelly supplied, which seems to show that in addition to the ear getting bent, the main part of the arm also appears to get misshaped.

I think the real solution might be to a) get the arm to the proper shape and then b) weld some reinforcement to the arm to provide more of a "box" arm similar to the box shape of the vertical part of the frame.

Or do you think that the arm REQUIRES some flexibility for assembly even as new?

Tom
 

Tom H

Platinum Level Sponsor
Mike (and Steve). I thought about the frame a bit more and re-read Steve's msg. Yes, I think the frame also gets bent out of shape. I think I recall needing to rebend a bit the angle at the top rear corner of each window. So before you adjust and bend the pivot arm, first fully attach the frame to the windshield (with the frame not bolted to the pivot arm). Then adjust the vertical part of the frame so it matches the window, with the bottom setting just above the chrome B post, by maybe a 1/4 inch. Then reshape the pivot arm and its ear to mate cleanly to the frame and the pivot bolt.

Tom
 

mikephillips

Donation Time
Besides the fact that the pivot arm assembly gets bend by the force of putting the top up and down over time, I think the hinge pin for the window frame also wears out causing the horizontal and vertical parts running over and behind the door window to move apart more than intended. Admittedly the best solution would have been a better design, but that's not what we got and if your desire is to remain original then a best solution I think is completely unworn parts so that everything fits the way it was intended. Unlikely to happen I admit since I know of no source of NOS frames and pivot assemblies.
It wasn't a bad concept, having the sides basically spring out to go around the rear of the windows, yet not require a well that extended out too far into the fender. Just cheap or inexperienced execution on the part of Rootes.
 

Tom H

Platinum Level Sponsor
Mike,

i don't think any pivot pins get worn and loose. I think the problems at both joints is the result of bending. First the ear on the pivot bracket gets bent as a result of lifting the top out of the storage - with the vertical part of the frame providing so much leverage and the pivot bracket getting a bit stuck. That puts the frame joint at the bottom rear of the window into an angle it is not supposed to have. (resulting in the common misfit shown in Steve's photos). But then when the frame extensions are placed into the pins in the windscreen, this forces an additional bend in the frame at the top rear of the window, making the angle between the frame extensions and the verticals larger than it should. The fact that both joints (2 joints on each side) get bent makes it a bit confusing at first and it's not obvious what angle either joint should be. But I think neither bend would occur if the first one (at the pivot bracket ear) didn't happen. One of these days maybe I'll find an easy way to strengthen that pivot bracket ear.

Tom
 

bbonner

Donation Time
same problem

I have the same problem....both sides sit up away from the body 1-2 inches and the window does not fit closely to the top. The Driver's side where the bows attach to the back of the top is bent. I am surprised that you could bend this back. It does not look like it is something that would bend easily. I see there is a bolt or nut there. So I guess you remove that and bend the piece into place.....I was going to replace the whole frame?
 

kmathis

Donation Time
yes it is the same on both sides. I should say similar.
do you have that picture from the other side so I can see the shape of the bend. mine had been dissembled and painted before I got the car, they may have modified the bend.
thought I'd give a shout out just in case there was an accepted solution, I suppose fabrication (as usual) will be the answer. like you have suggested I will use heat (bigger hammer) and get the angle just right.

you are certainly right about bending, with the frame straight, and symmetrical and connected to the pivots all the way forward at the angle they are. the windshield pins are just about touching the dash. by the time you pull them to the height of the pin holes the pivot has slightly retracted causing a gap at the bottom of the side window and the pins are at least an inch from the pin holes at the windshield. if you force the pins forward and into the holes the frame stresses and bends, as a result the frame profile no longer matches the side window profile...

I sure would like to see a non modified frame and pivot, even a good parts diagram with the two in the same shot. the cd manule I got off of e-bay seems to be missing that section. it seems that SV manules and parts list are rare. if any body knows of a good one let me know.

I attached another picture of the pivot hinge that was bent out of shape, again the one on the left is the good one, however Tom is right about the tab that the bolt goes through, I had to bend that also in order to get the top to align with the window; and that actually made the biggest difference in the fit.

It was a little intimidating heating and bending without much guidance, but doing a little at a time, it worked out.

Kelly
 

artic cat

Donation Time
Thanks everyone for the input. I'll adjust the ears (tabs) for rear lower window gap forward and back, I'll adjust curve of pivot arm for height and inboard outboard gap to window, and be sure cam action is correct also for inboard outboard gap at window.

Thanks again
Steve
 

Tom H

Platinum Level Sponsor
Steve, I think you got it. But don't forget:
1) First step (on each side) is put the side rail pin into the windshield bracket and adjust the frame verticals so they match the back edge of the window. Bend the joint/pivot above the top rear of the window if necessary.
2) Be sure to use a lock nut on the bolt that connecet the pivot bracket to the frame vertical so it is tight yet free to pivot.

Bev, Replacing the frame would probably not help. Most likely any frame you get would likely have the same problem. I have several frames ( and pivot brackets) and for my car I chose the pieces that had the least rust and worked on the shape to get it right. The most difficult problem is getting that pivot arm and the tab on it right. I think I got it right without using heat, but by getting some leverage on it. Heat might be easier.

Tom
 

kmathis

Donation Time
Hi, Tom:
Thanks for the pointer about the lock nut on the bolt where pivot hinge meets the vertical frame, allowing that area to pivot as you lower and raise the top. I did'nt realize how important that is for a smoother operation and relieving the stress on the hinges and the frame.
Kelly
 

Tom H

Platinum Level Sponsor
Kelly, glad to share the info. I think I struggled with this issue for years until I went to do a major restoration and spent time looking , thinking , looking , trying etc, until the light bulb went off!

Tom
 
Top