• Welcome to the new SAOCA website. Already a member? Simply click Log In/Sign Up up and to the right and use your same username and password from the old site. If you've forgotten your password, please send an email to membership@sunbeamalpine.org for assistance.

    If you're new here, click Log In/Sign Up and enter your information. We'll approve your account as quickly as possible, typically in about 24 hours. If it takes longer, you were probably caught in our spam/scam filter.

    Enjoy.

Struggling with Timing

Beamin

Platinum Level Sponsor
It appears as if I've still got some bugs to work out before I can take my Alpine out on its maiden voyage. Current issue is with timing.

I followed the WSM to set the initial timing without the engine running. Upon startup, it was running rough, so I rotated the distributor clockwise until it idled a bit smother. Then, again following the procedures in the WSM for using a timing light, I found that it appears as if I'm running somewhere in the neighborhood of 35-40 degrees BTDC. When I try to rotate the distributor back to where it should be (~11 degrees BTDC), it sputters and dies.

Is this an indication of a bad distributor?

Thanks again for all the help,
Andy
 

Nickodell

Donation Time
Sounds like you may have the inductive pickup for the timing light on the wrong plug. It should be on #1 (nearest the radiator).

In any event, I prefer to use a vacuum gauge rather than a timing light.
 

Eleven

Platinum Level Sponsor
Sounds like you may have the inductive pickup for the timing light on the wrong plug. It should be on #1 (nearest the radiator).

In any event, I prefer to use a vacuum gauge rather than a timing light.

Nick,
How does a vacuue gauge work for this? I've never heard of that technique.
 

Beamin

Platinum Level Sponsor
Sounds like you may have the inductive pickup for the timing light on the wrong plug. It should be on #1 (nearest the radiator).

In any event, I prefer to use a vacuum gauge rather than a timing light.

I thought that too, but I've got it hooked up to the #1 wire.

I installed one of the new balancers from SS. The timing markings are not the same as an original balancer (there are more on the new one), but I'm assuming they are still at 5 degrees per mark. Is that a correct assumption?

I tried the vacuum method too (must have read about that on one of your earlier posts that I researched...). The car runs best when pulling about 26 psi, but I can't ever really get the vacuum gauge to settle down much, so advancing the timing to the point of getting the fluctuations you talked about is really tough to tell.

Something else to throw out there. I've installed a new 32/36 Weber from SS. I have not done any adjusting to it yet, as I figured it would be basically set out of the box. Could the carb be out of whack enough that when at the correct timing, the car won't run properly, but at a super advanced timing, it will? If so, how does one establish a good starting point on the Weber?
 

Beamin

Platinum Level Sponsor
Great link! Thanks, Don!

I'll check the baseline carb settings, then try the timing again.
 

mikephillips

Donation Time
when you say the marks on the new balancer aren't the same, do they start in the same location relative to the keyway?? If not then you might try marking the rim with a bit of paint to replicate the original's markings and see if it times ok to them.
 

Nickodell

Donation Time
Nick, How does a vacuum gauge work for this? I've never heard of that technique.

Older engines can't always be tuned or adjusted using the original methods. Harmonic balancers can move, and with today's lower-octane fuels, it's harder to get your old engine to run efficiently without sacrificing performance. A vacuum gauge can help you get maximum performance from your engine, with its individual quirks, using today's fuels.

1. Connect a vacuum gauge to a vacuum source directly on the intake manifold (not a ported vacuum point on the carb.)

2. Disconnect the vac. line to the distributor advance port and plug it.

3. Loosen the bolt securing the distributor so you can turn it to adjust the timing.

4. Start the motor, let it warm up to normal operating temperature, and stabilize at normal hot idle (about 1000 rpm) using the idle speed screw (not the mixture screw).

5. While watching the vacuum gauge, slowly turn the distributor counterclockwise (advance timing) and look for a maximum reading on the gauge. For instance, if the reading on your gauge peaks at 18 inches of vacuum, that is the maximum for your engine. The normal range could be from a high of 20 inches to a low of 16 inches, depending on the internal condition of your motor. (Readings lower than 16 indicate problems). The reading will begin to fluctuate and finally drop when you advance beyond the optimum, so turn the distributor clockwise (retard timing) to go back to the peak, steady, reading.

6. If you are using 100-octane, or higher, fuel you can tighten the distributor knowing that you have the ideal advance for your engine, and the setting and power output the designers intended 50 years ago. (In my state you can use AVGAS [aviation piston-engine fuel] - which is 105-octane low lead - in cars registered as limited use, antique and classic). You may need to reduce the reading by 1-2 inches total depending on the fuel available in your local area to avoid detonation (pinging).

7. Now set your carb. idle mixture, using the same vacuum gauge and adjusting mixture strength for the highest vacuum reading.

8. Once you have achieved a satisfactory idle mixture, reduce the idle speed to your preference, then remove the vacuum gauge and reconnect the distributor vacuum advance.

Test drive your car and listen for any pinging under heavy acceleration. Additional retarding of the timing may be necessary if excessive pinging occurs, until you may hear a very slight ping under light acceleration, and none under heavy acceleration. Your engine is now optimally timed to run on your available fuel.
 

Beamin

Platinum Level Sponsor
when you say the marks on the new balancer aren't the same, do they start in the same location relative to the keyway?? If not then you might try marking the rim with a bit of paint to replicate the original's markings and see if it times ok to them.

Unfortuntely, the old balancer went the way of the trash heap quite a while ago. My believe that the marks are different is strictly from memory and what I is shown in the WSM. From what I can tell, there are simply more marks than on the new balancer. Doing some quick geometry, it appears as if they are spaced at 5 degrees per mark. Out of curiousity, where should the TDC mark be in relation to the keyway?

I'm at a complete loss on this one. The next thing I was going to chase down was the possibility that when installing the timing chain, I was one tooth off. I was extra careful when installing it, but who knows???? Would the engine run relatively smoothly if that were the case?

The WSM has a quick test to check for this based on when the No. 1 inlet valve opens up, but it is based on a stock cam. I'm running a KB grind from Delta. Does anyone know how the test parameters would be affected, if at all, by using a different camshaft?
 

64beam

Donation Time
The next thing I was going to chase down was the possibility that when installing the timing chain, I was one tooth off. I was extra careful when installing it, but who knows????

Hi Andy,

It may not be a bad idea to check the timing chain as I found out when I recently had my wife's car serviced recently. The mechanic found the timing was out by one tooth when changing the timing belt. Prior to this it was running fairly rough, but still drivable.
On another angle, could your problem be in the ignition system or is that all A1?

Regards, Robin.
 

Beamin

Platinum Level Sponsor
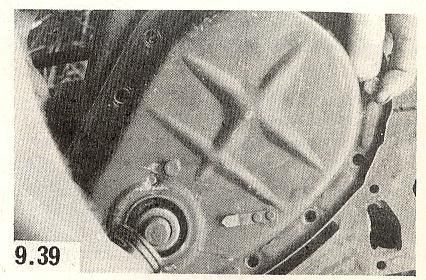
Think I may have finally figured this one out. I was starting the process of removing the timing cover to check for proper alignment of crank to cam when I noticed the timing pointer on my cover didn't look exactly like the one in the manual - seemed to be in a completely different location. Pulled the #1 plug and slowly rotated the engine while watching #1 piston and valves. Sure enough, using the TDC mark on my balancer, my pointer puts me at about 30 deg. out of whack.

Nothing that a few new marks painted onto the balancer can't fix. Luckly, I was only as far as removing the radiator and fan before I caught this.

Funny thing is, this timing cover did not look like it had been through any modifications. The motor is not an original Alpine...but it did come from a similar year Rootes group car. Were there subtle differences between makes/models?
 

husky drvr

Platinum Level Sponsor
Funny thing is, this timing cover did not look like it had been through any modifications. The motor is not an original Alpine...but it did come from a similar year Rootes group car. Were there subtle differences between makes/models?


Beamin,

Just a wild guess; I think your timing cover came off of a engine with an iron head. Possibly even a Hunter/Arrow range inclined engine.
 

Wombat

Donation Time
Beamin

This picture is from the Haynes "Sunbeam and Singer 1955 to 1965". I am guessing this is the timing pointer you have. The manual does not specifically state which cars used this, but just mentions "early" and "later" cars. Maybe this was used on the early iron head Rapiers??

TimingPointer.jpg
 
Top