• Welcome to the new SAOCA website. Already a member? Simply click Log In/Sign Up up and to the right and use your same username and password from the old site. If you've forgotten your password, please send an email to membership@sunbeamalpine.org for assistance.

    If you're new here, click Log In/Sign Up and enter your information. We'll approve your account as quickly as possible, typically in about 24 hours. If it takes longer, you were probably caught in our spam/scam filter.

    Enjoy.

Seat repair

jlupicki

Donation Time
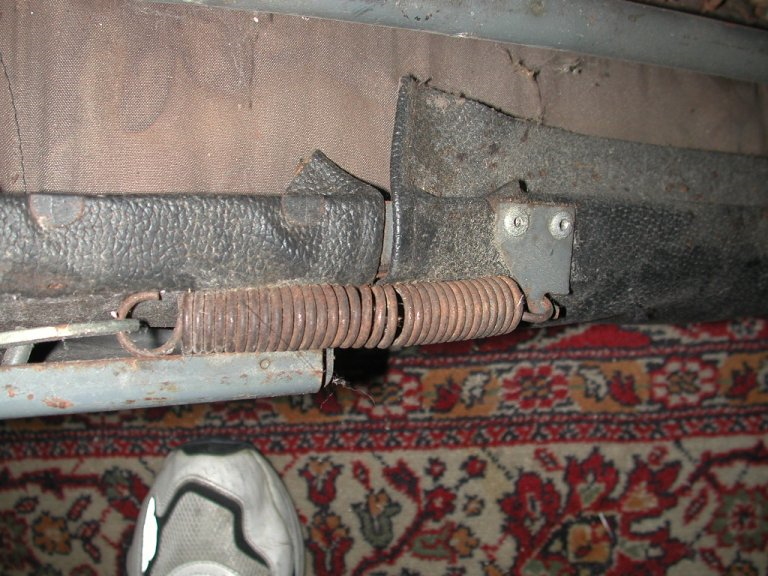
I am working on my SV seats. There are apparently many springs, linkages, pins, etc. missing. Neither seat back will stay in any position. I have looked all over the forum and the internet for pictures or drawings showing how these things are supposed to be assembled. I cannot find anything.

Does anyone have any pictures or drawings? Are any of these parts available anymore or will I have to fabricate these myself?

Any and all help is appreciated.
 

jlupicki

Donation Time
seat-hardware.png


What I really need is access to these parts and how they go.
 

Silver Creek Sunbeam

Gold Level Sponsor
upload_2020-6-15_21-59-2.jpeg
The items marked in red are the door side assembly and the ones marked in green are the inside. The screws are pretty easy to figure out as you assemble. I’ll try to upload some pics of my assembly tomorrow but it’s difficult to get good shots of them when they are installed.
I don’t know of anywhere that sales the pieces other than trying to dig around on eBay, unless someone on here can help you out.
 

jlupicki

Donation Time
View attachment 20112
The items marked in red are the door side assembly and the ones marked in green are the inside. The screws are pretty easy to figure out as you assemble. I’ll try to upload some pics of my assembly tomorrow but it’s difficult to get good shots of them when they are installed.
I don’t know of anywhere that sales the pieces other than trying to dig around on eBay, unless someone on here can help you out.

Thanks for looking at this for me. My seats are in quite a bit of disarray from years of Previous Owners trying to make due. My drivers side seat came from the passenger side and vice versa. I only have about 3 of the parts shown in that picture. I will have to source/make the rest of the parts somehow.
 

Silver Creek Sunbeam

Gold Level Sponsor
Thanks for looking at this for me. My seats are in quite a bit of disarray from years of Previous Owners trying to make due. My drivers side seat came from the passenger side and vice versa. I only have about 3 of the parts shown in that picture. I will have to source/make the rest of the parts somehow.
I’ll get what I can for pics or maybe a drawing tomorrow.
 

alpine_64

Donation Time
Thanks for looking at this for me. My seats are in quite a bit of disarray from years of Previous Owners trying to make due. My drivers side seat came from the passenger side and vice versa. I only have about 3 of the parts shown in that picture. I will have to source/make the rest of the parts somehow.

If the seats were bodged together are there cracks at the points where they pivot on the frames at the bottom of the rear squabs. They get leaned on.. twisted by people sitting in them ...

It might be a better option (and easier) to buy a pair of core seats to rebuild. I'd try speaking to 65sunbeam (Eric) or jaars (Robert) to see if they have some donor cores to sell.
 

junkman

Gold Level Sponsor
You are missing 1 important piece, it looks like a triangle with teeth along the bottom edge. it holds the seat in place when you depress the lever. I have these if you can't find yours. 781 829 O55O m-f 8-5 EDT. Jeff
 

Jimjordan2

Donation Time
This geared plate is the triangular piece Junkman mentioned. Pretty hefty, maybe 3/16 inch. Bolts to the back frame. Once the back is tilted to the desired position, the side handle has a matching gear and locks the back when you push the handle down. I'm sure someone will post a photo of the
piece unassembled.
The seat handle, especially on the passenger side gets used often, as when you want to tip up the seat for rear access, you would normally put the seat back flat. Anyway the handle was starting to wear my seat, so just took a nylon hose and split it. No more worn seats.
Also note there's a sheet metal backing plate that isn't in the photo you submitted.

seat 8.jpg seat 9.jpg seat 7.jpg

The seat handle was starting to wear my seat, so just took a nylon hose and split it. No more worn seats.
 

hartmandm

Moderator
Diamond Level Sponsor
I'm learning a bunch about seats lately. I think this thread solved a couple of mysteries for me - 1. what are these parts for in my collection; 2. why do I have to manually lock the seat back adjustment lever back into place when I make an adjustment.

upload_2020-6-16_22-28-14.png

Thanks,
Mike
 

jlupicki

Donation Time
This geared plate is the triangular piece Junkman mentioned. Pretty hefty, maybe 3/16 inch. Bolts to the back frame. Once the back is tilted to the desired position, the side handle has a matching gear and locks the back when you push the handle down. I'm sure someone will post a photo of the
piece unassembled.
The seat handle, especially on the passenger side gets used often, as when you want to tip up the seat for rear access, you would normally put the seat back flat. Anyway the handle was starting to wear my seat, so just took a nylon hose and split it. No more worn seats.
Also note there's a sheet metal backing plate that isn't in the photo you submitted.

View attachment 20122 View attachment 20123 View attachment 20124

The seat handle was starting to wear my seat, so just took a nylon hose and split it. No more worn seats.
Thanks for sharing those images. I hope to one day have seats that look that good.
 
Top