• Welcome to the new SAOCA website. Already a member? Simply click Log In/Sign Up up and to the right and use your same username and password from the old site. If you've forgotten your password, please send an email to membership@sunbeamalpine.org for assistance.

    If you're new here, click Log In/Sign Up and enter your information. We'll approve your account as quickly as possible, typically in about 24 hours. If it takes longer, you were probably caught in our spam/scam filter.

    Enjoy.

Project Sunbeam 3/18/09

afssanders

Donation Time
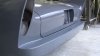
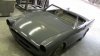
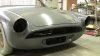
I finished the mud work about 2 or 3 weeks ago. I sealed it in Valspar's VP-50 series epoxy primer. It was laid down over the bare metal and mud work. I also sprayed and blocked out the Evercoat's SlickSand I put on. The VP-50 was blocked with 80 grit. The SlickSand was blocked with 120. I primered it again last night(3/17/09) with Valspar's HS-35 I'll be blocking this stuff out with 120 grit until all the lows are filled I will keep blocking with 120. The car will sit for awhile as this stuff cures. Patients is key here. I probably still have 3 weeks of work before paint. I might climb into the engine compartment and mud that up a bit while waiting.
I have made some short vids of the progress, but haven't spent the time to load them.

Later guys.
 

Trevor72bronco

Donation Time
Can Rage Gold be applied on a vehcile after the epoxy primer, or does all the bondo need to be applied before sealing the car? Thanks
 

afssanders

Donation Time
Mudski over primer.

I have put mud over Valspar's VP-50 series and PPG's DP series epoxy primers. Back in the day when only PPG made epoxy primer. They said it would stick to their primer better then bare metal. I did some testing and they were right. After PPG took the lead out of their primer is just wasn't the same.

In my experience if the solvents in the mud don't melt your primer or paint. You won't have any problems. I do test just about everything I do before going forward and discovering it later.

Here a link to the work I have been up to. Go to the last page for the most up to date work.


http://gallery.me.com/mnwheelers#100348
 

64beam

Donation Time
Hi John,

As Chuck said, you have been hard at work as usual. What an outstanding job on the body and paint preparation. I can't wait to see how the top coats end up. On a side note, what happened to your windscreen (looked like it was cracked)?

Regards, Robin.
 

afssanders

Donation Time
Windshield

The windshields that came with the cars are in my shed. The 88 Audi windshield that I cut down was removed and put in the corner after the metal work was done. I guess I could of put it in place for the pictures.
 

Rodewaryer

Donation Time
Good to see an update, good pics too.

Mudding and blocking right over the seams. Never seen that done before but likely had advantages in getting the surfaces perfect.

I'm not surprised at the comments on the fingers, this has to be taking it's toll on you.

Kudos again on another huge step toward the end.
 

Chuck Ingram

Donation Time
Thanks. My finger tips are wore thin. I think I could crack a safe.
It took me many years of thin finger tips but I now wear gloves for sanding.For rough sanding I use the canvas work gloves.They are cheap as we buy them for 11.99 a dozen.
Otherwise I will use the laytex gloves.In the very end I may or may not use the bare fingers as yes you seem to have better control.
How many hundreds of times I had my fingers wrapped with masking tape over the last 50 years.I was a painter that specialized in wood work.You know stain and finish etc.The fancier the better.I quit quoting a long time a go.It was some monies up front and the rest when I finished and billed the customer.
 

afssanders

Donation Time
seams

I welded the seams first. It is not a good idea to mud over seams that have not been welded up tight. The mud will likely crack if you do.

Good to see an update, good pics too.

Mudding and blocking right over the seams. Never seen that done before but likely had advantages in getting the surfaces perfect.

I'm not surprised at the comments on the fingers, this has to be taking it's toll on you.

Kudos again on another huge step toward the end.
 

afssanders

Donation Time
Sunbeam progress

I sanded on that roach all day. I sanded it all day yesterday too. I have a little more and it's time to primer again. After that I'm going to be taking the panels off the car and finishing the back side and inners.
To stick with my dead line I pretty much have to paint it right around the first of the month or at least get going on the dash. I like to throw different ideas around in my head while doing other stuff, so I'm close to getting the dash ideas worked out. That's how I get stuff done so quick.

I'll take some pictures here shortly. Possibly tomorrow night
 

66Tiger

Donation Time
Car looks great!

I am trying to remember...do you have a color picked out?

Can't wait to see this finished.

Paul
 

Rodewaryer

Donation Time
I used the wrong term previously. I meant bonett, boot and door panel gaps, not seams. I've never seen bodywork done that way and I imagine it could be a more common practice than I had guessed. That shot you took looking down the side of the car looks as good as it gets. Nice.
 

afssanders

Donation Time
Color

I have not picked it out yet, but I have two in mind. One is a greenish gold candy and the other is cobalt blue. Either color will look good, but I'm leaning toward the green one.

Car looks great!

I am trying to remember...do you have a color picked out?

Can't wait to see this finished.

Paul
 

afssanders

Donation Time
panel gaps

I do that when I would like the car to reflect images down the whole length of the car. It's a pain, but probably the best way to have the effect I'm looking for. A guy spends more time fitting when doing this, so the panel edges aren't a half inch thick. Thank you. It's getting close to the way I want it. Actually that's not true. I would like it to be straighter, but the way the car was designs it wouldn't be possible unless I build the crap out of the lower parts of the doors, rockers, and quarters. I'm not going to put mud on like that, so I'm going to have to live will it.. The doors are a little funny on these cars. The tops have a pretty good curve, but then toward to the bottom they flatten out.

I used the wrong term previously. I meant bonett, boot and door panel gaps, not seams. I've never seen bodywork done that way and I imagine it could be a more common practice than I had guessed. That shot you took looking down the side of the car looks as good as it gets. Nice.
 

Rodewaryer

Donation Time
Pretty good explanation and what I figured.

BTW my votes for blue but would have to see this green you're talking about. I've been a car freak for a lot of years and have found one interesting tidbit on colors, in my opinion it seems the easiest color to screw up or that just doesn't work is green. Could just be me (and I have a green Alpine!) but seems the case quite often.
 

afssanders

Donation Time
Progress

I really don't like cleaning under the hood. Hell. I don't even like opening the hood, but I figure it might be easier to power spray it down if it's all butter up and smooth under there.

Guys I have to pick a color out here soon. I'm about two weeks away from shooting this roach bag. One if I went balls out. My gaps are tight, so Kandy is out. I'm probably going to have to go with a KBC or PBC (candy base coat or pearl base coat)
I use House of Kolor brand for the color and clear and Valspar brand primers. For a number of reasons. One it's not expensive, two it's not hard to spray. The colors they have are of the finest ores and minerals. It doesn't fade and sands nice too. It's good stuff. If you've never tried it you should.
You know the nice thing about small cars is you can go crazy on the color. You can paint them colors you would never(Iwouldnever) paint a big car.

Here's the link go to the last page for the most up to date images.
http://gallery.me.com/mnwheelers#100348
 

afssanders

Donation Time
Mud work finished

Here's a short 3 minute something vid I took the night I finished the mud work up. I think you guys will know why the car looks like it does when you see this.
I have a couple of these that were never posted. I'll get to them slowly, but surely. I'm watching the kids this evening, so I had a bit of time to kill.


http://gallery.me.com/mnwheelers/100464
 

Attachments

  • IMG_1258_2.jpg
    IMG_1258_2.jpg
    13.4 KB · Views: 40
  • IMG_1255_2.jpg
    IMG_1255_2.jpg
    16.1 KB · Views: 42
  • IMG_1253_2.jpg
    IMG_1253_2.jpg
    16.9 KB · Views: 37
Top