• Welcome to the new SAOCA website. Already a member? Simply click Log In/Sign Up up and to the right and use your same username and password from the old site. If you've forgotten your password, please send an email to membership@sunbeamalpine.org for assistance.

    If you're new here, click Log In/Sign Up and enter your information. We'll approve your account as quickly as possible, typically in about 24 hours. If it takes longer, you were probably caught in our spam/scam filter.

    Enjoy.

Photos of your V6 conversion exhaust system

beijing_ken

Donation Time
Hi All,

If you have photos of the underside of your car, showing the exhaust system for a V6 conversion from the collectors back, that would be appreciated.

I am mostly interested in where the exhaust pipes have hangers and where the mufflers are situated. I understand that the pipes go below the body of the car( not through the opening in the frame and not to cut a new opening) and below the axle housing on the differential. Do most of you have the pipes hanging 2" below the axle housing ?

Any other tips and insights, along with the photos will be a bonus.

Thanks,

Ken

PS - this is my third summer(I am away in China for most of the year) working on my project, and I hope to drive it next summer ! :)
 

miket

Donation Time
Ken,

I cut a second hole opposite the original Alpine pass thru. (not fun).

I bought almost every bend (of exhaust tubing) that Canadian Tire sells. Lots of trial and error but it's a descent job.

Mike (In Montreal)
 

mferris

Donation Time
I, too, cut (actually burned through with a oxy-propane torch) a second pass-through in the X-frame on the passenger side, this required cutting through both the front and rear sections of the X-frame on the passenger side (close to the center X, and then I reinforced the holes with a single piece of 3" exhaust tubing in which the actual exhaust tube passes.

I then routed both sides of the exhaust to a crossover, then back over the axles (where I had some small mufflers placed), then straight back to another pair of mufflers since the first were way too loud (for me).

Now if only I had the energy to get to the cosmetics of the car and actually finish it someday (unlikely) so I'll probably be selling this soon.

Best picture I have access to only shows the front from the headers to the bend going back up to the X-frame passthrus (original one and the one I cut)

https://goo.gl/photos/cb57nF1Lg2x8GSey8

This is mostly an art, including where to place hangers.
 

Alpine 1789

SAOCA President
Diamond Level Sponsor
There is a much easier, and I believe better, way to cut the exhaust pass through. It was posted here almost 10 years ago by Jeff Scoville, who isn't active on the forum any longer. Here is what Jeff wrote at the time, slightly edited because of context:

A good quality (Greenlee) holesaw will work to cut the passthrough.
As a bit of advice, what I do when trying to run a holesaw through on an angle (which is what you'll need to do) rather than cutting a hole through each side, then ovaling them out and hoping your in the ballpark, what I have done is get a good quality spotter bit that fits your mandrel.
The spotter bits are usually about 12" long. You center the bit to where you want your exhaust to run through and the drill bit should have enough length to go through both sides of the X-brace. Now here's where you need patience, just let the holesaw SLOWLY chew it's way through, it will want to bind if you don't go REAL slow.
You can run it through all the way from one side, or once you've cut one side go at it from the other side so as to keep an eye on the holesaw bit.
Lastly (i'm out of breath) if you chose a holesaw to fit a given pipe dia. larger than what your exhaust will be, you can run a piece thru and let the bodyshop weld and trim it giving you a nice "factory" looking hole.
Whew.
Hope that wasn't too much info, just trying to be clear.
Have fun!

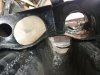
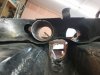
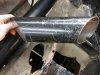
I did it this way and it worked extremely well. It was a PITA because I probably didn't go slow enough and the saw frequently did bind and the drill kicked back, breaking the drill bit. Still, it left me with a pretty clean hole through the cross member that looked pretty stock and was a breeze to fill in with the exhaust pipe for the "nice "factory" looking hole" that Jeff promised.

I do have a couple of suggestions to add to what Jeff gave me. First, the 12" bits bits are expensive and I went through two of them before it suddenly hit me that once the hole was drilled I was only using the bit as a guide for the saw. So, I switched to 1/4 rod which worked great. I bent a few of them along the way, but at about 50 cents each it was no big deal. It is also easier to drill the initial 'pilot' hole without the hole saw attached to the drill. Just use the long bit to drill all the way through both sides, then use the rod in the hole saw to keep the saw aligned.

Second, use the best, deepest hole saw you can get. Cutting at an angle causes the saw to bottom out pretty easily and I had to do a lot of ancillary cutting and grinding to get all the way through. Besides being difficult - and I did this on my back with the car on jackstands - the final cut wasn't as clean as I would have liked and it took some real effort to make it look professional. I think a deeper saw would have made a difference and, if I had it to do over, I would have bought the best quality one I could find, rather than the standard Home Depot saw I used.

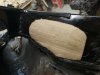
Finally, you might want to consider using 3" conduit, if you can get it, rather than 3" exhaust pipe. I recommend this for two reasons. First, I think it is a little heavier gauge then the exhaust. Second, it is a little larger - 3.25" which will help when routing the exhaust. I only happened on this by accident because there was an electrical crew working in my office at the time I was doing this and I had one of the electricians cut me a piece of 3" conduit. I didn't know that it was larger until I got it home, but since I'd already cut the 3" hole, I had to scrap it and buy a piece of exhaust pipe. I'd definitely go with the conduit if I ever do this again, but be sure to buy the conduit first so that you can match it's OD to the hole saw.

As Jeff said, Have Fun!
 

Dan Moore

Donation Time
Hi Ken
I used a piece of sch 10 pipe I would not use conduit as it is made of a poor grade of steel and doesn't weld all that great . Have welded both and conduit is a britle weld
 

DanR

Diamond Level Sponsor
I used heavy gauge exhaust tubing

I made a pattern from card board of the original exhaust hole..... scribe it on the opposite side.

Used my Plasma cutter for cutting a neat hole.

Next I cut the heavy gauge exhaust tubing to fit the new hole (the angles are slightly different on the front side vs the rear).

Fitted carefully, trimming any excess, "tacked" in place, then continued to weld each end and work under the exposed area of the "x" frame. Extra attention to this area because it can add a bit of extra strength for the car.

Of course you will notice My car is on a rotisserrie..... making all those most difficult problems on lying on your back unde the car easier to accomplish. Rotisserie Plans are available, just Email me your Email address.

DanR
 

Attachments

  • 20160131_160456 (320x240).jpg
    20160131_160456 (320x240).jpg
    97.1 KB · Views: 91
  • 20160131_160558 (320x240).jpg
    20160131_160558 (320x240).jpg
    86.2 KB · Views: 84
  • 20160131_172855 (320x240).jpg
    20160131_172855 (320x240).jpg
    91.4 KB · Views: 89
  • 20160131_173155 (320x240) (300x225).jpg
    20160131_173155 (320x240) (300x225).jpg
    71.4 KB · Views: 82
Last edited:
Top