• Welcome to the new SAOCA website. Already a member? Simply click Log In/Sign Up up and to the right and use your same username and password from the old site. If you've forgotten your password, please send an email to membership@sunbeamalpine.org for assistance.

    If you're new here, click Log In/Sign Up and enter your information. We'll approve your account as quickly as possible, typically in about 24 hours. If it takes longer, you were probably caught in our spam/scam filter.

    Enjoy.

Interior question

Acollin

Donation Time
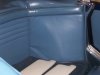
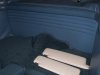
Can someone please send to me or post pictures of what factory interior -- specifically the area ( vertical curved area ) just behind the seats in a 1966 series V.

I have seen many pictures of choices people make, but I would like to see the actual factory look.

Thanks
Andrew
 

65beam

Donation Time
interior

here are photos of a correct interior done by Pro Prep in California.
 

Attachments

  • 109_0380.JPG
    109_0380.JPG
    86.8 KB · Views: 106
  • 109_0382.JPG
    109_0382.JPG
    90.1 KB · Views: 83

Acollin

Donation Time
Thanks for the pictures. They are helpful, but I was hoping for pictures of original factory. One wonders if that sort of stuff is still out there. I suppose possibly in a brochure or if one of you owns a "time capsule".

My reason for being so fussy, Is that I know all the pieces behind the original equipment look, but it is hard to patch my bits and pieces together in a way that makes sense.
I was hoping, I could get a better understanding of what the factory intended with all the bits I have assembled. With the restoration, it is impossible to know how they achieved their "look" because the shop had its own methods and materials. I would guess they used more modern materials.

Still hoping for a view of the factory original.

Thanks all
 

ALC 68A

Donation Time
I would point out that 65beam's picture is a GT interior - an ST is different and the ST's differ depending on the series - I think I/II are the same; III/IV are the same and V is different again. Which series do you have?

That being said, the inner quarter panels on an ST were just trimmed in vinyl of a material and colour to match the seats - a piece moulded over the curve of the wheel arch and a flat panel like an upside down L shape between the wheel arch and the door pillar. If it's a I/II or a III/IV the soft top bin covers have matching trims as well. GTs have a one piece trim each side and on the rear panel with flutes matching the door cards.

Steve (ALC 68A)
 

alpine_64

Donation Time
I would point out that 65beam's picture is a GT interior - an ST is different and the ST's differ depending on the series - I think I/II are the same; III/IV are the same and V is different again. Which series do you have?
Steve (ALC 68A)

Actually those pictures appear to be the normal series V rear seat trim setup. Maybe the ribs on the rear diff top panel are throwing you s little, but that's how all sV and mkia and mkii tigers were
 

65beam

Donation Time
interior

this interior was done by Martha at Pro Prep in California. It matches the way the original panels were made. the pleats are also heat welded and not sewn. one extra thing she did was to make the soft top boot cover the same color as the interior instead of the usual black. As a side note there were no series 5 Alpine GT's sold in the U.S. Any that are here were brought in by the owners.
 

Acollin

Donation Time
I hope I did not start a feud.

I wanted to see an original set up because I do know exactly how the restoration pictured was achieved. Do we really know how foam-- boards-- glue--clips were done when all that restoration was completed? We know the look,yes, but I am trying to understand how it was constructed.

I was hoping that if I could see an original, I might be able to make sense of the bits I disassembled from my own 1966 series V. I have scraps of thin board, foam, two part clips-- glue stains, but only a vague understanding of how what went where.

Please do not think for a minute that I am being critical of what you posted-- anyone-- . I am simply trying to understand my own task as I see it.

Thanks all-- Still hoping for a glimpse of a time capsule !!!!
 

65beam

Donation Time
interior

I know how it was installed because the wife and I installed everything. we've done several of our alpines using these kits. the rear panels were ready to install when it arrived. you should install the top boot first. the side panels are glued to the body prior to installing the center panel. the excess material is glued to the body behind where the back panel sets and also pulled around and glued to the B post area . this eliminates seeing any of the painted body. the back panel has clips like the ones used for the door panels. the padded roll around the top of the rear panel has clips that set down in the slots in the body panel and the end at each door is pulled around and secured by a rivet. we glued this down also. then the B post cap goes over that. we have glued the entire padded roll but it tends to come loose around the back panel when out in the heat of the sun. the seats take some time. we glue and rivet the cardboard to the seat frame. we also secure the seams of the bottom seat cover to get a high definition of the center section.
 

P. Scofield

Bronze Level Sponsor
That's as close as you're going to get to original factory. As far as what it looks like behind, that's really not going to help you, unless you are looking to make your own kit. The replacement kits from ProPrep use the same methods and clips as factory. Single layers are glued like factory. I think you're making it too complicated for yourself.
I don't think you're going to find any pictures of what things look like behind the layers unless it's in pieces like yours. If you are looking to reproduce yourself, you will need to find someone that has a kit ready to install so you can take a gander at it.

Thanks for the pictures. They are helpful, but I was hoping for pictures of original factory. One wonders if that sort of stuff is still out there. I suppose possibly in a brochure or if one of you owns a "time capsule".

My reason for being so fussy, Is that I know all the pieces behind the original equipment look, but it is hard to patch my bits and pieces together in a way that makes sense.
I was hoping, I could get a better understanding of what the factory intended with all the bits I have assembled. With the restoration, it is impossible to know how they achieved their "look" because the shop had its own methods and materials. I would guess they used more modern materials.

Still hoping for a view of the factory original.

Thanks all
 
Top