• Welcome to the new SAOCA website. Already a member? Simply click Log In/Sign Up up and to the right and use your same username and password from the old site. If you've forgotten your password, please send an email to membership@sunbeamalpine.org for assistance.

    If you're new here, click Log In/Sign Up and enter your information. We'll approve your account as quickly as possible, typically in about 24 hours. If it takes longer, you were probably caught in our spam/scam filter.

    Enjoy.

Heater Control Valve Repair

jumpinjan

Bronze Level Sponsor
I started on making a new valve last week, and I got it together this afternoon. I used SolidWorks to help me visualize the parts to make. Using O-rings is the way to go. The housing is made from brass tubing & brass bar and silver-soldered together.
(Please don't ask me to sell one, I don't have the time right now)
Jan
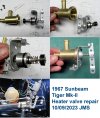
heater_valve_repair copy.jpg
 

puff4

Platinum Level Sponsor
Well done! Looks pretty easy to make with a decent lathe. Will you be sharing the CAD files or a measured drawing?
 

Aladin Sane

Diamond Level Sponsor
Nice work. I understand the amount of work it would require to produce these would make it hard to sell at a reasonable price for the small market it would fill. Nice that you have the skills to make the one you need.
 

jumpinjan

Bronze Level Sponsor
I just don't have the time to give details or make & sell them right now, if at all. Sorry, too many things going on. This was a priority to get the Tiger running again.
Jan
 

PROCRAFT

Donation Time
I started on making a new valve last week, and I got it together this afternoon. I used SolidWorks to help me visualize the parts to make. Using O-rings is the way to go. The housing is made from brass tubing & brass bar and silver-soldered together.
(Please don't ask me to sell one, I don't have the time right now)
Jan
View attachment 30072
 

rixter

Gold Level Sponsor
Nice !
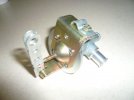
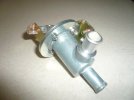
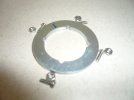
There are at least two issues with these valves.. they separate at the side tube fitting or the end with the plunger pops off. Further, they are not practically internally serviceable due to the plunger end mounting method. Jan's solution appears to address both. I also fabricated a revised plunger end to address my pop off issue and in turn, and in theory, provided for serviceable internals. I ground off the four cast tabs holding the end plate on, then altered three washers to accept small screws with nuts. Alas, I've not been able to obtain original internal parts. For now, it works. May have to adopt Jan's internal scheme at some point.

Rick
P1130489r.jpgP1130490r.jpgP1130492r.jpg
 

jumpinjan

Bronze Level Sponsor
Yes, a couple of problems using the original aluminum housing is: 1) the rear flange (not large enough in diameter for even 2-56 screw holes) and 2) the internal bore is tapered (this is normal for die-cast aluminum parts). That tapered bore needs to be bored (to use in my solution) and as well as a clean-up of the corrosion pitting. So I decided not to go down that path, and make a new housing from brass metal.
Jan
 

alpine_64

Donation Time
Yes, a couple of problems using the original aluminum housing is: 1) the rear flange (not large enough in diameter for even 2-56 screw holes) and 2) the internal bore is tapered (this is normal for die-cast aluminum parts). That tapered bore needs to be bored (to use in my solution) and as well as a clean-up of the corrosion pitting. So I decided not to go down that path, and make a new housing from brass metal.
Jan
Jan.... Deep down inside you.... you know you want to make these for all of us ....... ;)
 
Top