GlennB
Silver Level Sponsor
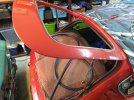
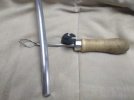
For info I have just replaced the rubber seal on my HLM. I bought 3m of seal and chrome finisher from Ebay: https://www.ebay.co.uk/itm/224831827131 - I also bought a spreader tool: https://www.ebay.co.uk/itm/122535510962 - but this needed to be squeezed to the right width and also opened a bit at the rear to allow the finisher strip to slide through it.
The seal was fitted first, pushed firmly into place all round, especially the corners, and then cut with a small overlap and forced in to make a good join. (I have seen an example where the join separated once the screen was installed.) The gap was lubricated with some Fairy Liquid (UK dish washing up soap). The screen was put into place sitting in as much of the lower channel as possible, then inserted by using cord all round the inside of the channel and then pushing the screen down as the cord was drawn out - this peals back the edge of the seal over the glass. This worked for me 75% and I finished the job with a slim trim tool and a small screwdriver, teasing the seal over the glass mm by mm. Very satisfying as the window finally pops into place.
Getting the chrome/plastic finisher strip into the tightening gulley was super-difficult. (You start at the top centre - the seal join is at the bottom centre) The theory is that you spread the gap with the tool and push the strip into the gulley as you move the tool forward. This works OK for straight lengths but any relaxing of force or angle especially going round the corners results in a tendency for the tool to slip out. At this point you have to start all over again. It is super-difficult (impossible at corners but not impossible on straights) to go back and push down any lengths that are not properly seated. Generally it is easier to start over and try to concentrate harder on getting it right next time! My problem was that physical exhaustion required me to change hands regularly and at this point the tool would often slip, or I failed to keep pushing the strip down hard enough. After many attempts I learned what angle to use with the tool, plus a wiggling technique to keep the tool in the gulley while I moved along mm by mm. One particular corner was a nightmare but it eventually surrendered. I actually had a failed insertion close to this corner so I decided to force that bit into place manually afterwards rather than undo the corner!
Success meant I didn't need a 100 mile round trip to a specialist classic car window engineer. Last job was cleaning off all the Fairy Liquid residue - there was lots of it. If it rains I'll be leaving a trail of bubbles behind me for a year.
Summary: it is a do-able job for the average home mechanic like me. Just requires patience and perseverance.