
-
Welcome to the new SAOCA website. Already a member? Simply click Log In/Sign Up up and to the right and use your same username and password from the old site. If you've forgotten your password, please send an email to membership@sunbeamalpine.org for assistance.
If you're new here, click Log In/Sign Up and enter your information. We'll approve your account as quickly as possible, typically in about 24 hours. If it takes longer, you were probably caught in our spam/scam filter.
Enjoy.
You are using an out of date browser. It may not display this or other websites correctly.
You should upgrade or use an alternative browser.
You should upgrade or use an alternative browser.
Sunbeam 2000 build
- Thread starter belmateo
- Start date
Lookin' Good! ..... Are you using a full bumper in the rear? or maybe two bumperette's?
.... David
OR maybe none.
belmateo
Gold Level Sponsor
Don't know about a Tiger or why anyone would want to ruin the looks of a Tiger by doing it but to each his/her own. I have pic.s of a couple early series and it doesn't look half bad....Here's one ... I'll try and find the others .... Hope this loads correctly as I had to change the format.
..... David
..................................................... BINGO!
Yeah, not my cup of tea either
It just does not fit and not late sixties look that I am shooting for.
belmateo
Gold Level Sponsor
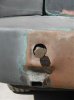
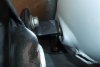
I found a shop in Pleasanton that will make my new door windows. Not cheap, so I opted to get a set made for the car and a spare set (just in case). Got some of the latches and supports welded in, routed hydraulic lines to get ready to seal up the trunk floor so the muffler can be installed. Will get some more sheet metal tomorrow for the trunk floor and build the deck lid. Had a bit of a slowdown last week due to Vertigo, Ugh!
belmateo
Gold Level Sponsor
Trunk floor is done! Exhaust is done!
Got pretty hot here today so didn't want to do much welding so I started laying out the wiring needed for the top along with the hydraulic pump. it is a good thing that wiring does not intimidate me LOL
Will get back on it tomorrow and either continue with the wiring or start on the trunk lid.
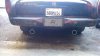
Update, the front bumper will fit with no modifications. Anybody have pictures of how the rear bumper mounts?
Got pretty hot here today so didn't want to do much welding so I started laying out the wiring needed for the top along with the hydraulic pump. it is a good thing that wiring does not intimidate me LOL
Will get back on it tomorrow and either continue with the wiring or start on the trunk lid.
Update, the front bumper will fit with no modifications. Anybody have pictures of how the rear bumper mounts?
belmateo
Gold Level Sponsor
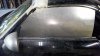
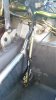
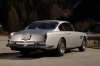
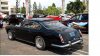
Here are some photos of what I have been doing. I had to make a template from sheet metal to give to the glass shop for the new windows that will be made. 6-8 weeks is the best they can do, they should be here before the rains start (fingers crossed). The space between the door and rear glass will be fitted with a roll bar. In the second pic you will see how congested the area is for the arm, gas filler, vents and some of the cables and wiring.Next picture is of the hydraulic ram installed in the new well. The rear shot is what everybody will see as I pass them by! She sounds so sweet in the upper rpm range. Red line on this motor is 9K stock rated at 240 horse using 91 octane fuel
Attachments

SoCal'beaming
Donation Time
Looking good ... Sure wished you were as good of a photographer as you seem to be a fabricator  ... What pic.s of the rear bumper mount do you need? .. the brackets. mounting points?
.... David
... What pic.s of the rear bumper mount do you need? .. the brackets. mounting points?.... David
belmateo
Gold Level Sponsor
Hey David.
Thanks for your words of encouragement.
I have no idea how the bumper mounts at all, so I need to know what the bracket looks like and what mounting points are used. On the rear clip that I am using I only see one hole on each side the the jack hole.
Thanks
Guy
Thanks for your words of encouragement.
I have no idea how the bumper mounts at all, so I need to know what the bracket looks like and what mounting points are used. On the rear clip that I am using I only see one hole on each side the the jack hole.
Thanks
Guy
SoCal'beaming
Donation Time
Here's some pic's of the mounting points and the bumper bracket. Hope this helps ....
..... David
*** Whoops ... those last two pic's may be the front brackets
..... David
*** Whoops ... those last two pic's may be the front brackets
Attachments

Last edited:
belmateo
Gold Level Sponsor
Thanks David!
That is what I needed to see how the factory did it. Seems rather flimsy with just two bolts holding it. Guess that means a solid bumper and have to make sure it does not cover the license plate enough to make it illegal.
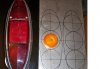
Did some more work on the wiring today and got everything eliminated that is not related to the top function. Also worked on the rear lights, factory lights are rare and pricey so I am looking at something like Ferrari used on the classic GTE250. Mine will have an incandescent bulb for the running light and six LED for Stop and Turn function. The backing will be polished Stainless Steel with a border around it.
That is what I needed to see how the factory did it. Seems rather flimsy with just two bolts holding it. Guess that means a solid bumper and have to make sure it does not cover the license plate enough to make it illegal.
Did some more work on the wiring today and got everything eliminated that is not related to the top function. Also worked on the rear lights, factory lights are rare and pricey so I am looking at something like Ferrari used on the classic GTE250. Mine will have an incandescent bulb for the running light and six LED for Stop and Turn function. The backing will be polished Stainless Steel with a border around it.
SoCal'beaming
Donation Time
Yep! ... Dans right .. the last two are the frt.s . There both hung in my garage so if ya' need 'em (pic.s) let me know! .... Not sure what you mean about the lights, changing them to a 250GTE? Photo? ... What is the deck/boot lid from? a kompressor.
....David
....David
Attachments
belmateo
Gold Level Sponsor
Here is a picture of the GTE250 Lights I am talking about. I was going for 1 red, 1 amber, and one clear but could not find a clear that I likes to match the others. So it will be two red and one amber. Starting out with a 3/16 sheet of Stainless steel, will need to cut it to the shape of the stock lights then drill the holes for the three lights and add the trim around it before being polished.
The donor car was a SLK230, I took the roof with all the works including the trunk. Now that the roof is done it is time to make a new trunk skin to fit the new opening because the shape and size of the SLK lid is only correct at the edge of the back window. That will be the only part to keep after I make new rain gutters along the sides.
Almost done with the wiring so it can be tested, once it passes, the top switch can be mounted permanenty.
Attachments
Jay Laifman
Donation Time
Look at the factory Sebring race cars. They had that style brake lights.