• Welcome to the new SAOCA website. Already a member? Simply click Log In/Sign Up up and to the right and use your same username and password from the old site. If you've forgotten your password, please send an email to membership@sunbeamalpine.org for assistance.

    If you're new here, click Log In/Sign Up and enter your information. We'll approve your account as quickly as possible, typically in about 24 hours. If it takes longer, you were probably caught in our spam/scam filter.

    Enjoy.

Rotisserie attachment question

rixter

Gold Level Sponsor
Hi,

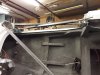
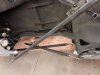
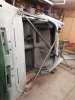
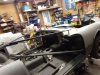
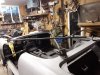
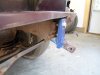
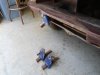
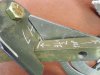
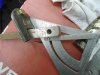
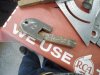
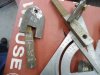
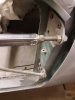
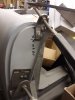
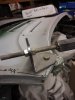
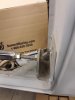
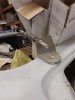
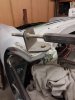
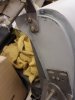
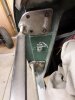
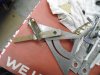
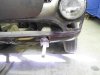
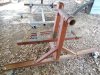
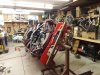
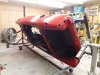
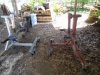
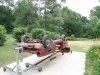
Thinking of getting a rotisserie to work on the bottom of my Alpine. I assume any model of rotisserie wouldn't be able to include attachment components to attach cleanly to every type of vehicle and thus some fabricating of such would be required. Can anyone who has used one tell me how you attached the rotisserie to the car with respect to having to get or make the interface parts and where on the front and rear of the car the attachments are made? Photos of the attachments would also be appreciated.
Thanks
Rick
 

jumpinjan

Bronze Level Sponsor
I built a framework that is bolted to the shock holes and the front cross member holes. In that way I can work on the front & rear ends without any obstructions. And it helps to keep the body straighter than mounting it at the extreme ends.
I'll look for a picture of it with a body in the frame.
Jan
 

jumpinjan

Bronze Level Sponsor
index.php


index.php
 
Last edited:

DanR

Diamond Level Sponsor
I made mine from plans I found on the WEB back in 2007-08.

The plans have been utilized by a lot of Guys since.

The picture of the bracket is what I utilized to "fit" in the jack holes.

Blue Boy is pictured in a partial roll over. Nice working position, various positions on sides, top up or bottom up, or even at 45 degree angles.

If you want the plans send me an E-mail
 

Attachments

  • Alpine to  rotisserrie brackets   DSC02766.JPG
    Alpine to rotisserrie brackets DSC02766.JPG
    325.4 KB · Views: 47
  • Blue Boy on rotisserrie.jpg
    Blue Boy on rotisserrie.jpg
    319.3 KB · Views: 46
  • 3819    1116.JPG
    3819 1116.JPG
    510.4 KB · Views: 46
  • Rotisserrie   1095.JPG
    Rotisserrie 1095.JPG
    965.5 KB · Views: 45
  • 0766 Red GT near bottoms up on rotisserrie         20210525_190715.jpg
    0766 Red GT near bottoms up on rotisserrie 20210525_190715.jpg
    513.3 KB · Views: 45
  • 0766 Red GT near bottoms up on rotisserrie         20210525_190620.jpg
    0766 Red GT near bottoms up on rotisserrie 20210525_190620.jpg
    418.4 KB · Views: 44
  • Rotisserie DSC01348.JPG
    Rotisserie DSC01348.JPG
    28.8 KB · Views: 44
  • DSC02929.JPG
    DSC02929.JPG
    182.6 KB · Views: 45

Alpine 1789

SAOCA President
Diamond Level Sponsor
I made one from two heavy duty engine stands and fab'd a crossbar with steel inserts that went into the jack holes and attached to the bumper bolts. All of the weight was taken up by the jack points; the bumper bolts just held the crossbar to the body. I used this article for some inspiration (http://www.tigersunited.com/techtips/MenkeRotis/rt-MenkeRotis1.asp) along with one or two others on using engine stands. While I built it for my S3, the only time it was ever used was on my Tiger project with Mototron. Someone - not even a Sunbeam owner - just offered me $500 for it, which I took as quickly as possible before he changed his mind.

IMG_2606.jpeg
 

rixter

Gold Level Sponsor
I made mine from plans I found on the WEB back in 2007-08.

The plans have been utilized by a lot of Guys since.

The picture of the bracket is what I utilized to "fit" in the jack holes.

Blue Boy is pictured in a partial roll over. Nice working position, various positions on sides, top up or bottom up, or even at 45 degree angles.

If you want the plans send me an E-mail
Dan,
I won't be much for taking on making a rotisserie, but it looks like you answered my question about the connection to the car. You fabricated a part that attaches to the bumper mounts and that plugs into the square part on the rotisserie? You answered another question I forgot to ask and that is about rotating a car with the wheels on. Our cars are light enough that weight probably isn't an issue, but I wondered why I always just see fully stripped cars on rotisseries. That is probably just the nature of a car's condition or restoration stage when one takes on flipping it over to work on it.

Thank you
Rick
 

rixter

Gold Level Sponsor
I made one from two heavy duty engine stands and fab'd a crossbar with steel inserts that went into the jack holes and attached to the bumper bolts. All of the weight was taken up by the jack points; the bumper bolts just held the crossbar to the body. I used this article for some inspiration (http://www.tigersunited.com/techtips/MenkeRotis/rt-MenkeRotis1.asp) along with one or two others on using engine stands. While I built it for my S3, the only time it was ever used was on my Tiger project with Mototron. Someone - not even a Sunbeam owner - just offered me $500 for it, which I took as quickly as possible before he changed his mind.

View attachment 27711
Jim,
Thanks. This is interesting. Wouldn't the weight load be somewhat distributed between the bumper mounts and the jacking points using this method? And I guess any rotisserie without hydraulic rams implemented means you're having to get the car lifted up to the rotisserie mounts and there are no fine-tuning of balance features?
Rick
 

DanR

Diamond Level Sponsor
Rick, I built mine heavy enough to do a small Pickup and the 63 Volvo P1800.

I have done several with complete engines and running gear on mine. It is strong enough anad easily rotated "if" you figure the balance points:)
 

Alpine 1789

SAOCA President
Diamond Level Sponsor
Wouldn't the weight load be somewhat distributed between the bumper mounts and the jacking points using this method?
It would probably take an engineer to answer that question (fortunately, we have several here) but my feeling was that the jacking points took nearly 100% of the weight. I hope so, as the bumper mounting points are very weak.
And I guess any rotisserie without hydraulic rams implemented means you're having to get the car lifted up to the rotisserie mounts and there are no fine-tuning of balance features?
Yes on both points. I don't remember exactly how we got the car up on the lift. I'll see if Rocco remembers. I do know that everything was very well balanced and I could roll the car over on my own. And, to your question to Dan, I felt much more comfortable doing all of this with just a bare shell. I assume the rotisserie was strong enough to handle the added weight of the drivetrain, but I doubt I could have moved it around alone and wouldn't have trusted it that way, just to be safe.
 

rixter

Gold Level Sponsor
Dan,

OK, I am getting your photo now with the fabricated mount and the protractor. The receptacle for the jack is at an upward angle compared to the bumper bolt mount which is near or horizontal to the ground. I didn't realize that pronounced angle until I just went out and looked at my car.

Thank you
Rick
 

rixter

Gold Level Sponsor
It would probably take an engineer to answer that question (fortunately, we have several here) but my feeling was that the jacking points took nearly 100% of the weight. I hope so, as the bumper mounting points are very weak.

Yes on both points. I don't remember exactly how we got the car up on the lift. I'll see if Rocco remembers. I do know that everything was very well balanced and I could roll the car over on my own. And, to your question to Dan, I felt much more comfortable doing all of this with just a bare shell. I assume the rotisserie was strong enough to handle the added weight of the drivetrain, but I doubt I could have moved it around alone and wouldn't have trusted it that way, just to be safe.

Jim,
Looks like the bumper bolt connection is just to keep the tongue piece going into the end of the jacking point is to keep it from popping out and not so much as a weight bearing point.

I'll make sure nobody is under the inverted car when the engine fluids come running out. Ha ha.. kidding. The engine would be removed. I'll look into any other disadvantages of leaving the other stuff on.

Thanks
Rick
 

DanR

Diamond Level Sponsor
Rick, Some words of caution....Beware the Alpine can have some very weak points when using the rotisserie.

The bumper mount positions "can" be very deceiving with unseen rust which can cause them to give way under a load
such as when placing the Alpine on a rotisserie.

I have a PIC of the Red GT where I did a rather sloppy weld on the end of the frame rail where the left rear bumper is bolted. I discovered a weak point in one of the front frame rails while towing the GT with a tow bar hooked to the bumper positions (using the same brackets I use for the rotisserie) from a storage point to the Shop. The tow bar connection broke loose from the bumper/frame rail due to rust.
Rotisserie to Alpine Jack Hole Bracket   0766 Red Gt   1058.JPG

My Blue Boy and all of the others have not had that sort of problem.

Another suggestion would be to build use some braces that will secure the Alpine from twisting under load. I made some very sturdy braces out of 1" square tubing and 3/4' threaded rod.

I added the "Original Plans" so that you can see what I started with. They are very informative. I made a few mods I thought better to suit the Alpine. My Mods to the Plans are available, just ask.
 

Attachments

  • The Green1 with rigid braces        20210810_185911.jpg
    The Green1 with rigid braces 20210810_185911.jpg
    268.9 KB · Views: 28
  • The Green1 with rigid braces        20210810_185902.jpg
    The Green1 with rigid braces 20210810_185902.jpg
    497.2 KB · Views: 27
  • The Green1 with rigid braces        20210810_185855.jpg
    The Green1 with rigid braces 20210810_185855.jpg
    295 KB · Views: 26
  • The Green1 with rigid braces        20210810_185841.jpg
    The Green1 with rigid braces 20210810_185841.jpg
    256.2 KB · Views: 27
  • Sunbeam Restoration Body Braces by DanR    20210807_194236.jpg
    Sunbeam Restoration Body Braces by DanR 20210807_194236.jpg
    413.6 KB · Views: 27
  • The Green1 with rigid braces        20210807_194204.jpg
    The Green1 with rigid braces 20210807_194204.jpg
    323 KB · Views: 26
  • Auto Rotisserie_plans Autobody 101.pdf
    2 MB · Views: 1
Last edited:

Alpine 1789

SAOCA President
Diamond Level Sponsor
Dan's brackets are very impressive. Far more stability than the ones we made for the Tiger. I am curious as to whether they are overkill or ours were underkill. Any thoughts?
 

belmateo

Gold Level Sponsor
Dan's brackets are very well made to keep the structure and especially the door openings from getting tweaked. If you do a rotisserie, you have to brace it.
 

DanR

Diamond Level Sponsor
Jim, I used 1" square stock for the main piece for the Jack mounting hole and 3/8" flat plate for the piece used to bolt the face to the Alpine. I had to trim/shave done the 1" square stock a bit to slip into the Jack Mounting holes.

The idea of the bracket was not new to me when I started on the rotisserie, I had designed the bracket for towing my Alpines with a Tow Bar years before. Just had to remove the Bumper.

Maybe one day I will reinvent the wheel and re-design the bracket to be more user friendly for towing and leaving the Bumper in place:)
 

Attachments

  • Rotesserrie   1108.JPG
    Rotesserrie 1108.JPG
    489.6 KB · Views: 29
  • Rotesserrie   1109.JPG
    Rotesserrie 1109.JPG
    534.1 KB · Views: 29
  • Rotesserrie   1112.JPG
    Rotesserrie 1112.JPG
    639.5 KB · Views: 29
  • Rotisserrie   1113.JPG
    Rotisserrie 1113.JPG
    662.2 KB · Views: 28
  • Rotisserrie   1114.JPG
    Rotisserrie 1114.JPG
    657.5 KB · Views: 28
  • Rotisserrie   1115.JPG
    Rotisserrie 1115.JPG
    656.7 KB · Views: 29

DanR

Diamond Level Sponsor
Here are better PIC's of the attaching points I utilized for the "X" frame Braces.
 

Attachments

  • X Braces for strength and ridgity     20221021_173210.jpg
    X Braces for strength and ridgity 20221021_173210.jpg
    364.2 KB · Views: 28
  • X Braces for strength and ridgity    20221021_173156.jpg
    X Braces for strength and ridgity 20221021_173156.jpg
    327 KB · Views: 28
  • X Braces for strength and ridgity    20221021_173133.jpg
    X Braces for strength and ridgity 20221021_173133.jpg
    286.8 KB · Views: 28
  • X Braces for strength and ridgity    20221021_173114.jpg
    X Braces for strength and ridgity 20221021_173114.jpg
    295.1 KB · Views: 27
  • X Braces for strength and ridgity    20221021_173101.jpg
    X Braces for strength and ridgity 20221021_173101.jpg
    290.1 KB · Views: 27
  • X Braces for strength and ridgity    20221021_173053.jpg
    X Braces for strength and ridgity 20221021_173053.jpg
    328 KB · Views: 28
  • X Braces for strength and ridgity    20221021_173035.jpg
    X Braces for strength and ridgity 20221021_173035.jpg
    285.2 KB · Views: 27
  • X Braces for strength and ridgity    20221021_173026.jpg
    X Braces for strength and ridgity 20221021_173026.jpg
    384.6 KB · Views: 28

jdoclogan

Platinum Level Sponsor
This is how I approached the 4 point Harbor Freight engine (two units) lift configuration attachment. More of a creative engineering, use what you have, approach. Unlike Dan's precision engineering.
Rotis 3.jpg Rotis 2.jpg Rotis.jpg
 

rixter

Gold Level Sponsor
Thank you all. Lots of good information here. Using existing holes and adjustable braces to do the bracing is creative. I've seen square stock tack welded criss-cross style.

Rick
 

Aladin Sane

Diamond Level Sponsor
I took a different approach to accessing the bottom of my alger project. I built wood cribbing for the wheels to sit on and then jacked the car up and worked on it from below. I had to do some reinforcing welding for the rear suspension mounts so that the V8 and Dana rear end didn't tear the springs loose.
 
Top