• Welcome to the new SAOCA website. Already a member? Simply click Log In/Sign Up up and to the right and use your same username and password from the old site. If you've forgotten your password, please send an email to membership@sunbeamalpine.org for assistance.

    If you're new here, click Log In/Sign Up and enter your information. We'll approve your account as quickly as possible, typically in about 24 hours. If it takes longer, you were probably caught in our spam/scam filter.

    Enjoy.

Restoring HB9116754 Lemans

I'm looking at their catalog right now
Also:
Jan
 

Attachments

  • IMG_6687.png
    IMG_6687.png
    1.8 MB · Views: 16
  • IMG_6686.png
    IMG_6686.png
    1.8 MB · Views: 16
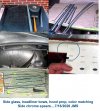
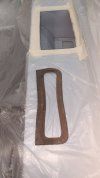
A whole week doing little things. I didn't have a hood prop so I made one. Also, made new headliner bows from 1/4" steel bar. Cleaned & painted the door glass retaining channels & installed w/ new setting tape. I had to match the interior, off-white color on the rear hatch before I strip it.
Also, inventoried all the side chrome & spears. Everything accounted for! All of it will be polished.
Jan
July_2026 copy.jpg
 
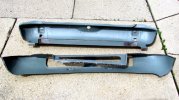
My battery cover had some problems. The flange that the cover slides under it, was bent way out of shape. So I removed it and made a new one.
Also, I'm missing one of the little clips that holds it down. I'll probably make one.
Jan
battery cover.jpg
 
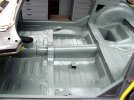
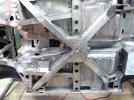
Well, after about 200-300 hrs of metal repair I finally got to epoxy the interior. I'm using PPG DP40 (gray-green) epoxy over bare metal that was metal prep'd to clean-up the metal surface. The DP40 is the older epoxy and it is awesome (The current PPG epoxy is "DP40LF"...it's not as good IMO, it's thin and doesn't cover as well).
I'll fill in the seams tomorrow using 3M 08300 Autobody Sealant, which is also awesome stuff.
The next step is to get the car body back in my mobility frame & on it's side. More metal work & painting coming.
Jan
epoxy_primer_interior.jpg
 
Last edited:
Well, after about 200-300 hrs of metal repair I finally got to epoxy the interior. I'm using PPG DP40 (gray-green) epoxy over bare metal that was metal prep'd to clean-up the metal surface. The DP40 is the old style, lead-based epoxy and it is awesome (All one can buy now is the DPLF, lead-free...it's not as good).
I'll fill in the seams tomorrow using 3M 08300 Autobody Sealant, which is also awesome stuff.
The next step is to get the car body back in my mobility frame & on it's side. More metal work & painting coming.
Jan
View attachment 38739
Looks sweet Jan ! .. been following the progress of this one ... did ya' make a cover holddown clip for the batt. box? .. I may have one. free!

... David
 
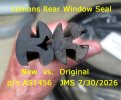
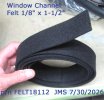
I found a good match for the rear window seal and the window channel felt. Both items are from https://www.restorationspecialties.com
Look at page 37 & 45 in their catalog (one can download their catalog).
The rear window seal in p/n AS1456 ($3.00/Ft with chrome locking strip); The window channel felt is p/n FELT18112 ($2.00/Ft). The felt is much harder and it's black, just like the original.
Jan
rear window seal copy.jpg
window channel felt.jpg
 
Rootes didn't make it easy to repair the seals in the air control blade for the early series heater/defroster. Mine were rock hard and fell apart.
So what does one do?....Drill out the spot welds and take it out of the body to work on. Well, I had it out in about an hour or so.
I'll use pop rivets (and not spot welds) to make it easier to remove for servicing in the future.
Jan
View attachment 38503
Hello Jan,

do you know how the air valve seal is installed?
Since I have never disassembled an Alpine, let alone a Harrington LM, I don't know how that air valve works!
I found a seal in the pile of boxes with parts from my HLM.
The seal is hard and brittle, but otherwise good enough to make a mold.
Regards, Marc
 

Attachments

  • Seal air valve.jpg
    Seal air valve.jpg
    689.5 KB · Views: 15
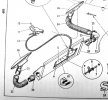
In the Series-I parts books it shows two seals:
Seal 1 - An "Oval" one that seals off the heater air in the OFF position (#6)
Seal 2 - One "L" shaped strip that covers the air gap next to the hinge (#10)

SI_parts_book_air flapperseal.jpg
Mine still had the L-shaped seal, but it was hard & brittle.
The L-shaped seal fills in the air gap next to the flapper hinge, as seen here:
air seals copy.jpg
 
I found a good match for the rear window seal and the window channel felt. Both items are from https://www.restorationspecialties.com
Look at page 37 & 45 in their catalog (one can download their catalog).
The rear window seal in p/n AS1456 ($3.00/Ft with chrome locking strip); The window channel felt is p/n FELT18112 ($2.00/Ft). The felt is much harder and it's black, just like the original.
Jan
View attachment 38806
View attachment 38807
Dang! ... Those profiles are so .. close?

..... David
 
In the Series-I parts books it shows two seals:
Seal 1 - An "Oval" one that seals off the heater air in the OFF position (#6)
Seal 2 - One "L" shaped strip that covers the air gap next to the hinge (#10)

View attachment 38886
Mine still had the L-shaped seal, but it was hard & brittle.
The L-shaped seal fills in the air gap next to the flapper hinge, as seen here:
View attachment 38887
Jan,
Sorry forgot to mention, my HLM is a late S2. Does that makes a difference?
 
After 4-5 days of doing metal prep, I finally epoxied the undersides...and some topsides too (A lot of surface area on the undersides).
Even though this body was dipped about 25 years ago, it had some slight surface rust over that time it was in storage.
Now to do more fitting to the top and body.
Jan
.epoxy_undersides.jpg
 
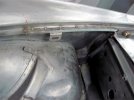
Another favorite spot for rust is the rain channel on top of the front fenders. It's the seam between the fender & inner splash panel where it rusts.
I replaced about 13" of that channel on both sides.
Jan
gutter-repair_2.jpg

gutter-repair_1.jpg
 
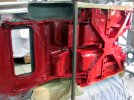
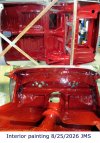
Today is the start of applying the top coat (Glasurit 22-line, single stage, activated Urethane). Starting with the underside, I did a cutting in painting with a small touch-up gun to get coverage into the nooks & crannies and followed up with my larger spray gun.
Jan
cutting-in_undersides.jpg
 
Last edited:
Hello Jan, I wonder if you have 48 hours in a day?
It looks beautiful in that red color
Keep going, the end is in sight!!.. almost :p
Grtz Marc
 
Hello Jan, I wonder if you have 48 hours in a day?
Marc, I'm in a race against time before winter arrives, so I try to accelerate the rebuild where I can.
My body frame allows it to be upside down in a very ridged state. I can pound it with my hammer & dolly and it's not moving a millimeter.
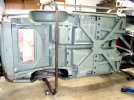
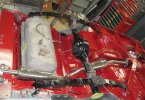
Anyway, I did a mockup of everything like rear axle & springs, fuel tank, exhaust system, brake & fuel lines and wiring just to see what I missed and any interference issues. I'm using the S/S exhaust system and there isn't much room for the muffler between the fuel tank & rear springs. About 1/2" clearance on both sides. Would you say that's a bad place to put a big fat & very hot muffler???!!!...LoL!
This reminds me to start soldering up the pinholes in the fuel tank and paint & seal it. Also, exhaust pipe hangers.
I'll be rebuilding the E-brake linkage that's on the rear axle.
Jan
undersides_mockup.jpg
 
Last edited:
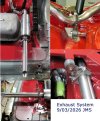
For the past two weeks, I been working on making a Series V exhaust system (Rick's 3-piece stainless steel) fit into a S-II. After making three cuts in the pipe to change the bends, and fab'ing pipe hangers, it's fitting pretty well. I'm still using the original S-II tail pipe hanger, and it looks fine.
(Note- Make sure the trail pipe tip doesn't extend beyond the bumper!!!! If you back into a wall, that total force will bend up that whole exhaust and be junk. I have seen pipes on Tigers that extend way outside the bumper...that's a really stupid thing to do...JMS)
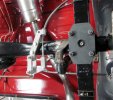
Also, working on the E-brake linkage and replacing the two pull rods. All new rods made from 3/8 steel rod and a NOS cable.
Now to do the rocker panels & finishing work.
Jan
exhaust system copy.jpg

E-brake_system.jpg
 
Last edited:
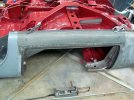
I made up the left side rocker panel from an old Victora British panel bought maybe 25 years ago.
V/B sold a straight panel which will not fit properly, and I re-worked it to fit. There's nothing straight in the panels and they have a crown on all three planes (top, front & right planes). I use an English Wheel & a hand operated press brake w/special tooling for making the flanges.
Jan
left_side_rocker.jpg
 
Back
Top