I am slowly working my way through all of the side projects that go along with installing my new dashboard. Next up is painting the Bakelite. The recommendation in the past was always to use vinyl paint as this 'gives' a bit and is less likely to crack. However, I've lately seen plastic paint in hardware stores (see, for example, http://www.krylon.com/products/fusion_for_plastic/) and am wondering if this might be better. Has anyone tried this?

-
Welcome to the new SAOCA website. Already a member? Simply click Log In/Sign Up up and to the right and use your same username and password from the old site. If you've forgotten your password, please send an email to membership@sunbeamalpine.org for assistance.
If you're new here, click Log In/Sign Up and enter your information. We'll approve your account as quickly as possible, typically in about 24 hours. If it takes longer, you were probably caught in our spam/scam filter.
Enjoy.
You are using an out of date browser. It may not display this or other websites correctly.
You should upgrade or use an alternative browser.
You should upgrade or use an alternative browser.
Painting Bakelite
- Thread starter Alpine 1789
- Start date
jack Bacon
Donation Time
I restored a wall telephone a while back using a clear spray of either of poly or acrylic on the bakelite pieces and it looked good.
Jack
Jack
Why not just polish the bakelite? I think it has a great patina when it's done. To me, painting it always looks a bit to shiny.
I agree with you, but I've not had great luck polishing it. What do you use?
puff4
Platinum Level Sponsor
I agree with you, but I've not had great luck polishing it. What do you use?
I just use 1000 wet-paper to smooth out any imperfections or to remove stubborn oxidation, then just polish it with automotive polishing compound on a small wheel (not spinning too fast - you don't want to burn the item). I've also used 0000 steel wool to prepare particularly grotty bakelite items, then wet-sand and polish as above. Final finish with some Armor-All or carnuba wax for a warm, glowing finish.
tony perrett
Gold Level Sponsor
Google "Radiophile Magazine" - they sell a product called "Bake-o-Bryte" to polish bakelite. Another useful site giving information on polishing old radio cabinets is www.vintage-radio.com
P. Scofield
Bronze Level Sponsor
Works but never turns as black as it was when new.
Paul
Paul
Why not just polish the bakelite? I think it has a great patina when it's done. To me, painting it always looks a bit to shiny.
I wanted to update this post with my progress and especially with what I've learned. I decided to go the quick and dirty route (when will I ever learn?) and just paint the surround. I wet sanded it with 400 grit paper and got a nice smooth surface that should have taken appropriate paint well. The first one I tried was Rust-Oleum Universal. In theory, that should have been perfect, but it produced an awful, very thick, almost hammered finish. I stripped this off (using CitruStrip, which works very well on the old plastic) and tried again, this time with Valspar Plastic paint. I got almost the same result (and I suspect it is almost the same paint), but not quite as bad. Back to the Citrustrip, and then one more try with the Valspar, trying to be very light with the paint. It was little better than the first two attempts, but far from acceptable.
I decided to pick a different group's brain and posted the question on the Team.Net Shop Talk Forum. I got a couple of ideas, but one that especially intrigued me came from a Healey owner who said the Healey guys use India Ink and black shoe polish. I followed up with him and he sent me two emails he'd saved on the topic:
This sounded pretty promising and I re-sanded the surround with 600 grit followed by 1000 grit paper, figuring that re-dying the plastic wasn't going to cover as well as painting it. I tried India Ink first and found the Bakelite absorbed it very well. I did about four coats, brushing it on with a small foam brush, letting it sit, then wiping off any excess with an old t-shirt. This did a nice job of returning the finish to the original black and probably would have done the trick alone, had I not initially sanded the surround with the 400 grit paper to begin with. Unfortunately, I could still see the fine scratches in the plastic. So, I decided to give the shoe polish a try. This worked better than I had hoped, and made it look almost new!
The trim looked so good when I was done that I hit all of the switches and knobs with the India Ink to bring them back to black. I will want to see how everything lasts before doing it again, but if all stays well then next time I want to clean up a surround I will probably try to sand with the 1000 paper (assuming the surface is rough from oxidation) from the start and see if I can skip the shoe polish step, as I fear that it will now require regular maintenance to keep it looking nice.
I decided to pick a different group's brain and posted the question on the Team.Net Shop Talk Forum. I got a couple of ideas, but one that especially intrigued me came from a Healey owner who said the Healey guys use India Ink and black shoe polish. I followed up with him and he sent me two emails he'd saved on the topic:
andIn following the discussion on Finishing Bakelite I have not noticed the process I have used on a number of occasions with satisfactory
results. I clean the bakelite surface with laquer thinner and then paint the part with India ink 3 to 5 times allowing the part to dry between each
application. I then buff the surface with a soft cloth. I have found this gives a finish very close to the original.
Even though most of the plastic type parts on your car are Bakelite,
the steering wheel rim isn't one of them. What I have used on Bakelite in the past is either shoe polish or India ink. The shoe polish will help to
re-moisturize the Bakelite part but will not do a very good job of
dying it black. Remember from my other posts and articles that Bakelite is a
natural plastic and usually has a filler in it i.e., wood or saw dust, and
thus will dry out with age.
India ink does a better job of blackening the part, but the best product that
I have found is "Fiebing's" Leather Dye, which can be found at most
hardware stores, shoe care and repair shops. You might try this on the rim,
but I don't know how well it will work since the plastic rim is not as
porous as Bakelite.
This sounded pretty promising and I re-sanded the surround with 600 grit followed by 1000 grit paper, figuring that re-dying the plastic wasn't going to cover as well as painting it. I tried India Ink first and found the Bakelite absorbed it very well. I did about four coats, brushing it on with a small foam brush, letting it sit, then wiping off any excess with an old t-shirt. This did a nice job of returning the finish to the original black and probably would have done the trick alone, had I not initially sanded the surround with the 400 grit paper to begin with. Unfortunately, I could still see the fine scratches in the plastic. So, I decided to give the shoe polish a try. This worked better than I had hoped, and made it look almost new!
The trim looked so good when I was done that I hit all of the switches and knobs with the India Ink to bring them back to black. I will want to see how everything lasts before doing it again, but if all stays well then next time I want to clean up a surround I will probably try to sand with the 1000 paper (assuming the surface is rough from oxidation) from the start and see if I can skip the shoe polish step, as I fear that it will now require regular maintenance to keep it looking nice.
sammaw@bellsout
Silver Level Sponsor
Jim, you can always get the guy at the airport to detail the plastic from now on, right after he finshes your wingtips.")
Sure thing. I've been waiting until I was completely finished and think I got there this evening. It was pretty dark in the garage by the time I finished, but I'll inspect it tomorrow and take some photos then. Unless I find some more parts that need to go back on.Hey Jim,
How about some pics ??
Jim, you can always get the guy at the airport to detail the plastic from now on, right after he finshes your wingtips.
Perfect! Many people claim that the best shoe shine in the world can be had at the St. Louis airport (http://www.golf.com/golf/tours_news/article/0,28136,1579131,00.html). Think the TSA will look at me funny if my carry on luggage is filled with Bakelite?
Chuck Ingram
Donation Time
Jim
regarding the plastic surround.You can use Meghaurs fine cut polishing compound with a small buffer pad on your drill.You want about 1000 rpm but a drill will work if you don't load it too much.This will not only clean the part up nice but will remove all the scratches.You may want to sand with 1500 wet and dry first and then polish.How do I know this will work? The side windows on the Lister are Lexan and not glass.
You could maybe try this on the steering wheel.I would remove the wheel as it can be a bit messy
I considered using model paint and even wrote Testors to ask them how well it held up in exterior use. While they said they didn't recommend it, they indicated that it has been successfully used by others. It would have been my next method, had I not been happy with the ink/shoe polish.
Thanks for the recommendation Chuck. I will definitely try that next time, in addition to the ink/shoe polish.
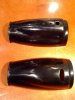
Finally, while there is still a bit more to do, here are a couple of pictures:


I deliberately left the medallion off of the steering wheel center so you could see the before and after from the India Ink. And the clock is just space filler at the moment; I am having my other one repaired.
All that is left at this point is to reattach the map light and put the radio back up. That should be done today. So, I didn't quite meet my goal of being done by Spring, but I certainly got close.
Next up: carpet and seats.
Thanks for the recommendation Chuck. I will definitely try that next time, in addition to the ink/shoe polish.
Finally, while there is still a bit more to do, here are a couple of pictures:

I deliberately left the medallion off of the steering wheel center so you could see the before and after from the India Ink. And the clock is just space filler at the moment; I am having my other one repaired.
All that is left at this point is to reattach the map light and put the radio back up. That should be done today. So, I didn't quite meet my goal of being done by Spring, but I certainly got close.
Next up: carpet and seats.
socorob
Donation Time
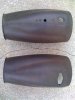
I had a spare surround and read aabout the india / leather creme solution. I went to Michaels craft store and bought some inida ink, its in the calligraphy sction if anyone else needs it, it took me forever to find it. The bottles were tiny, so i bought 2, but 1 small bottle would probably do 10 cars. I guess i did about a dozen coats of the india ink on the extra steering column surround that came with my car. It was in really bad shape, looks like something was ripping on it the whole time where it was stored. First i cleaned it with warm soapy water and a soft green pad, then i wet sanded it with 600, then 1500, let it dry, did all the coats of india ink, rubbed it with a clean rag, and it was almost perfect, a few of the drip spots were still showing through, there were some big stains on there. So i did 1 light coat of the leather polish creme, and buffed that, and it looks brand new. Heres the middle and after, forgot to take a picture of the before.
Attachments
It looks terrific Robbie. I should add one thing I have learned since posting this: you do have to be careful when using Windex to clean the windshield. Any over spray will dull the polish; I need to re-polish my steering wheel surround to get it back to looking as nice as it did when I took those photos.
ForzaDesign
Donation Time
Just an FYI. I used Eastwoods chassis black (high solids). Looks like glass and is a tough as nails.
Jim
Jim
greenbeam
Platinum Level Sponsor
Perfect timing!
Hi Jim,
Your tip is perfect timing for me. I have the dash out putting in a new dash pad, so all those trim bits are siting on the bench looking tired.
I'm also making use of a few of those bits you let me have from the junkers you found in St Louis. A long time back, but finally getting to use them!
Regards,
Paul in Adelaide.