• Welcome to the new SAOCA website. Already a member? Simply click Log In/Sign Up up and to the right and use your same username and password from the old site. If you've forgotten your password, please send an email to membership@sunbeamalpine.org for assistance.

    If you're new here, click Log In/Sign Up and enter your information. We'll approve your account as quickly as possible, typically in about 24 hours. If it takes longer, you were probably caught in our spam/scam filter.

    Enjoy.

Oil Pressure Gage disassembly

bobbo

Gold Level Sponsor
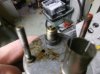
Wanting to renew the finish inside the oil pressure gage. Have it disassembled to the point of removing the interior works. Appears to be a nut that holds the works in place on the back side of the housing ( see attached photos DSCF1172.JPG ).
Any advise on how to remove the nut, It's smooth with 2 small cut-outs. Probably a special tool required.
Or is it fixed in place and not removable?
 

Attachments

  • DSCF1174.JPG
    DSCF1174.JPG
    172.3 KB · Views: 32

Shannon Boal

Platinum Level Sponsor
Very carefully.....examine with bright light and magnifier. It looks like a spanner type nut, needle-nose pliers may fit into the slots to move it. Cleaning before disassembly may help. I might run it through the dishwasher, maybe with a cup of vinegar.
 

puff4

Platinum Level Sponsor
Go to your local hardware store and buy a piece of pipe or a deep socket that fits snugly over the nipple. Then mark and cut the pipe or socket to have the two pins you need to remove that nut. Needle nose might well remove it, but you also might bugger it (ask me how I know!)... but it's really easy to make a semi-correct tool.
 

puff4

Platinum Level Sponsor
How does the size of the retaining nut compare to the bezel removal tool pieces sold by Moss (https://mossmotors.com/bezel-remover-tool-set)?

Mike
I was thinking that as well. I actually have one of these sets, and the dimensions are probably too large:

B07-D3631-FD37-4-E84-A9-C0-865-BC0-EB82-FC.jpg


3-AFC7898-1990-4-C49-920-F-25217-F0-FE763.jpg
 

bobbo

Gold Level Sponsor
Tried fashioning a tool out of a 10mm, socket. but I was a little sloppy, so that wasn't working.
A little WD40, some heat with the propane torch ( not enough to flow the soldered parts ) a pair of pliers and voila, its off.
Time for a beer.
I'll clean all parts now, re-paint and assemble.
What paint are you using for the needle?
Thanks guys for your help.
Bob
 

Gordon Holsinger

Diamond Level Sponsor
Tried fashioning a tool out of a 10mm, socket. but I was a little sloppy, so that wasn't working.
A little WD40, some heat with the propane torch ( not enough to flow the soldered parts ) a pair of pliers and voila, its off.
Time for a beer.
I'll clean all parts now, re-paint and assemble.
What paint are you using for the needle?
Thanks guys for your help.
Bob
 

bobbo

Gold Level Sponsor
Amazon up here have a Testor's fluorecsent red which is really an orange, any search for the Testors FS28915 says our of stock.
I'll drop into Michael's tomorrow, see what they have. Also will be looking for the light blue for inside the housing.
Thanks for the info and leads.
Cheers
 

hartmandm

Moderator
Diamond Level Sponsor
Amazon up here have a Testor's fluorecsent red which is really an orange, any search for the Testors FS28915 says our of stock.
I'll drop into Michael's tomorrow, see what they have. Also will be looking for the light blue for inside the housing.
Thanks for the info and leads.
Cheers

My notes from restoring an overdrive speedometer:

Painted can interior gloss white using Dupli-Color Acrylic Lacquer part DAL 1675.


Painted the top half of the can interior (top half relative to where the light bulb resides) with light blue paint: Krylon Rust Protector gloss enamel 69013 Gloss Light Blue. Krylon is more blue than the original can blue. Original can blue has more green tones – more of an aqua / teal


I have gone with LED lights for gauges, so the light color on the gauge face is quite different than the original incandescents. I was happy with how the speedo appeared when lit at nighttime. I think going with gloss paint is good, as more light will be reflected.

Original paint in the speedo:

upload_2022-4-3_21-3-4.png

The Krylon blue:

upload_2022-4-3_21-3-56.png

Mike
 

mikephillips

Donation Time
Since Testors paint was mentioned. It can be hard to find since the brand was sold a couple years or so ago and the new owner shut down production. They did the same with Pollyscale and Floquil brand model paints. Round here the racks in hobby and craft places are mostly empty or removed completely. As a model builder, I don't know how long my older stocks may last. But there are new, environmentally friendly brands you may be able to find online at hobby places, although I cannot swear they'll be a perfect match.
 

bobbo

Gold Level Sponsor
Mike; you mentioned going with LED's. Just about to order a kit . have the option of standard white LED's or the warmer light variation ( similar to incandesent)
Any suggestion as to which is better, easy to read at night, is the white easy on old eyes?
BTW. picked up at Michael's today acrylic DecoArt NEONS in Fluorescent orange for the needle. 2 oz bottle under3 $3.00.
Thanks Bob
 

hartmandm

Moderator
Diamond Level Sponsor
I bought my LEDs from Joe Parlanti back in 2015. He only sold the Cool White version back then. I haven't seen the Warm White version he sells. When I first installed the LEDs in the gauges I was surprised about the color. It is a bright white, but it has a bluish hue to it. I wasn't sure what to think initially. But very quickly I grew to really like the color. And the bulbs are so much brighter than the incandescent bulbs, which makes the gauges much easier to read at night. If you have painted the gauge interior with a gloss paint, the gauge face will be even brighter. And new paint on the needle will really make it pop. Even though I haven't seen the Warm White version, I wouldn't hesitate to go with the Cool White again.

Mike
 

bobbo

Gold Level Sponsor
Just got an email back from Joe. Says 95% of sales are for the white.
Thanks for your input Mike.
Bob
 
Top