• Welcome to the new SAOCA website. Already a member? Simply click Log In/Sign Up up and to the right and use your same username and password from the old site. If you've forgotten your password, please send an email to membership@sunbeamalpine.org for assistance.

    If you're new here, click Log In/Sign Up and enter your information. We'll approve your account as quickly as possible, typically in about 24 hours. If it takes longer, you were probably caught in our spam/scam filter.

    Enjoy.

Installing a BW35 automatic in a series III

What transmission do you have


  • Total voters
    18

Knightowl61

Gold Level Sponsor
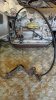
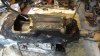
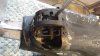
I have pretty much all the parts for the transplant - torque converter, brake petal, kickdown and shifter & linkage, driveshaft, speedometer & cable, and upper trans tunnel all from a series IV.
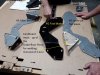
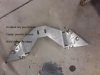
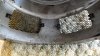
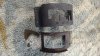
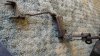
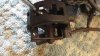
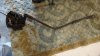
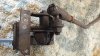
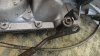
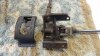
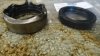
I found the standard 4 bolt transmission mount will replace the original 3 bolt BW35 mount. Waiting for the front and rear oil seals.
I'm just wondering if anyone has any tips or suggestions on the transplant?
 

DanR

Diamond Level Sponsor
John, The location for the transmissions in the two different type transmission options in the Sunbea Alpine are very different as you may already know. Not just the bolt pattern, but the location underneath.

The BW35 transmission sits about 4 inches farther to the rear than the standard 4 speed with ot without the OD.

In my transmission mounts I designed I have the "perfect" brackets for sitting an automatic type transmission in the Alpine. The new design brackets will work with about any type transmission to be adopted to the undercarriage of the Sunbeam Alpine (or even a Tiger). Will be IMO a perfect means to do any tranny for and Alger project too.

Of course you could cut the stock brackets from underneath the floor and reweld them in a new location as needed but most likely they will be shorter than required.
 

Attachments

  • Transmission Bracket with underfloor mount pieces for welding      20210415_192526.jpg
    Transmission Bracket with underfloor mount pieces for welding 20210415_192526.jpg
    224.5 KB · Views: 38
  • Transmission Bracket with underfloor mount pieces for welding      20210415_132545.jpg
    Transmission Bracket with underfloor mount pieces for welding 20210415_132545.jpg
    307.8 KB · Views: 37
  • Transmission Bracket with underfloor mount pieces for welding      20210415_182318.jpg
    Transmission Bracket with underfloor mount pieces for welding 20210415_182318.jpg
    220 KB · Views: 37
  • Transmission Bracket with underfloor mount pieces for welding      20210415_192538.jpg
    Transmission Bracket with underfloor mount pieces for welding 20210415_192538.jpg
    259 KB · Views: 37

65sunbeam

SAOCA Membership Director
Diamond Level Sponsor
Can you post a photo of the automatic shifter and linkage please? I just got what I think is the complete assembly and want to compare it with yours. Thanks!
 

puff4

Platinum Level Sponsor
Transmission Screens ?? How do they work ??

They fit in the bell housing (see #14, below) and are very often missing, as the original design was prone to breakage. My design helps prevent that. The screens allowed airflow to help cool the torque converter, whilst keeping stones and debris out of the housing. Two were fitted, one to each side of the bell housing.

0010029ae.gif
 

Tim R

Silver Level Sponsor
One of our Alpines is a Series IV Automatic. Once you get the Auto set up installed you won't be disappointed, they are a great drive, especially around town or in traffic. The only time we prefer the manual with overdrive is when you are on the motorway and travelling at top end speeds, then the auto revs high and feels like it could do with another gear.
Tim R


DanR

Diamond Level Sponsor
Very nice design you have there Kevin. Looks like an item that will serve well as a replacement.
 

Knightowl61

Gold Level Sponsor
Can you post a photo of the automatic shifter and linkage please? I just got what I think is the complete assembly and want to compare it with yours. Thanks!
This should cover it.
 

Attachments

  • DSC09853.JPG
    DSC09853.JPG
    310.1 KB · Views: 30
  • DSC09854.JPG
    DSC09854.JPG
    198.1 KB · Views: 28
  • kickdown linkage (1).JPG
    kickdown linkage (1).JPG
    395.1 KB · Views: 29
  • kickdown linkage (2).JPG
    kickdown linkage (2).JPG
    361.9 KB · Views: 29
  • Shifter  (1).JPG
    Shifter (1).JPG
    315.2 KB · Views: 29
  • Shifter  (2).JPG
    Shifter (2).JPG
    273.5 KB · Views: 29
  • Shifter  (3).JPG
    Shifter (3).JPG
    282.8 KB · Views: 28
  • Shifter  (5).JPG
    Shifter (5).JPG
    334.6 KB · Views: 28
  • Shifter  (4).JPG
    Shifter (4).JPG
    226.6 KB · Views: 28
  • Shifter  (6).JPG
    Shifter (6).JPG
    239.4 KB · Views: 28

Knightowl61

Gold Level Sponsor
Couple more shift pics
 

Attachments

  • Shifter  (7).JPG
    Shifter (7).JPG
    309.3 KB · Views: 16
  • Shifter  (8).JPG
    Shifter (8).JPG
    239.2 KB · Views: 16
  • Shifter  (9).JPG
    Shifter (9).JPG
    227.2 KB · Views: 15

Knightowl61

Gold Level Sponsor
John, The location for the transmissions in the two different type transmission options in the Sunbea Alpine are very different as you may already know. Not just the bolt pattern, but the location underneath.

The BW35 transmission sits about 4 inches farther to the rear than the standard 4 speed with ot without the OD.

In my transmission mounts I designed I have the "perfect" brackets for sitting an automatic type transmission in the Alpine. The new design brackets will work with about any type transmission to be adopted to the undercarriage of the Sunbeam Alpine (or even a Tiger). Will be IMO a perfect means to do any tranny for and Alger project too.

Of course you could cut the stock brackets from underneath the floor and reweld them in a new location as needed but most likely they will be shorter than required.

Sorry Dan, I can't see how your mounts could work on an Alpine transmission. The Alpine mounts are spaced way far apart.
 

Attachments

  • DSC09841.JPG
    DSC09841.JPG
    318.6 KB · Views: 16
  • DSC09852.JPG
    DSC09852.JPG
    245.2 KB · Views: 15

DanR

Diamond Level Sponsor
That transmission mount with 4 bolt holes each side is for a manual transmission NOT a BW35.
 

Knightowl61

Gold Level Sponsor
That transmission mount with 4 bolt holes each side is for a manual transmission NOT a BW35.
I know, I took off the 3 bolt BW35 and the manual 4 bolt fits. Just don't know if it will bolt up at the same place. The second picture is on the BW35.
But how is yours supposed to work?
 

Knightowl61

Gold Level Sponsor
First problem - I received an order from SS including a rear transmission seal (TR46 Rear seal, Alpine 1-IV, all OD) it fit without applying any pressure.
The original was difficult to get out and the new one pulled out with no pressure. The original is twice as thick and measures 1.952" and the TR46 measures 1.940. Id is snug on the yoke with both seals.
 

Attachments

  • DSC09856.JPG
    DSC09856.JPG
    213.6 KB · Views: 11
  • DSC09857.JPG
    DSC09857.JPG
    348.2 KB · Views: 11

Tim R

Silver Level Sponsor
Knightowl61,
What carb are you planning to run? We have the club weber and curved manifold with forced induction on our Automatic and it is superb. What we also have is a new Automatic linkage made by Graham Howard (alpinedcltd@ntlworld.com) this is a far superior piece of kit to the original Rootes set up. (Note: in one photo the PCV is shown fitted to inlet No4, we now know that it is important to plug that threaded hole and not fit the PCV there)
Tim R
 

Attachments

  • P1070745.JPG
    P1070745.JPG
    500.1 KB · Views: 23
  • P1070748.JPG
    P1070748.JPG
    491.4 KB · Views: 23
  • P1080092.JPG
    P1080092.JPG
    449 KB · Views: 23
  • P1080094.JPG
    P1080094.JPG
    464.5 KB · Views: 23
  • P1080898.JPG
    P1080898.JPG
    503.5 KB · Views: 23

65sunbeam

SAOCA Membership Director
Diamond Level Sponsor
Thanks for all of your shifter photos! I will compare with mine and see what I have......
 

DanR

Diamond Level Sponsor
But how is yours supposed to work?

Refer back to POST # 2 and you will see two triangluar brackets with three (3) bolt holes (same as BW35 factory), these are to be welded inplace underneath the floor in what ever position you need to place the transmission mount.

Hang the engine and transmission inplace; bolt the Tranny bracket to the transmission; place/bolt the triangular brackets to the tranny bracket; position them in the position you wish to be with clearance for the tail shafft and yoke; tact weld or mark them for welding.
 

Knightowl61

Gold Level Sponsor
Refer back to POST # 2 and you will see two triangluar brackets with three (3) bolt holes (same as BW35 factory), these are to be welded inplace underneath the floor in what ever position you need to place the transmission mount.

Hang the engine and transmission inplace; bolt the Tranny bracket to the transmission; place/bolt the triangular brackets to the tranny bracket; position them in the position you wish to be with clearance for the tail shafft and yoke; tact weld or mark them for welding.

The BW35 mounts are 5" farther back measuring from front of the bell housing to the center of the trans mount which will take it back to the X frame (thus the 3 bolt triangular).
I now understand that you're talking of the two triangluar brackets and not the center piece pictured on your #2 post. Those I'll need.
 
Top