• Welcome to the new SAOCA website. Already a member? Simply click Log In/Sign Up up and to the right and use your same username and password from the old site. If you've forgotten your password, please send an email to membership@sunbeamalpine.org for assistance.

    If you're new here, click Log In/Sign Up and enter your information. We'll approve your account as quickly as possible, typically in about 24 hours. If it takes longer, you were probably caught in our spam/scam filter.

    Enjoy.

Fuel Tank Sending Unit

Thor 1211

Silver Level Sponsor
I have an intermittently operating fuel gauge on my series V. It operates best when I turn on the ignition and rock the car which indicates to me that there is sticking float or gunked up sending unit. I can't find anything in the Workshop Manual about the Fuel tanks and the Parts book shows the sending unit sitting up in the air near the fuel tank (drivers side tank I think). Before I start rooting around in the trunk can anyone tell me where it is and how hard it is to get off for inspection/cleaning. A picture/schematic of the thing would be very helpful.

Thanks in advance.
 

RootesRacer

Donation Time
Usually such a problem will be an intermittent connection between the wiper arm and the wirewound sender.

Removal, cleaning and bending the wiper arm for a tad more tension is the solution if this is the case.
 

jmthehermit

Donation Time
Thor 1211, google this..... S IV fuel tank removal saoca ...... and pick the second from the top. It's a long thread, but you will most likely need it in the future. Jeff
 

SIVAllan

Gold Level Sponsor
It's in the driver's side tank. Remove the trunk inside side panel if present, and you will see a single wire running to the sending unit. It is removed by disconnecting the wire (simple spade connection) then twisting the circle clip that surrounds it and removing the clip.

At that point, maybe you can remove the sending unit but it's a bit long and the space is small. I've had to loosen the tank, then angle the tank a bit in order to remove the fuel level sender unit.

You may want to replace the rubber seal while the unit is being reinstalled.
 

puff4

Platinum Level Sponsor
RootesRacer said:
Usually such a problem will be an intermittent connection between the wiper arm and the wirewound sender.

Removal, cleaning and bending the wiper arm for a tad more tension is the solution if this is the case.

HUH???

Jose

Yes... we're not talking about the windshield wiper here... the 'wiper' in this case is the small finger within the sending unit that 'wipes' over the wound resistance wire, offering different resistance outputs at different places along the wound wire. It sometimes does not wipe well across the windings and becomes intermittent or fails altogether. By gently flexing the wiper you can increase the contact with the windings and restore the sender to utility.

I also suggest testing the float to ensure it is not leaky. Using some tongs, submerge the float in some near-boiling water and look for tiny bubbles which will escape if there's a crack in the float. If it's a leaker, it's best that you replace it with a known good float. If you don't have one, after ensuring there's no liquid gas in the float you can use a soldering iron and some spare nylon to 'weld' the crack shut... of course, you'd want to practice on a spare piece of nylon first, if you've never welded plastic before. I've not found any glue that sticks well enough or is permanent enough to work effectively on tank floats. (The same repair process can be applied to carburettor floats, although with them it's very important to weigh it before and after to be sure you've not made it too heavy.)
 

Tom H

Platinum Level Sponsor
Jose, Rootes Racer is correct. Maybe an explanation will help. The "sender" in the tank is a wirewound adjustable resistor. It is a resistor made up of wire wound around a ceramic "donut" much like lacing wrapped around a steering wheel. And there is a rotating wiper - a metal contact on an arm with a pivot in the middle of the donut. That metal wiper makes connect with the resistance wire wrapped around the donut and the contact is connected to the float arm such that the position of the float and arm sets the resulting resistance of the wire wound around the donut. Most likely the problem is poor contact where the wiper makes contact at various points around the donut.

Once Thor gets the sender out he'll see all that clearly.

Tom
 

tony perrett

Gold Level Sponsor
There is a danger that if the friction is increased too much the float may hang and not drop as the petrol level falls, giving the impression that there is more fuel in the tanks than there actually is.
 

puff4

Platinum Level Sponsor
There is a danger that if the friction is increased too much the float may hang and not drop as the petrol level falls, giving the impression that there is more fuel in the tanks than there actually is.

Absolutely right. Just give it a gentle bend, only enough to contact with moderate pressure along the windings, and ensure it does not hang at the ends of the winding.
 

65beam

Donation Time
sending unit

when all else fails ,do what many of us have done over the years. #1 - always take the wife along. that means many fuel stops. #2- carry a stick and a flashlight and measure the right tank. #2 may sound dumb, but it works and i know several long time owners that do it.
 

SIVAllan

Gold Level Sponsor
Bug eyed Austin Healy Sprites came from the factory with a stick to measure fuel level, or so a guy said at a car show and demo'ed the stick.
 

puff4

Platinum Level Sponsor
Bug eyed Austin Healy Sprites came from the factory with a stick to measure fuel level, or so a guy said at a car show and demo'ed the stick.

Cute story, but not true... even the earliest Bugeyes came with a Smith's fuel gauge.

However, early VW bugs did NOT come with a fuel gauge, and the 'stick' method was the only way to tell how much you had. Fortunately, they also came with a 'reserve' tank, for those who didn't stick it.
 

65beam

Donation Time
sending unit

back in the late 60's when i drove the series 4 to work every day, i had it all figured out. i knew it was seventy miles round trip every day so i figured i needed to top the tank every other day. never knew what the mileage would be and i didn't want to run out. none of the gauges worked right then and it was a low mileage car at that time.
 

jmthehermit

Donation Time
Here are three of my sending units. There is no wire wound anything in them, see picture 005 and 006. There is only a shaped metal bar, as seen in picture, that an arm slides on to give the variable resistance. Granted the newest of them is for a 1966 Tiger, and the oldest is from a 1963 Alpine Series 3. All three of them have soldered metal floats.
Thor, note the crusty unit in picture 004. When this crust forms around the float arm it will inhibit or completely stop any movement. This might be your problem. A good soak in carb cleaning solution will remove it. You can remove the side cover on the unit to soak it but under no circumstances pry on the sliding arm inside the unit. Losing metal to metal contact renders the unit non operational until contact is restored along the full reach of the arm.
If you're lucky you might have an identical unit in your Series V tank, but there are units with plastic floats out there. It could have been a running change in production. But in either type of float if it has a leak, you would get NO reading at all. Jeff
 

Thor 1211

Silver Level Sponsor
Thanks to all who responded. It looks like there are two types of sending units and two types of floats. I'll take a look at mine tonight but it seems the principle is the same, the sliding arm makes contact with the resistance piece, whether its a coil or a bar, and that determines the signal to the gauge. By the look of the units in the pictures, these units get "crudded up" and the wiper arm and float unit won't move as it should or the arm gets away from the resistor. Sounds like a cleaning and adjustment is in order.
 

Tom H

Platinum Level Sponsor
JM, thanks for the great pics. I had never actually taken one apart and had always assumed it was a wire wound resitance! That is quite neat how they shape that bar of resistive metal to somewhat compensate for the shape of the tanks and the response curve of the gauge to give an "accurate" number of gallons.

From my measurements of fuel guages , the resistance should be 248 ohms at 0 Gal, 77 ohms at 4 Gal, and 28 ohms at 11 Gal.

Tom
 

RootesRacer

Donation Time
JM, thanks for the great pics. I had never actually taken one apart and had always assumed it was a wire wound resitance! That is quite neat how they shape that bar of resistive metal to somewhat compensate for the shape of the tanks and the response curve of the gauge to give an "accurate" number of gallons.

From my measurements of fuel guages , the resistance should be 248 ohms at 0 Gal, 77 ohms at 4 Gal, and 28 ohms at 11 Gal.

Tom

I guess since the movement is bimetal, it would probably make sense to make the sender resistance also bimetal for purposes of temp comp.

Kind of odd, but not terribly surprising.

In any event, the bimetal "arm" is the resistor, and it rubs on the chassis for its contact point, which is that gets dirty and or the pivots get worn, will reduce the tension between the bimetal and the rubbing block.

The fix as mentioned above is to bend the bimetal arm for sufficient but not excessive tension.
Couldnt hurt to smooth and polish the rubbing block too.
 

Barry

Diamond Level Sponsor
The fuel gauge sender that came "with" my S-V has a wire wound resistance element.

The best I can tell, the resistance values are about 240 ohms (empty position) and 33 ohms (full position).

I can take a picture if it will help.
 

sunbby

Past SAOCA President
Donation Time
JM, thanks for the great pics. I had never actually taken one apart and had always assumed it was a wire wound resitance! That is quite neat how they shape that bar of resistive metal to somewhat compensate for the shape of the tanks and the response curve of the gauge to give an "accurate" number of gallons.

Tom

I think it is just hard to see in those pics, but I believe there is wire wound around that metal bar. There was on my sender when I opened it up.
 

Tom H

Platinum Level Sponsor
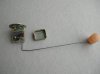
OK, curiousity got the best of me, so today I went into my garage and removed the sender from a spare tank I have. This tank was from an SV I bought used in 1975. The car sat unused from 1977 to 1988, including 7 years stored outside thru Cleveland winters. Since 1988 the tank has set hanging from the ceiling of my unattached and unheated garage. The sender came out of the tank easily, just one tap with a screwdrive to one of the locking tangs. What came out is a marvel. I showed it to my wife and she assumed it was NEW! It is made of 3 pieces of steel stamping (plus a separate cover plate), welded together, unlike the die casting in Jeff's photo. The yellow chromate (?) used to prevent corrosion has worked extemely well.

Inside is a bar that looks identical to the bar in Jeff's photo, but indeed it does have resistance wire wrapped around it. I am guessing that Jeff's sender has similar wire wound resistance wire wrapped around the bar in his unit. I measured the resistance and it varied from 13 ohms at one stop to 235 ohms at the other stop.

The most important thing I found was that the biggest contact problem is NOT where the wiper contacts the resistance wire, but in the ground contact. If I connect my ohmmeter from the connector - where the wire harness connects to the sender - and the long float arm, I get reliable and steady readings. But if I move the ohmmeter lead to the housing, where the system ground connection normally is made, no matter how solid and clean a connection I make to the housing, the readings are very erratic. This tells me that the problem is where and how the wiper makes contact to the housing. I saw a bit if gray powdery surface on both ends of the shaft of the wiper pivot and on the mating holes in the housing and cover. Not wanting to destroy the anti-corrosion coating on the steel housing I used a Q tip and some Radio Shack contact cleaner to clean the surface around the pivot holes on the housing. I think any cleaner might do as well. And then I used a piece of 600 grit sandpaper to thoroughly clean the brass pivot until it was shiny brass where it fits through the holes. If the wires and wiper themselves were gunked up or corroded, I would probably use contact cleaner on those surfaces.

After re-assembly the sender works perfectly.

Tom Hayden
 

Attachments

  • Series V Fuel sender and arm.jpg
    Series V Fuel sender and arm.jpg
    34.2 KB · Views: 180
Last edited:
Top