
-
Welcome to the new SAOCA website. Already a member? Simply click Log In/Sign Up up and to the right and use your same username and password from the old site. If you've forgotten your password, please send an email to membership@sunbeamalpine.org for assistance.
If you're new here, click Log In/Sign Up and enter your information. We'll approve your account as quickly as possible, typically in about 24 hours. If it takes longer, you were probably caught in our spam/scam filter.
Enjoy.
You are using an out of date browser. It may not display this or other websites correctly.
You should upgrade or use an alternative browser.
You should upgrade or use an alternative browser.
David Kellogg's Harrington Alpine
- Thread starter jumpinjan
- Start date
bulldurham
Platinum Level Sponsor
Great looking bodywork and paint on the car; How is the roof being made, other than carefully.?
jdoclogan
Platinum Level Sponsor
Bernd, I did make progress on the Lyrad last winter and some during the summer. I need to catch up to Jan and Ian. I will get back to the Lyrad project now that a new 4800 sq ft (446 sq meters) shop has been erected. Never enough space.
Attachments
cdk84
Donation Time
Harrington Roof Question
Hi Doug,
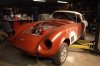
The roof for this car is an original Harrington molding. The fiberglass was in excellent condition when first acquired. Jan has removed the old, black paint and repainted the roof in Arctic White, matching the body color shown in photographs of the body on what looks like a U-Haul trailer.
I saw the body in process in the summer of 2015 when at the TEAE United in Dayton. Jan has innovated several techniques for bodywork and panel-matching during this repaint and the results are more impressive in person than the photographs can show. The car, even topless, is really impressively done and looks truly amazing.
As the weather has turned, now, Ian and Jan have suspended work on the car until next season.
Thank you for your kind birthday wishes. When is Your birthday?
Sending Smiles,
David
Great looking bodywork and paint on the car; How is the roof being made, other than carefully.?
Hi Doug,
The roof for this car is an original Harrington molding. The fiberglass was in excellent condition when first acquired. Jan has removed the old, black paint and repainted the roof in Arctic White, matching the body color shown in photographs of the body on what looks like a U-Haul trailer.
I saw the body in process in the summer of 2015 when at the TEAE United in Dayton. Jan has innovated several techniques for bodywork and panel-matching during this repaint and the results are more impressive in person than the photographs can show. The car, even topless, is really impressively done and looks truly amazing.
As the weather has turned, now, Ian and Jan have suspended work on the car until next season.
Thank you for your kind birthday wishes. When is Your birthday?
Sending Smiles,
David
jumpinjan
Bronze Level Sponsor
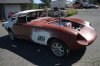
To add what Dave has mentioned, the top was initially re-sprayed many years ago (a local bodyshop) and over that period, many paint fractures or micro-cracks appeared on the top's surface. All that paint & primer (there was a very thick layer of primer) had to be removed. And doing so, damaged the very, very thin (if any) gelcoat....So that gelcoat damage & the hairline cracks (opened up with a Dremel tool), were filled with a fiberglass panel adhesive (Evercoat). Then sanded and sanded and sanded some more. Typically using sanding blocks ranging from 4 inches in length....to a 4 foot length, flexible sheet metal strip lined with sandpaper to plane down those long wavy surfaces. Then the Eckler's sprayable gelcoat application....more sanding, and more sanding (have to sand the Eckler's because there's a wax additive to cure it and all that top surface needs to be removed by sanding), and then epoxy primed and surfacing primer applied. More sanding using the 4-footer and more surfacing primer. Then the topcoat of Glasurit 22 single-stage activated urethane.
There were repairs done on the inside top regarding the wooden pieces too. Looks like the bonding agent to the wood let go and needed cleaned of old bonding material and re-bonding.
That's it in a nutshell,
Jan
There were repairs done on the inside top regarding the wooden pieces too. Looks like the bonding agent to the wood let go and needed cleaned of old bonding material and re-bonding.
That's it in a nutshell,
Jan
Last edited:

65beam
Donation Time
alpine
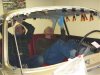
I removed the headliner from one of my cars and had one made for our red car. My wife and I spent several days on the installation. The install is tough due to the hatch opening and I won't attempt another. The install will probably will be tough around the rear window of Dave's car. We have the headliner already made and we're letting the upholstery shop do the RHD car.
Great progress. It must be good to proceed the project from there after all the preparation and endless sanding. Headliner installation is also not easy on such a big roof...
I removed the headliner from one of my cars and had one made for our red car. My wife and I spent several days on the installation. The install is tough due to the hatch opening and I won't attempt another. The install will probably will be tough around the rear window of Dave's car. We have the headliner already made and we're letting the upholstery shop do the RHD car.
bernd_st
Bronze Level Sponsor
Certainly a wise decision. Got already mad over just a Hardtop headliner installation. Perhaps it was too cold at that time plus I lacked the necessary patience.
As you say a Harrington one is even more complicated because of the hatch opening. Even though a club mate has achieved it earlier by using loads of black "Mauly" clips. Not sure whether these are available in US...
As you say a Harrington one is even more complicated because of the hatch opening. Even though a club mate has achieved it earlier by using loads of black "Mauly" clips. Not sure whether these are available in US...
jumpinjan
Bronze Level Sponsor
Working on upholstery now......jan
65beam
Donation Time
Isn't Dave's car a Harrington Alpine and not a LeMans?Working on upholstery now......jan

65beam
Donation Time
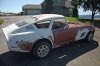
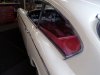
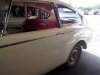
Spent the afternoon installing the rear side windows and furflex. The windshield is next. LiBrandi's in Pennsylvania replated the frame and all the other little bits for it along with the sun visor parts. I picked up the visors last week. 
Attachments
DanR
Diamond Level Sponsor
Jan has been doing a phenomenal job on the Harrington project. He developed a method for rebuilding the door hinges and......
I would like to know of the hinge rebuilding method Jan has developed... and I'm sure there are many others interested too.
jumpinjan
Bronze Level Sponsor
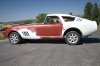
I'll be starting on Kellogg's headliner later this week, after I receive the material. Its a "basketweave" design vinyl material shipped from California.Jan,
It seems I ended up with what looks and fitted to be a headliner made for possibly Dave's car. View attachment 10345
One needs a Bridgeport mill to drill & ream the hinges.
Jan