-
Welcome to the new SAOCA website. Already a member? Simply click Log In/Sign Up up and to the right and use your same username and password from the old site. If you've forgotten your password, please send an email to membership@sunbeamalpine.org for assistance.
If you're new here, click Log In/Sign Up and enter your information. We'll approve your account as quickly as possible, typically in about 24 hours. If it takes longer, you were probably caught in our spam/scam filter.
Enjoy.
You are using an out of date browser. It may not display this or other websites correctly.
You should upgrade or use an alternative browser.
You should upgrade or use an alternative browser.
Clayton Dewandre -Another messy one...
- Thread starter bernd_st
- Start date
Limey
Donation Time
I really like the exchanges between Limey and Bernd on the CDW. I didn't mean to run a parallel thread on the Series II dash color. But it seems to be working for everyone.
Hi mate,
Bernd, me and you are three of a kind and we're not the only ones. As the old cliche says. 'It's the journey' and that's true. I love discovering the solutions. I had a real anti climax when the last resto came together. I love the doing and sharing of it but for me the final result will always be a dead end. So onto the next rebuild")
jumpinjan
Bronze Level Sponsor
Yes, they pick a metallic, light silver aerosol spray can but the aluminum flakes are TOO large and the silver too light...not good. I have done some paint matching at my paint store (20 years ago now) and my tech found a match using a "Pearl" medium silver. A pearl has much smaller "flakes" and matches the original better. Also his pearl does not have that pearlescent look of the hot-rod, custom paint jobsOften restorers use a silver metallic from a spray can, which is not exactly right from what I can tell. Any help would be appreciated
Jan
Hewi
Bronze Level Sponsor
Hi. New to the forum (in fact new to forums of any kind) I'm looking for some help if possible. I am trying to restore the Clayton servo for my C series.
In the fluid passage from the main cylinder to the air valve there is a grub screw that can only be accessed by a Allan key throught the bleed nipple hole. The grub screw prevents the passage of fluid to the air valve piston. As far as i know there is no similar device in the Lockheed servo. and I cannot find a schematic diagram and cannot think why the screw should be there as fluid needs to reach the air valve piston. Can anyone explain the reason for it? I'd be grateful for any assistance
In the fluid passage from the main cylinder to the air valve there is a grub screw that can only be accessed by a Allan key throught the bleed nipple hole. The grub screw prevents the passage of fluid to the air valve piston. As far as i know there is no similar device in the Lockheed servo. and I cannot find a schematic diagram and cannot think why the screw should be there as fluid needs to reach the air valve piston. Can anyone explain the reason for it? I'd be grateful for any assistance
bernd_st
Bronze Level Sponsor
First of all welcome to this corner of the forum. Your Avatar C-series looks somewhat familiar to me . Have you been with it to last year's Spares Day ?
Secondly, that is a very interesting aspect you recognized with your CDW. Haven't quite been that far on mine but when I opened up the air valve screw I found it too. Hmm not sure what the actual function is. The makers chart shows a small bit called "seating" (part#24):
Secondly, that is a very interesting aspect you recognized with your CDW. Haven't quite been that far on mine but when I opened up the air valve screw I found it too. Hmm not sure what the actual function is. The makers chart shows a small bit called "seating" (part#24):
Attachments
Last edited:
jdoclogan
Platinum Level Sponsor
I just finished the second iteration of my #41 Sebring Alpine Series II dash repaint. My paint guy and I came to the same conclusion Jan, re the metallic flakes. I'm not certain he used Pearl medium silver, but this product is very close to original. My paint guy and I agreed on adding some clear. First coating had a wonderful shine. After sanding with 1200 I compared the outcome to a 1200 sanded steering column cover plate with original paint.


Hewi
Bronze Level Sponsor
Hi Bernd. Appreciate the welcome. I've had the Harrington 35 years so been around a bit. Also it's the car on C series section of the Harrington Website and if you mean this years spares UK spares day at The Rootes Archive Cantre then yes I was there.
Thanks for posting the exploded diagram. Very useful.
With regard to the grub screw I can only surmise it is there to control the flow of fluid to the air valve piston. I intend to remove the air valve and piston, connect the servo, bleed the brakes and open the grub screw sufficient to allow fluid to flow into the chamber at a controlled rate then reconnect and test. The flow rate being a matter of trial and error as I cannot find any info. Other suggestions most welcome.
bernd_st
Bronze Level Sponsor
Ok, think we briefly met at the Spares day then.
There also is a function description of CDW in the SAOC Alpine Guide. However this grub screw is not explicitly mentioned there so one can only make assumptions. Can not tell you more at the moment, but pls. let s us know how you get on with this topic...
There also is a function description of CDW in the SAOC Alpine Guide. However this grub screw is not explicitly mentioned there so one can only make assumptions. Can not tell you more at the moment, but pls. let s us know how you get on with this topic...
bernd_st
Bronze Level Sponsor
Then we briefly met @ the spares day. Took some pictures of your car. Nice original one...
Regarding the CDW there is a more detailed functional description in the SAOC Alpine Guide. However grub screw function not explained in there. Can not help more at the moment since I'm also still digging into the functional aspects. Pls. keep us informed about any progress you make...
Regarding the CDW there is a more detailed functional description in the SAOC Alpine Guide. However grub screw function not explained in there. Can not help more at the moment since I'm also still digging into the functional aspects. Pls. keep us informed about any progress you make...
Limey
Donation Time
Hi Hewi,
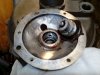
I dismantled 2 CDWs last week. One had a grub screw and the other did not. I do not think either had been open in their life.
I believe it could be a machining hole because it runs in a straight line from the bleed screw, through the secondary diaphragm and ends in the main bore.
The hole in the bore is less than 1mm so I can't see how it can be something adjustable
Oliver
Limey
Donation Time
Hi Bernd,
You probably have all this sewn up but I found this company in the UK does all the re-coil kits for the CDW. All my CDWs have corroded screws on the main diaphragm cover which sheared of and required drilling out and re-threading back to original thread. It's been a while but after one false start I think I will have the correct screws next week. The problem is that one of the 2 screw sizes slightly too long by 1.8mm. I can live with this. Its easy enough to lop off 2mm if rather tedious.
Oliver