• Welcome to the new SAOCA website. Already a member? Simply click Log In/Sign Up up and to the right and use your same username and password from the old site. If you've forgotten your password, please send an email to membership@sunbeamalpine.org for assistance.

    If you're new here, click Log In/Sign Up and enter your information. We'll approve your account as quickly as possible, typically in about 24 hours. If it takes longer, you were probably caught in our spam/scam filter.

    Enjoy.

The Journey Begins - Series I V6 Restomod

Bill Eisinger

Platinum Level Sponsor
It’s been a while since the last post…took some time off for some other projects but now (slowly) back at it. Rear end components are now all in…getting ready to run fuel lines and drop the tank in.

For those following along at home, recall this is a SI car…you might notice a few differences here.
 

Attachments

  • F513F6F8-3D11-46D0-A7E0-F19C96EDEA9C.jpeg
    F513F6F8-3D11-46D0-A7E0-F19C96EDEA9C.jpeg
    217.7 KB · Views: 75

Bill Eisinger

Platinum Level Sponsor
Some more progress....the engine compartment as it sits so far and the under dash area. All under dash components are mounted and I'm ready to start wiring. For those following along, recall this is a SI car undergoing a V6 conversion with an A4LD transmission. A few details that won't show up in a stock SI car...

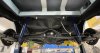
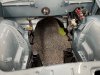
Note the pedals: Since we are installing an automatic we just need two pedals. The A4LD requires a wider tunnel so, to make room, we moved the pedals to the left using the original clutch position for the brake pedal and using the original brake mounting position for the throttle pedal. We used a little "torch love" to heat up the original brake pedal to rotate it sideways to appear more like a pedal found with an automatic transmission. After a lot of unsuccessful messing around with both early and late series stock pedals I, on a whim, ordered a Lokar pedal from Summit just to see if it might work. It turns out that it works great. The only issue was that, because the firewall is curved at the mounting point, I had to insert a spacer under one side of the pedal bracket to account for the curvature. I just used a nylon spacer and shaped it down until everything fit correctly. I don't know why I didn't start with Lokar pedal to begin with...it would have saved many hours.

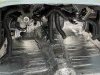
Heater/AC unit: I opted for the Old Air Hurricane unit. During the body/paint phase we removed the center portion of existing heater plenum and it fits perfectly in that space. Thanks to DanR for his original efforts in figuring out how to make the after market heater fit. The only issue (that is visible in the picture) is that there is now a lot more ductwork than the car had originally...in addition to the defrost vents there will be 4 more for heat and A/C....2 in the center console and 1 under each corner of the dash.

Wiper Motor: Keen eyed people will note that the wiper motor position is for a later series car. I wanted a 2 speed wiper so I procured a later motor and bracket and mounted it on what is left of the original heater plenum as would be in a later series car.

Drains: We sealed up the cowl vents as the Hurricane unit draws its input air from the cabin (plus, even with a top up, the Sunbeam is so un-airtight that an external fresh air seems unnecessary). Because of the reputation for rusting we installed a drain in each cowl vent area...you can see the drain lines running down in the corners of the firewall and exiting down near the floor in the front wheel wells.

EPS: Despite the recent cautionary discussions regarding EPS and potential damage to the steering box, I'm forging ahead. Based on the information contained in the Alpine Horn, I'm planning on setting the output torque of the EPS to about 25% of its maximum which should be within the tolerance of the steering box. The EPS has a variable control plus I'm going to add a circuit breaker rated for about 25% of it's current draw at max torque.

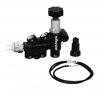
Engine Compartment: Note that, during the body/paint phase we cleaned up the firewall for visual appearance. For brakes I've gone with the Dodge Colt master cylinder that has been recommended here on the forum but have also added a Wilwood proportional valve to the system. We'll be using a throttle cable (rather than mechanical linkage) which can be seen in the photo...it will be cut down to proper size once the engine is in.

Next up is wiring...my new walnut dash panel has been completed so I'm going to start working on a harness for it such it can be easily removed if necessary, as opposed to all the instruments being hard wired as originally built. There are still a couple more holes to be punched in the firewall for wiring and then a little more sound deadening on the cabin side of the firewall once we have the wiring in place. Also I'll be wiring in stereo speakers...front ones will obviously go in the kick panels...not sure about rear speakers yet, if at all.

I'm still waiting for my engine to go on the dyno but hopefully, soon.
 

Attachments

  • Picture1.jpg
    Picture1.jpg
    609.7 KB · Views: 83
  • Picture2 (2).jpg
    Picture2 (2).jpg
    429.5 KB · Views: 83
Last edited:

DanR

Diamond Level Sponsor
Bill, the only thing I see that could be a big problem when installing the engine is the A/C and heater connections are headed straight toward the distributor.

Looks like you may have the connections that run straight thru the firewall out into the engine bay. Mine are out the passenger side then into through the firewall into the engine compartment through one of the brake/clutch hole for the Right-Hand Drive (England) Alpines.
 

Bill Eisinger

Platinum Level Sponsor
Bill, the only thing I see that could be a big problem when installing the engine is the A/C and heater connections are headed straight toward the distributor.

Dan- we (think we :) ) took that into account when we mocked things up. We didn’t install the heater box flush with the firewall…mounted it on standoffs so that the connection pipes don’t protrude through the firewall as far as they would if mounted flush….the dizzy will be on the centerline of the firewall and the pipe protrusions are off to one side a bit. It will be tight…may have to use a couple right angle fittings at the firewall but I think it will work.

Otherwise, as you say, it could be a big problem! I’ll never tell if it is…:)
 

DanR

Diamond Level Sponsor
Bill E, just curious, did you not know of the passenger side option for routing the connections?

Sure hope you can make it work.
 

Bill Eisinger

Platinum Level Sponsor
Bill, why the proportioning Valve?

Bill
I know it’s been debated here before but I just think it’s good engineering to have a proportioning valve on systems that have front discs and rear drums to prevent lockup of the rear drums in a hard stop. It may be over kill but I’d rather be safe than sorry.
 

Bill Eisinger

Platinum Level Sponsor
Bill E, just curious, did you not know of the passenger side option for routing the connections?

Dan- you should know by now from our multiple conversations that I'm kind of a dope!...:)...never even thought about the side connections! I just had a conversation with my body/paint guy...we think we're good....our final engine position ended up being a bit higher than what you have done in the past and the heater outlets should tuck right into the space under the vacuum advance. Down, the road, if you see pictures with the heater outlets coming in from another location, I'll deny we had this conversation! ;)
 

Bill Eisinger

Platinum Level Sponsor
What valve did you use?
I used the Wilwood combination proportioning valve (see picture). The front circuit has dual outlets for running separately to each caliper. The rear circuit has a single outlet with the adjustable valve to run to the rear drums. It also has a built-in brake light switch which simplifies things. It comes with a bracket that mounts the valve to the master cylinder....it took a little massaging to get the bracket to work with the Dodge Colt master cylinder and the clearance in the car but I'm happy with how it ended up. I'm not sure if you could employ this setup in a car with a clutch master cylinder in place (space wise) but I think there's room if you modify the bracket similar to what I did.
 

Attachments

  • Proportioning Valve 2.jpg
    Proportioning Valve 2.jpg
    257.5 KB · Views: 63
  • Proportioning Valve.jpg
    Proportioning Valve.jpg
    127.9 KB · Views: 63

Bill Blue

Platinum Level Sponsor
Curious as to how you will adjust the proportioning valve. Standard practice is to start with little to zero pressure reduction to the rear brakes, test and increase pressure reduction to the point the brakes no longer lock up. Stock Alpine rears are not known to suffer from premature lockup.

Bill
 

Bill Eisinger

Platinum Level Sponsor
Curious as to how you will adjust the proportioning valve. Standard practice is to start with little to zero pressure reduction to the rear brakes, test and increase pressure reduction to the point the brakes no longer lock up. Stock Alpine rears are not known to suffer from premature lockup.

Bill
Never having built an Alpine before I’ll take your word for it but, I find it hard to believe that the rear brakes wouldn’t ever lock up. Also, this won’t be a stock Alpine…front and rear brakes are now on separate circuits plus the car will be heavier than stock with the V6 and other mods added to it along with bigger wheels, stickier tires, etc. I guess worst case, if it’s not necessary, I’m out a hundred bucks for the valve but I’m not going to lose any sleep over it.
 

Aladin Sane

Diamond Level Sponsor
I am seriously considering a similar proportioning valve for my alger project. The postal jeep rear end currently has much larger drum brakes than a stock alpine. I may try changing to rear disks, but will likely run drums at least to start.
 

Bill Blue

Platinum Level Sponsor
I am seriously considering a similar proportioning valve for my alger project. The postal jeep rear end currently has much larger drum brakes than a stock alpine. I may try changing to rear disks, but will likely run drums at least to start.
Larger as in diameter? How about width of shoe? Diameter of cylinder? Braking power is the combination of the three.
Bill
 

Aladin Sane

Diamond Level Sponsor
Just by eyeball and memory, I would say larger drum diameter, and wider shoe. I have not had the drum off yet to get a look at the wheel cylinder.
 

Bill Blue

Platinum Level Sponsor
Don't be surprised at what you find. My brother in law (a mail carrier) described USPS jeep brakes of the era as "one foot to slow down, two feet to stop".

Bill
 

Barry

Diamond Level Sponsor
Offered as information only, YMMV.

According to the WSM's
, all Series Alpine rear brake drums were 9" x 1.75".

Posts in this forum indicate that Series Alpine rear brake wheel cylinders were either 0.875" (early) or 0.750" (late).

The best I can find, all Postal Jeeps (aka, Jeep Dispatcher) used 0.813" rear brake wheel cylinders and either 10" x 1.75" (early) or 9" x 2.5" (late) rear brake drums .

My SWAG's for the "relative rear brake force effort" values are:

Late Series Alpine 8.85
Early postal jeep 11.57
Early Series Alpine 12.05
Late postal jeep 14.87
OTBE, I am confident that late postal jeep rear brakes are considerably more powerful than late Series Alpine rear brakes. The other relationships are less clear. The simple approach is to find an empty parking lot or road and see what happens in a series of increasingly hard stops. If the postal jeep rear brakes lock up before the Series Alpine front brakes, then a proportioning valve for the postal jeep rear brakes is a logical next step.
 
Last edited:

Alpine 1789

SAOCA President
Diamond Level Sponsor
The only issue (that is visible in the picture) is that there is now a lot more ductwork than the car had originally.
Would it be possible to use smaller ducts? That might limit the air just a tad (although it probably doesn't have to travel as far in an Alpine as in other vehicles) but it would certainly make fitting everything a lot easier.
 

Bill Eisinger

Platinum Level Sponsor
I suppose you can use any size of duct you want…I just went with the standard 2” duct as specified by Old Air Products. It looks worse than it really is…with the 4 heat/AC vents that wouldn’t be present on a stock Alpine the ducting definitely adds a rat’s nest look to the under dash area but it wasn’t that difficult to get everything properly routed.
 

Bill Blue

Platinum Level Sponsor
I suppose you can use any size of duct you want…I just went with the standard 2” duct as specified by Old Air Products. It looks worse than it really is…with the 4 heat/AC vents that wouldn’t be present on a stock Alpine the ducting definitely adds a rat’s nest look to the under dash area but it wasn’t that difficult to get everything properly routed.
Exactly! When I installed my Old Air Hurricane, i went with a smaller size ducting, don't remember which size. I do remember the size steps are rather large, something like 1 1/2, with the next size 2". Anyway, the smaller ducting was a wipe out, not much air flow. Installed 2" ducting with no major prob;ems. Removing the dash is somewhat like cutting open your abdomen, guts flying everywhere. But there is enough room as the ducting is pliable. Best of all, the 2" provides good air flow.
Bill
 
Top