• Welcome to the new SAOCA website. Already a member? Simply click Log In/Sign Up up and to the right and use your same username and password from the old site. If you've forgotten your password, please send an email to membership@sunbeamalpine.org for assistance.

    If you're new here, click Log In/Sign Up and enter your information. We'll approve your account as quickly as possible, typically in about 24 hours. If it takes longer, you were probably caught in our spam/scam filter.

    Enjoy.

cleaning & refreshing gauges

hopsedge

Platinum Level Sponsor
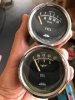
I want to remove the glass face and bevel of some of my Smiths Jaeger gauges to clean up the faces and maybe repaint the needles. Other than the usual risk of shoving something sharp into my hand while trying to unbend the bevel clasps, is there any other reason I should not do this?

I assume that I will have to replace the O-ring/gasket beneath the outer side of the bevel, but is there also a second one on the inside of the gauge housing; like b/t the glass and the bevel or beneath the glass and the housing? Is it actually a single larger gasket that covers both the inside and outside edges of the bevel?

To be clear, the gauges work fine (temp, oil pressure and gasoline). I am not trying to replace the guts of the gauges. I only to want to clean them up now that I have them removed from the dash.
 

Attachments

  • gauges.jpg
    gauges.jpg
    21.4 KB · Views: 27

sunalp

Diamond Level Sponsor
Eric,
The bezels have tabs on the back and will twist off. At least that's what they're supposed
to do. I have had some that will, most won't. I take a small blade screwdriver and slightly bend
the tabs up until I can turn the bezel . Once you clean the glass, repaint the needle and polish
the bezel you can put them back together and gently bend the tabs back. Whether this is
what most do I'm not sure, but I've done it with great success!
Cheers!
Steve
 

mikephillips

Donation Time
The original gasket between the bezel and the glass was cork, and generally have long since dried out and "glued" themselves to on or both sides. As noted you can gently bend the retaining tabs up to get the bezel off. I've then cleaned out the remaining cork and used a bit of glazing type compound to fill in the bezel and seal against the glass when reassembling. Then clean off any that might squeeze out on the outside from the glass. The inner, if there is one should be a small rubber o-ring. Some have it, some don't. You might also consider taking the insides out and cleaning and painting the outside of the gauge housing, most I've seen have a partial coating of rust on the outside and the mounting studs.
 

Tim R

Silver Level Sponsor
If you are just looking to do a basic refresh of the gauges this video on The Sunbeam Alpine Channel may be of use.

Tim R


Tom H

Platinum Level Sponsor
Good video, Tm. I would add a couple thoughts, particularly regarding the tach. Many tachs I have repaired have a lot of paint flaking inside the case. it is important to clear out the flakes especially any that have gotten into the area in and around the meter movement magnet and moving coil. I also recommend repainting the case interior if there is extensive flaking. Also be careful to minimize the thickness of the paint on the needle. The movement of the moving coil assembly is very sensitive. Even a slight increase in the weight of the paint on the needle can have a significant effect on the accuracy due to increased weight of the needle. There is an adjustable counterbalance on the pivoting movement, but I would not suggest doing any adjustment of it unless you do a recalibration at several point around the dial, using a precision frequency source. Just be careful to minimize the paint coating. I don't think teh speedo is as sensitive to this.

Tom
 

hartmandm

Moderator
Diamond Level Sponsor
Instead of bending the bevel tabs for removal, I get a piece of rubber, such as an upside down computer mouse pad, and press the gauge face down into the rubber and then rotate. I've had success with this method on the large and small gauges. Not bending the tabs will keep the bevel tight when reassembled.

Mike
 

hopsedge

Platinum Level Sponsor
Thanks, everyone. A follow-up question:

I've received new gaskets from Nisonger for both the bezel (i.e., b/t the glass and the inner face of the bezel) and the dash (i.e., the one that sits on the outside of the gauge, but snugs down next to the outer face of the bezel and provides a cushion b/t that outer face of the bezel and the dashboard itself). I think that Nisonger refers to these as "bezel gaskets" and "dash gaskets," respectively. My question is, do the small metal tabs of the bezel (n=3) bend over that outer "dash gasket," or instead, do they instead only bend over the metal edge of the gauge housing itself, leaving that outer gasket to simply snug down on top of the bent over tabs?
 

Alpine 1789

SAOCA President
Diamond Level Sponsor
My question is, do the small metal tabs of the bezel (n=3) bend over that outer "dash gasket," or instead, do they instead only bend over the metal edge of the gauge housing itself, leaving that outer gasket to simply snug down on top of the bent over tabs?
Tbe latter. And, if you haven't removed the bezels yet, you shouldn't need to bend the tabs, except on clocks. There are cut-out sections on the housings that match up to the tabs and the goal is to rotate the bezel until the tabs match up. The inner gasket often turns into something approaching concrete, so this can be easier said than done, but it can be done. Penetrating oil can help and I've sometimes had to just slightly bend the tabs to create some slack, but you want to be careful here as they break very easily if you completely open them up and then try to close them. One of those lessons many of us have learned the hard way.
 
Top