• Welcome to the new SAOCA website. Already a member? Simply click Log In/Sign Up up and to the right and use your same username and password from the old site. If you've forgotten your password, please send an email to membership@sunbeamalpine.org for assistance.

    If you're new here, click Log In/Sign Up and enter your information. We'll approve your account as quickly as possible, typically in about 24 hours. If it takes longer, you were probably caught in our spam/scam filter.

    Enjoy.

Your Opinion??

Alpine66

Donation Time
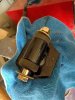
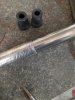
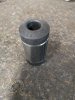
I pulled my original fabricated motor mounts on my Chevy v6, and am currently looking at different ways to utilize the existing pad on the k member.

I think I can do it with a Lot of finagling and possibly be happy with the results.

Or... I could drop the k member and remove the existing welded in mount pads and weld in new style ones that are at a more conducive angle.
I don't remember seeing this on the forum, although I'm sure it's been done.

I'm leaning toward the first option, and if not happy with that, go to new pads.

Thoughts?
 

Barry

Diamond Level Sponsor
James,

I have a L32 sitting in my S-V with fabricated brackets that attach to the original Alpine mounts / rubber pads.

FWIW, the Alpine mounts / rubber pads are conveniently angled at 60 degrees.

Maybe not exactly "local", but we are both in metro Atlanta. You can reach me through the forum PM or e-mail function.
 
Last edited:

Alpine66

Donation Time
Thanks Barry,
Be interested in seeing how you did it.

I used the OEM mounts for my first go round but not happy how they turned out.
I'm taking pics through this process, plan on posting them a little farther along.
 

Alpine66

Donation Time
Some pics of my first mount, which I am not going to use now, dont like the way it fits in there.
It mounts to the same place on the cross member as the original does.
 

Attachments

  • saoca4.jpg
    saoca4.jpg
    36.9 KB · Views: 24

Alpine66

Donation Time
My other project at the body shop.....definitely a darksider
 

Attachments

  • saoca3.jpg
    saoca3.jpg
    31.9 KB · Views: 25

Toyanvil

Gold Level Sponsor
For my Miata install, I found it easier to just cut the stock ones out and start over.
RIMG0030-L.jpg

RIMG0001-L.jpg

Tacked in
RIMG0004-L.jpg

RIMG0007-L.jpg
 
Last edited:

Alpine66

Donation Time
For my Miata install, I found it easier to just cut the stock ones out and start over.
RIMG0030-L.jpg

RIMG0001-L.jpg

Tacked in
RIMG0004-L.jpg

RIMG0007-L.jpg
I like how that turned out, good pics and good looking set up. If my latest try doesnt work out to my satisfaction then I'll be doing what you did.
 
Top