260Alpine
Silver Level Sponsor
There have been a few to put aluminum Volvo DOHC heads on the old 2.3 Pinto.
http://www.mgexp.com/phorum/read.php?40,2980072
http://www.mgexp.com/phorum/read.php?40,2980072

Welcome to the new SAOCA website. Already a member? Simply click Log In/Sign Up up and to the right and use your same username and password from the old site. If you've forgotten your password, please send an email to membership@sunbeamalpine.org for assistance.
If you're new here, click Log In/Sign Up and enter your information. We'll approve your account as quickly as possible, typically in about 24 hours. If it takes longer, you were probably caught in our spam/scam filter.
Enjoy.
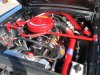
Barry, like many of us I got the 2.3 in a "deal" then read up on them. Not really a race motor but solid and can make lots of torque for its size. On the street torque is better than HP...usually, and that is why I did not swap a 302 into my 65 Mustang but stayed with the 200" SIX...YES, SIX! I would love an aluminum head but will make-do with what I have. With a mild cam, Esslinger intake, 2150 two barrel, hotter ignition, head work (basic polish, valve job), cool-air intake, custom header and tuning for the highway, it should make 130 HP and with the A4LD - 3.89 gears get high 20's MPG. NOT UP TO TODAY'S STANDARDS, but okay for me and no computers! Remember, I started out building street rods that were basically Hot Rods setup for the street. With a heater, better insulation, suspension rebuild and new interior, it should be ready for 500 miles a day. I covered 600/700 miles a day in a 289 powered 1932 Ford 5 window coupe...no AC, just baby-wipes and a crank-open windshield. Which reminds me, you ever try to swat an angry Yellow Jacket while doing 75 mph down the interstate? The wife hit me 5 or 6 times before we got it smashed against a door frame. The picture is my 200 SIX that I am very happy with...but most speed stuff must be made or found on ebay.Bill,
Noted that a typically dressed 2.3 / 2.5 Duratec is about 300 pounds compared to about 400 lbs. for the 2.3 SOHC Pinto engine.
An extra 100 pounds and a lot less power with the 2.3 SOHC Pinto engine doesn't compute for me, but .....
Just my opinion, YMMV.
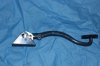
Barry, here is (I hope) a picture of the 6:1 brake pedal. The original pivot pin was removed and a steel plate was bolted onto the original pedal bracket. The new steel and bracket were drilled to accept a 3/8" I.D. bushing and the pedal was drilled and reamed to .374" and a 3/8" dowel pin pressed in. I pressed the pin into the pedal and the bracket be assembled with the pin in place as I did not want to compromise the friction fit with assembly/dis-assembly. The pushrod was not modified.
Please feel to improve on the idea. While it is pure barnyard engineering, I think it has merit.
Bill