• Welcome to the new SAOCA website. Already a member? Simply click Log In/Sign Up up and to the right and use your same username and password from the old site. If you've forgotten your password, please send an email to membership@sunbeamalpine.org for assistance.

    If you're new here, click Log In/Sign Up and enter your information. We'll approve your account as quickly as possible, typically in about 24 hours. If it takes longer, you were probably caught in our spam/scam filter.

    Enjoy.

Tricks to installing Doors

napa 1

Donation Time
The doors on my Le Mans had been rehung when it was at the body shop and they fit nicely...the question I have is reinstalling the dove tail on the door jamb so that it is in the right place to nealty meet the latch on the door when it closes. There is quite a bit of wiggle room for adjustment on the dove tail. Any thoughts on that?
 

Bill Blue

Platinum Level Sponsor
Jim, if all else fails, place a block of wood at the top of the door and give the bottom a nice shoulder block to give it the correct "twist" to fit the body. I had to do it on my passenger's door. You'd probably puke if you saw the stuff a body shop does to get panels to fit.

John, all I can say is adjust the dovetail to give proper fit of the door when shut and smooth operation of the latch. It's a no man's land, that's why there is so much wiggle room.

Bill
 

Alpine 1789

SAOCA President
Diamond Level Sponsor
Jim, if all else fails, place a block of wood at the top of the door and give the bottom a nice shoulder block to give it the correct "twist" to fit the body.

Yeah, but do I do that (and the rest of the alignment steps) with the weatherstripping on or off the door?
 

Bill Blue

Platinum Level Sponsor
Yeah, but do I do that (and the rest of the alignment steps) with the weatherstripping on or off the door?

Well, I did it with the stripping off the door. I must say, I don't see that it makes much difference, but I would vote for no weatherstripping. The door needs to go where it fits, if it is being "nudged" into position with the weatherstrip, the rubber will quickly give up and allow the door to go out of alignment.

In my experience, the weather stripping did not change the door alignment, but my stripping is not stock. It did affect how far the door would close. Without it, the door would easily close too far.

Bill
 

Alpine 1789

SAOCA President
Diamond Level Sponsor
Thanks Bill. I have the feeling that the weather stripping is creating the problem in the lower left, so I will try removing it. I may cut a couple of small pieces off (the PO left it untrimmed when he put it on) and put them in a few places to provide some cushioning.

While we are back on this topic, Ken Ellis had a great idea when it was first posted :

I've been toying with the idea of making special screws for the door hinges -- screws with the standard head and thread, but with a hex profile on the 'first end thru the hole'... so the hex end will still fit through the standard hole, but one could tighten it from the inside of the door, once you removed the interior panel. That way, you install 'loose', and then adjust/shim/hammer/curse for good 3-dimensional fit. Then, (with the interior door panel off, window up) you reach in and tighten each screw counterclockwise, securing the hing/door alignment. Then you can safely open the door to fully tighten the screws, and with any luck, it won't shift. The thing I don't know is if you can get to the inside of the body's door pillar to do the same thing on the body. It would seem that doing the door/hinge interface would help, but being able to do both would really help. (It's likely that shims or hinge-pounding would still be required to some extent.)

This was very much on my mind when I was playing with the hinges over the weekend. It seems to me like they would make the task far easier. I don't know how difficult it would be to make them (I certainly don't have the tools or the talent), but I would love a set. I don't think you'd need more than 8 of them; two on each side of each hinge ought to do it. You put all of the bolts in the hinges, with the special ones on the corners. Once everything was aligned and the original screws were tight, the Ken screws could be removed and replaced with stock one. They could then be saved for the next car, or passed on to the next guy.

Ken: did you ever make any of these? If not, count me in for a set if you want to try!
 

Ragg Mopp

Donation Time
A tip I got 3 years ago when I did my car was to drill a small hole in each hinge for realigning when I put the doors back on. I ended up jamming an awl into the holes rather than using the drill bits since it was easier to get in. Of course, this only works if the doors are still on and properly aligned to begin with. You end up with a small hole that is almost invisible but could be filled with putty and painted to hide if looking for a perfect concours look. I did not have to do any hinge moving when it went back together. It also worked for the hood.
 

Alpine 1789

SAOCA President
Diamond Level Sponsor
I am bringing this back up to the top, as I may have found a solution to the age old problem of getting doors adjusted once they have been completely removed. If you read my last comment above, you will see that I was very intrigued by Ken Ellis' idea of machining a hex profile into the end of a screw in order to tighten them from the inside. As I said in January, "I don't have the tools or the talent" for the job, but that didn't stop me from thinking about a solution.

My first thought was to try to file/grind a hex profile by hand, but doubted I could pull that off. I also considered finding a very small nut and welding that to the end of a screw, but doubted I could do that with my welding equipment or skills. That let me to think about a simple solution, just cutting a slot into the end of a screw and using a flat head screw driver. I wasn't sure that would be strong enough, but that image made me think of ordinary set screws. What I was trying to design was just a set screw with a flat head screw head on the other end. So, instead of trying to machine something into the butt end of a screw, why not just use a standard set screw and figure out a way to make an appropriate head for that?

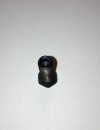
I went to Ace Hardware and picked up a handful of allen head 5/16-24 set screws for about $0.70 each. I then took a couple of 5/16 nuts and attached them to the end of a bolt, locking the two together so that one was basically flush with the end of the bolt. Holding the end of the bolt I was then able to pretty quickly grind the nut down at about a 45 degree angle until it approximated the head of the original door bolt. I got it close by hand, then removed the nuts and re-attached them to a bolt with the head cut off. I chucked this into my drill press and used a file to smooth my grinds and to make the nut more symmetrical than I'd been able to do with the grinding wheel. Obviously, this would have been a lot easier with a small metal cutting lathe, but I don't have one and had to improvise. The picture below shows the nut/bolt attachment after smoothing in my poor man's lathe.

003rcc.jpg


Note that I left just a bit of the flats on the nut. I didn't do this the first time, then had to mangle the nut removing it from the bolt with a vice grips. the stock nuts have a rounded profile on top and there is plenty of room in the hinge area to leave part of the hex profile in place. (This also helps when screwing them into the doors.)

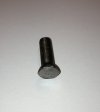
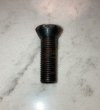
Step two is to just screw the set screw into the nut, making sure the allen head end goes in first so that it is now the tip end of the new screw. I screwed it in a little past the end of the nut, so that there was room to weld it a bit. A couple of seconds with my mig welder and the two were attached very firmly. I then ground the end flat again, and just for good measure chucked the screw back into my drill press to file the end completely flat. Here are a couple of pictures of the end product next to the stock original:

1001275t.jpg

1001276k.jpg


I did all of this work about a month ago and made four screws, but didn't have a chance to try out Ken's method until just a few days ago. I put one screw in each leg of the hinges and loosened the remaining screws enough to allow the door to be easily moved into position. Then, with my wife holding the door in place, I tightened each one of the set screws from the inside. This is very doable if the car has no interior, which is the case with my S3. It only took us about 15 minutes to get the door about 95% perfect! I don't think 100% perfect is possible in my case, as the PO painted the door jambs, doors and hinges before re-assembling the car.

I also learned that the process would be even easier and more accurate with two helpers - one to hold the front in position and one to hold the back. At this point, I wasn't worried about trying to get it spot on; I only wanted to prove to myself that I could do it. Now I can remove the doors in good conscience and get the car up on the lift. I'll worry about getting everything perfectly positioned when I get to that point.

Hope this helps someone else. Based on what I've read here, I would guess that the total time to make the screws and adjust the doors is still less than doing it the traditional way. :)
 

alpine_64

Donation Time
Jim,

Great to hear that worked, is a really good solution to a comon probem.. now you need to develop a bonnet and boot method.

Also probably the only time i will get to say, "that was the thing we all discussed over dinner, good to see it worked out!" :D
 

Alpine 1789

SAOCA President
Diamond Level Sponsor
Also probably the only time i will get to say, "that was the thing we all discussed over dinner, good to see it worked out!" :D

I beg to differ. It is the first time you could say that, not the only time. As Douglas MacArthur is reported to have said: I shall return!
 

hartmandm

Moderator
Diamond Level Sponsor
Hi Jim,

I am wondering if you can re-post the pictures from your post #47 above?

Thanks,
Mike
 

Alpine 1789

SAOCA President
Diamond Level Sponsor
Hi Jim,

I am wondering if you can re-post the pictures from your post #47 above?

Thanks,
Mike
I've changed computers (and operating systems) since then and it doesn't look like I have the photos archived on my current laptop. I'll see if I can't find them on a backup disk somewhere and also try to find one I can take a current photo of. I know most of the ones I originally made (13 years ago!) have gotten lost in the shuffle, but I may be able to lay my hands on one. It will just take me a few days either way.
Would it help to scribe the location of the hinges on the body and the door before you remove them?
That is certainly a preferable option. Probably even better is the trick to drill a small hole though the hinge and into the door before removing them. in my case, it was too late for either, as the PO had already taken the doors off and reinstalled them.
 

Alpine 1789

SAOCA President
Diamond Level Sponsor
I am wondering if you can re-post the pictures from your post #47 above?
I was hoping I could avoid having to post the following photos and publicly admit to an embarrassing screw-up, but this may be all I have, so…

Here are some photos of a door screw I made, which would have been fine if I’d used the correct size screw. I used a 3/8 set screw and bolt instead of 5/16 and didn’t notice my mistake until I’d finished. It came out very nice, other than being completely useless. Still, it should provide a good idea of what I did, when I did it correctly. The last photo shows my bolt next to a stock one for reference.
 

Attachments

  • IMG_6829.jpeg
    IMG_6829.jpeg
    826.6 KB · Views: 29
  • IMG_6827.jpeg
    IMG_6827.jpeg
    950.9 KB · Views: 29
  • IMG_6826.jpeg
    IMG_6826.jpeg
    1.1 MB · Views: 30
  • IMG_6830.jpeg
    IMG_6830.jpeg
    1 MB · Views: 29

hartmandm

Moderator
Diamond Level Sponsor
Thanks Jim!

There's always a learning curve on the first item. :) Your description now makes sense once I see the photos.

Thanks,
Mike
 

hartmandm

Moderator
Diamond Level Sponsor
I am wondering if a slightly simpler way to do what Jim did is to start with a long 5/16-UNF flat head screw (I see lengths up to 1-3/4"), grind some flat spots on the end of the screw (they don't need to be perfect), then use a universal fit socket to turn it. Would need to find the right length screw based upon how much the pins in the universal fit socket can retract. Thoughts?

1689897827142.png

Mike
 

Alpine 1789

SAOCA President
Diamond Level Sponsor
That certainly might work. My main concern would be the amount of room you have inside the kick area. As I recall, it was pretty tight. But, this might still do the trick and avoid having to machine special screws.
 
Top