
-
Welcome to the new SAOCA website. Already a member? Simply click Log In/Sign Up up and to the right and use your same username and password from the old site. If you've forgotten your password, please send an email to membership@sunbeamalpine.org for assistance.
If you're new here, click Log In/Sign Up and enter your information. We'll approve your account as quickly as possible, typically in about 24 hours. If it takes longer, you were probably caught in our spam/scam filter.
Enjoy.
You are using an out of date browser. It may not display this or other websites correctly.
You should upgrade or use an alternative browser.
You should upgrade or use an alternative browser.
Sunbeam 2000 build
- Thread starter belmateo
- Start date
Barry
Diamond Level Sponsor
Google knows.
http://dixonmayfair.com/wp-content/uploads/2018/02/2018-Car-Show-Entry-Form.pdf
I like the "must be driven in" rule.
http://dixonmayfair.com/wp-content/uploads/2018/02/2018-Car-Show-Entry-Form.pdf
I like the "must be driven in" rule.
Last edited:
belmateo
Gold Level Sponsor
Well, the glass guy really screwed up my plans. Just a heads up for you guys to AVOID tri-valley auto glass in Pleasanton, Ca. Total FLAKE!!!
Wednesday I had to have an operation on my hand but that didn't stop me from getting a hardtop with the window size very close to the S2000 which is from a Miata. The Ebay item number is here 202299394681. I was also able to get that rear cover from the same seller item number 202237400883. All I need to get now is the passenger side motor and I already found the hardware for the cover with motors, which I hope to get a reply soon. In short, off comes the Mercedes top and all the hydraulic plumbing that is VERY heavy so I will gain a weight reduction in the process and everything will be electrical with no risk of hydraulic fluid raining down on the passengers or filling up the trunk. With this new direction, I will be able to keep the stock Alpine trunk without modification. Can't wait for my hand to heal to get back into this project. Thanks for all the comments and suggestions guys.
Wednesday I had to have an operation on my hand but that didn't stop me from getting a hardtop with the window size very close to the S2000 which is from a Miata. The Ebay item number is here 202299394681. I was also able to get that rear cover from the same seller item number 202237400883. All I need to get now is the passenger side motor and I already found the hardware for the cover with motors, which I hope to get a reply soon. In short, off comes the Mercedes top and all the hydraulic plumbing that is VERY heavy so I will gain a weight reduction in the process and everything will be electrical with no risk of hydraulic fluid raining down on the passengers or filling up the trunk. With this new direction, I will be able to keep the stock Alpine trunk without modification. Can't wait for my hand to heal to get back into this project. Thanks for all the comments and suggestions guys.
Last edited:
belmateo
Gold Level Sponsor
Here is an update since I acquired the MX-5 retractable top. I found a really good deal on a Windshield frame from a dealer in Seaside. We ordered it and I got a call yesterday to come pick it up. so I made the nearly two hour trek there and could not believe my eyes. The box had the correct part number, however what was in the box looked like an upper part of a station wagon rear! The parts guy could tell I was really pissed after driving there and it being the wrong part. His first response was,"You gave us the part number" so I pulled up HIS add on my phone and he apologized. He sent an email to the warehouse (Located in Irving, California) asking them to make sure and check it before they send it. Needless to say same wrong part in the right box!! The first box, we could tell that somebody opened it and then resealed it and I was not there for the second one. I hope to hear back by the end of today after he talks to the warehouse directly.
Oh the fun of building a custom car......
Oh the fun of building a custom car......
belmateo
Gold Level Sponsor
OK, we learned something about Mazda parts. The windshield frame is sent out with the extra metal connecting the sides is intended to be cut out when you install it. Would have been nice if they actually put the part number on the product. Anyway, drove back down to Seaside and got it. I was also able to pick up the motors and hinges that motors for the deck lid cover. If you look at a video of the MX-5 retracting you will see that what they call the deck lid lifts up and back to make room for the top to retract and tuck in behind the seats. then the cover comes back down. You can actually lower the top and raise in about one minute. I'll get some pics up as this project gets going again.
Here is the link to a video.
Mazda MX5 Miata Power Retractable Hardtop opening & closing
Here is the link to a video.
Mazda MX5 Miata Power Retractable Hardtop opening & closing
belmateo
Gold Level Sponsor
I decided to take a drive down to San Jose looking for miata door glass (2007-2015). As luck would have it, there was a red one just inside the yard and it still had both doors. Went ahead and both complete doors since I don't know what channel, regulator etc. that would be needed.
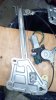
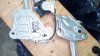
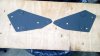
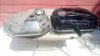
After working on it most of the day yesterday, it became clear that the Honda regulator must be used because the Mazda one had no place to mount it neatlly. Took a small sheet of metal flashing to temporarily mount the window in the door to get a baseline and make any adjustments needed. The window fits so good that I went ahead and made some adapters for the Mazda window to be attached to the Honda regulator. Here are some pictures. The first picture is the Honda regulator, second picture is the Mazda, third is a side by side view and lastly the adapters I made.
After working on it most of the day yesterday, it became clear that the Honda regulator must be used because the Mazda one had no place to mount it neatlly. Took a small sheet of metal flashing to temporarily mount the window in the door to get a baseline and make any adjustments needed. The window fits so good that I went ahead and made some adapters for the Mazda window to be attached to the Honda regulator. Here are some pictures. The first picture is the Honda regulator, second picture is the Mazda, third is a side by side view and lastly the adapters I made.
Attachments

belmateo
Gold Level Sponsor
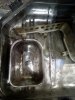
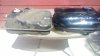
Here is a shot of the Miata roof to show how closely the window shape is to the car. Both windows are now in the doors, Drivers side is done, passenger side is still being worked on for the channel. Once it is done I can put the door panel back on, then I will take the roof apart so I only have the rear portion to work with to get it lined up correctly and attach it to the body. The mounting points for the Miata are wider than the car, so I may have to do some massaging and possibly use the Honda convertible roof hardware and mate it to the Miata.
Attachments

belmateo
Gold Level Sponsor
It has been a busy week, the top now moves freely without anything in the way. As I stated before, gas tanks oh what fun! I bought a tank from a salvaged car. Was able to cut the top off since it needs to be modified. Relocated the sump and baffle from the top of the tank to the base. In short I wanted to move the fuel pump/sending unit further back, relocate the filler tube to the center rear and make a new top for it. I have attached some pictures for you to see. Also been working on the original saddle tanks. I took the sending unit out of the drivers side and replaced it with the evaporative controls from the Honda, also relocated the bottom tube to the front of the tank (It will be attached to a crossover tube just behind the axle)
Thanks guys
Thanks guys
Attachments
belmateo
Gold Level Sponsor
Here are side by side views of how the tank shape changed so it would not interfere with the PRHT. I put compressed air into the sealed tank then sprayed it with soapy water to find any leaks. Once all the leaks were sealed up, I put a layer of JB Weld over all the welds. Tank and all hoses (including EVAP) are back in place. Rear subframe is also back in place so the rear brakes will have to be bled again. I am working on the modified crossover pipe now and will post pics of that when it is done.
Attachments
belmateo
Gold Level Sponsor
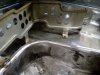
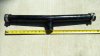
Here is the stock fuel tank crossover pipe after I modified it. You will notice that the small fuel feed has been replaced with a much larger one and the ends have been shortened. this will get mounted in front of the spare tire and into the tank that is mounted above the rear axle. Made some good progress on the rear frame rails to make them look similar to the Sunbeam factory rails. Once that is sealed and primed, will be able to move onto the quarter panels.
Attachments

Ken Ellis
Donation Time
Have you tried the Tiger Auto guys? I know they moved to the vicinity of Tennessee a couple years ago, and scrapped a lot of stuff before they left Dayton, but you may still be able to establish contact. Brad Babb might know info, maybe? Perhaps they saved and moved something like that, or could tell you what scrapyard in Dayton ended up with the body shells.