• Welcome to the new SAOCA website. Already a member? Simply click Log In/Sign Up up and to the right and use your same username and password from the old site. If you've forgotten your password, please send an email to membership@sunbeamalpine.org for assistance.

    If you're new here, click Log In/Sign Up and enter your information. We'll approve your account as quickly as possible, typically in about 24 hours. If it takes longer, you were probably caught in our spam/scam filter.

    Enjoy.

Sunbeam 2000 build

belmateo

Gold Level Sponsor
DanR,
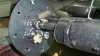
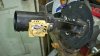
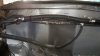
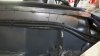
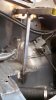
My first attempt was to replace the top plate with steel instead of nylon. Nylon is very difficult to adhere to anything other than itslef, so it did not quite seal. What I have in the car now just to move it around is a brass tee tapped and threaded into a hole drilled where the factory one broke off. Just finished what is to be the final one made out of solid steel with two sleeves welded into the top plate, with the connecter sealed into it so I can replace thinkgs like the sending unit and pump with factory parts.
 

Attachments

  • 100_4100.JPG
    100_4100.JPG
    175.5 KB · Views: 56
  • 100_4102.JPG
    100_4102.JPG
    201.2 KB · Views: 54
  • 100_4101.JPG
    100_4101.JPG
    187 KB · Views: 52

DanR

Diamond Level Sponsor
Lots of labor! Glad you can do that sort of thing. Looking forward to seeing the "finished product".....on-the-road....
 

belmateo

Gold Level Sponsor
Me Too!
Had a chance to wash the beast and happy to say no leaks around the roof and windows. Yesterday I started working on the dreaded trunk details, Ugh!
Some square tubing with one side cut off is making its way to be a nice water channel behind the firewall. I also started to remember to bring the camera out to the shop so I can take more car porn for you guys.
 

Attachments

  • 100_4097.JPG
    100_4097.JPG
    219.3 KB · Views: 36
  • 100_4098.JPG
    100_4098.JPG
    335.7 KB · Views: 36
  • 100_4099.JPG
    100_4099.JPG
    250.1 KB · Views: 36

belmateo

Gold Level Sponsor
Front rain gutter attached to rear firewall so I can continue with the final quarter panel attachements (for the second time). Also attached the fuel vent lines tying all three tanks together.
 

Attachments

  • 100_4103.JPG
    100_4103.JPG
    166.4 KB · Views: 31
  • 100_4104.JPG
    100_4104.JPG
    183.5 KB · Views: 30

belmateo

Gold Level Sponsor
I need to use the maita trunk lid because it matches the deck cover. Of course it will need to be enlarged wider and will add the Sunbeam trunk panel to the back of it for the correct look.
 

Attachments

  • 100_4105.JPG
    100_4105.JPG
    173.7 KB · Views: 44
  • 100_4106.JPG
    100_4106.JPG
    164.4 KB · Views: 44
  • 100_4107.JPG
    100_4107.JPG
    160.7 KB · Views: 45
  • 100_4108.JPG
    100_4108.JPG
    125.7 KB · Views: 41

belmateo

Gold Level Sponsor
Success! The retractable hardtop goes up and down perfectly on it's own. Major milestone, now working of the deck cover motors and wiring. Waiting on trunk weatherstrip to arrive so I can continue with the trunk.
 

belmateo

Gold Level Sponsor
David,
I will post pics and a video so you can see how cool it is! It was much easier than anticipated. The Miata motors were used but had to be rewired with the car plugs. After I tested them to make sure A) the windows would roll down first B) they were turning the correct direction. The top goes up and down suprisingly fast.
belmateo
 

SoCal'beaming

Donation Time
Looking forward it! ...... A retractable Sunbeam hardtop, WOW .. Something probably impossible to do with a stocker without a serious case of migraines .... David
 

belmateo

Gold Level Sponsor
I worked on the trunk today, first tried to bring a point to the front but that interfered so in pic 4115 you can see the final shape
 

Attachments

  • 100_4109.JPG
    100_4109.JPG
    157.5 KB · Views: 41
  • 100_4111.JPG
    100_4111.JPG
    165.3 KB · Views: 40
  • 100_4110.JPG
    100_4110.JPG
    210.8 KB · Views: 40
  • 100_4112.JPG
    100_4112.JPG
    216.9 KB · Views: 42
  • 100_4114.JPG
    100_4114.JPG
    149.2 KB · Views: 40
  • 100_4115.JPG
    100_4115.JPG
    159.5 KB · Views: 42
  • 100_4116.JPG
    100_4116.JPG
    162.8 KB · Views: 41

belmateo

Gold Level Sponsor
here is a shot of the hinge supports and initial trial of the Sunbeam trunk in position. The last three pictures are of less Mazda and MORE SUNBEAM!
I only cut off the portion that had the hinge holes. The video has been taken and will post as soon as it is sent to me.
 

Attachments

  • 100_4117.JPG
    100_4117.JPG
    182.1 KB · Views: 39
  • 100_4118.JPG
    100_4118.JPG
    169.5 KB · Views: 39
  • 100_4119.JPG
    100_4119.JPG
    259 KB · Views: 39
  • 100_4120.JPG
    100_4120.JPG
    410.2 KB · Views: 39
  • 100_4121.JPG
    100_4121.JPG
    319.3 KB · Views: 39
  • 100_4122.JPG
    100_4122.JPG
    365.4 KB · Views: 39

SoCal'beaming

Donation Time
Looks to work quite smoothly ... Sure is taken shape nicely. That top looks somewhat similar to the early series hardtop ... looks like a future project for a SII, along with the shooting brake I'd like to fab. o_O
 

belmateo

Gold Level Sponsor
Thanks, I am pleased with the progress so far. I don't see why you could not use the hardware from the Miata and adapt it to any top to make it wider or narrower. The length is already what I believe to be the limit for the motors. We were able to compress the video to make it a smaller size, but still not able to upload here. Any other way to post a video on here?
Here are two pictures of the way I did the top of the windshield to mate the two.
I like your thinking outside the box.
 

Attachments

  • 20190505_163052.jpg
    20190505_163052.jpg
    391.2 KB · Views: 30
  • 20190505_163042.jpg
    20190505_163042.jpg
    376.7 KB · Views: 30

SoCal'beaming

Donation Time
I'm not real familiar with the S2000 ... Did you add that header pc. to the windshield to capture the hardtop line?

..... David
 

belmateo

Gold Level Sponsor
David,
Yes, I bought a new windshield frame from the dealer and merged the two together. It was tedious and I am happy with the transition. The advantage you have with the Sunbeam is there is nothing behind the seats to interfere with any retractable top you can go with. Mine took quite a bit of time because Honda stuffs many things under the convertible top i.e. tall fuel tank, spare tire.
Guy
 

belmateo

Gold Level Sponsor
The wiring for the deck cover that sits just behind the roof took a lot of figuring out how to wire it up. After much research and thinking, it turned out that I could use another roof switch (which only uses three pins). Even though it has five call outs, I wired two 5 pin relays together and to both motors. It is located just above the fuel pump access cover, diagram below. With that taken care of, been busy sorting out the console switch layout and at the same time decided to change out the boot color.
 

Attachments

  • deck cover wiring.jpg
    deck cover wiring.jpg
    25.3 KB · Views: 25
  • 100_4123.JPG
    100_4123.JPG
    285.4 KB · Views: 25
  • 100_4124.JPG
    100_4124.JPG
    234.9 KB · Views: 25
  • 100_4125.JPG
    100_4125.JPG
    187 KB · Views: 25
Top