• Welcome to the new SAOCA website. Already a member? Simply click Log In/Sign Up up and to the right and use your same username and password from the old site. If you've forgotten your password, please send an email to membership@sunbeamalpine.org for assistance.

    If you're new here, click Log In/Sign Up and enter your information. We'll approve your account as quickly as possible, typically in about 24 hours. If it takes longer, you were probably caught in our spam/scam filter.

    Enjoy.

Rear lamps on SIV

Scotty

Silver Level Sponsor
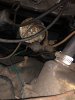
Long story short, I was having issues with ground. So I grounded the lamp housings with some 14 gauge wire and magically power returned to my front and back parking lights.. for a time.

The fronts are bulletproof but the rear amuses me (feel free to read into that as you like lol).

Before I grounded the housings, the rear parking lights came on and worked. When I went to take a bulb out from the top of the housing, the parking lights cut out and refused to come back on unless I tapped it with my hand. When I grounded them they came back but are dim and not sure why when the fronts are really damn bright. Plus for some reason when I grounded it, the top drivers side light in the rear is on. The brake lights don't work and my servo works fine. Any ideas what I might be missing or what could be going on?

And while I'm on the subject, what bulb sizes does the rear use? I have been told a few sizes and they're too big for mine. Thanks!
 
Last edited:

Tim R

Silver Level Sponsor
Earths (Grounds) on Alpines are often poor and that certainly sounds like you have earthing issues. We add numerous additional earth wires when we re-wire our cars to ensure that there is good consistent electrical flow all round the car. It prevents numerous future problems for cars like ours that get properly used in all weathers.

You may find this video on the Sunbeam Alpine Channel on YouTube useful. Tim R


Tom H

Platinum Level Sponsor
Scotty, You ask "what size" the lamps are. They are not usually referred to by "size" but rather bulb number. I am 95% sure the flasher bulbs, bothe front an rear are #1056. And the dual rear Tail light / Brake light are a #1057.

At first I thought this was a dumb question as "everybody" knows these numbers. But then I tried to find a place where you can find this info on this site, but was unsuccessful. These numbers are not listed in the Owners manual, nor the WSM. Instead the old Lucas numbers are listed and I can find no cross-reference.

Group, can we add this info somewhere.

Tom
 

Scotty

Silver Level Sponsor
Thanks for the information! Tom, yes the numbers are bang on. The bulbs I had are pretty old and three of them decayed from the inside out when I removed them, had to use a pair of needlenose pliers to bend and remove one of them in the front light housing. Was nasty...

For the sake of clarity for anyone searching for the 'bulb' answer and wondering about the tiny front parking bulbs, those are 194 and they are so nice :)

I watched the video, used some bolts and now the lights are bright and shiny, which leads me to my second problem that I'm diagnosing: The brake lights activating when I press the pedal.

I figured out the where, a small unit with two prongs for electrical wires attached to a cross near the servo. The cross is not attached to anything and I'm wondering a few things:

1. I had the brakes fixed and the car stops and stops very well, but, if the servo is in some way botched, would that affect the brake lights coming on? Asking this in case I run across something I can't figure out and it turns out it has something to do with pressure or the servo. Forgive me if it's a silly question.

2. How would I diagnose this? I'm going to check the wires, clean the prongs and so forth and see if it will work on its own. Might even ground the cross too just because.

3. If it turns out to be the brake light switch, where do I find the correct one? I checked Rick's catalogue and I didn't see one in there unless I missed it (and I could have).

I searched the forum and noticed there was a thread detailing the fix on iirc a S2 and it sounds different than what I have.

Thoughts?
 

Tom H

Platinum Level Sponsor
I figured out the where, a small unit with two prongs for electrical wires attached to a cross near the servo. The cross is not attached to anything and I'm wondering a few things:

Not attached to anything?? That "cross", where the brake light switch is mounted, is supposed to be the junction for the brake line carrying the brake line pressure to the front and rear brakes. Are you saying there are no brake lines going into and out of that "cross" ? If so that's the problem. If the crosss does have the lines going into it, and your brakes are working, then that switch is probably bad. If your brakes work and the car stops, there is enough pressure in the line to cause a good switch to close. A quick way to test that the rest of the circuit , wiring, and bulbs are good is to pull the two wires off the switch, and connect them to each other - you can use a paper clip to connect them. Then look at the brake lights- They should be on when you connect those two wires- with the ignition key in the ON position. If not you have a wiring, or lamp problem.

Tom
 

Scotty

Silver Level Sponsor
Not attached to anything?? That "cross", where the brake light switch is mounted, is supposed to be the junction for the brake line carrying the brake line pressure to the front and rear brakes. Are you saying there are no brake lines going into and out of that "cross" ? If so that's the problem. If the crosss does have the lines going into it, and your brakes are working, then that switch is probably bad. If your brakes work and the car stops, there is enough pressure in the line to cause a good switch to close. A quick way to test that the rest of the circuit , wiring, and bulbs are good is to pull the two wires off the switch, and connect them to each other - you can use a paper clip to connect them. Then look at the brake lights- They should be on when you connect those two wires- with the ignition key in the ON position. If not you have a wiring, or lamp problem.

Tom

The "cross" itself is floating, like in the picture below. The brake lights were working before and the car has sat for a long time. The DPO did something with the wiring on the back lamps, as I discovered a few minutes ago and they're been that way since I owned the car. One of the two prongs was plugged in and it's been like that since go. I don't understand how it all works and I'm working on remedying that, but it did work so I'm going to assume the switch is broken. Which switch is the right one and when I install it, do I need to bleed the brakes or do anything else, since this switch is screwed on right into the line?
 

Attachments

  • 118193502_437350733891026_6145127852184564738_n.jpg
    118193502_437350733891026_6145127852184564738_n.jpg
    265.3 KB · Views: 38

Tom H

Platinum Level Sponsor
That cross was originally bolted to the chassis, I think with the bolt that shows in the photo. Can you get your oil filter off and on with that crosss in the way? What is that hose and hose clamp in the photo? I'm guessing that is some kind of replacement booster? It is not stock. Most likely the switch is bad, but before you try to replace it, do the simple test I described earlier, and be sure the Ignition switch is ON when you test. As originaly wired the brake lights only work when Ign is ON.

"A quick way to test that the rest of the circuit , wiring, and bulbs are good is to pull the two wires off the switch, and connect them to each other - you can use a paper clip to connect them. Then look at the brake lights- They should be on when you connect those two wires- with the ignition key in the ON position. If not you have a wiring, or lamp problem"

A replacement switch is available from Sunbeam Specialties in CA : https://www.rootes.com/. Part number ES55 on page 16 of their catalog.

Good question about bleeding the brakes. I am pretty sure I have replaced that switch without needing the bleed the brakes. Be sure you don't step on the brake pedal while the switch is out. And don't delay between removing the old and installing the new switch. A few drops may dribble out and air dribble in if you delay.

An alternative you might consider is installing a mechanical switch near the brake pedal. Bill Blue on this forum used to sell a kit. Maybe he still has one.

Tom
 

Scotty

Silver Level Sponsor
That cross was originally bolted to the chassis, I think with the bolt that shows in the photo. Can you get your oil filter off and on with that crosss in the way? What is that hose and hose clamp in the photo? I'm guessing that is some kind of replacement booster? It is not stock. Most likely the switch is bad, but before you try to replace it, do the simple test I described earlier, and be sure the Ignition switch is ON when you test. As originaly wired the brake lights only work when Ign is ON.

"A quick way to test that the rest of the circuit , wiring, and bulbs are good is to pull the two wires off the switch, and connect them to each other - you can use a paper clip to connect them. Then look at the brake lights- They should be on when you connect those two wires- with the ignition key in the ON position. If not you have a wiring, or lamp problem"

A replacement switch is available from Sunbeam Specialties in CA : https://www.rootes.com/. Part number ES55 on page 16 of their catalog.

Good question about bleeding the brakes. I am pretty sure I have replaced that switch without needing the bleed the brakes. Be sure you don't step on the brake pedal while the switch is out. And don't delay between removing the old and installing the new switch. A few drops may dribble out and air dribble in if you delay.

An alternative you might consider is installing a mechanical switch near the brake pedal. Bill Blue on this forum used to sell a kit. Maybe he still has one.

Tom

Here is the problem I am running into:

On the switch there are two prongs. Only one has something plugged into it. There is no other wire there and the wires in the bonnet are neat and organized and wrapped like original. I went through the wiring and rear lights and don't see anything modified beyond a "missing" wire.

What does each of the prongs do? That could help me figure this out, because this car's brake lights DID work and so did the TURN signal as well before I broke and fixed it. Neither one works and the flasher does jack.

I'm only listing it in case there's a common thread between them. I just rebuilt my horn but it's not attached to anything and the wire that it plugs into in the steering column is gone, but the original horn itself is still bolted on the car. I'm not getting frustrated insomuch as I am confused. Does the switch itself get power from somewhere? How does it work?

I'm going to order one from Rick tomorrow, so anyone reading along who has done the switch fix please tell me: Do you bleed the brakes when doing the fix? I'm going to do the mechanical mod on it but I also want all options open in case I wind up with, for some reason, needing the switch for what I got wired to work.
 

Attachments

  • AAAAPIC.jpg
    AAAAPIC.jpg
    265.1 KB · Views: 20

hartmandm

Moderator
Diamond Level Sponsor
The two prongs/connectors are either side of an open / close switch. The brake light switch is normally open when there is no brake fluid pressure and that results in no connection across the two connectors. When brake fluid pressure rises when the brake is applied, the switch closes and there is continuity across the two connectors to allow current to flow to the brake lights.

The fact that you have only one wire on those two connectors means the brake light switch is not controlling the brake lights.

As Tom H mentioned, you need to first figure out how to get your brake lights to light when you have by-passed the brake pressure switch. I am wondering where the second wire is that is normally connected to that pressure switch.

The turn signal and brake lights are different circuits. They do share a common ground in the light housings, though.

Mike
 

husky drvr

Platinum Level Sponsor
Scotty,

If only one wire is on your pressure switch, it's not controlling your brake lights.

As a wild guess, look under your dash at your brake pedal arm. If you a see a switch that operates when the pedal is depressed, then someone has modified your brake light operation.

Hopefully this is the case.

I once had a two filament bulb that broke one of the filaments. The only problem, the broken filament welded itself to the other filament and it seemed the lights all worked - sort of. It had some really strange symptoms until I found the problem. Another point to check is make sure the bulbs are in the sockets correctly. The two locating pins are different heights so the bulb only installs one way. Sometimes old, corroded sockets will have the spring not holding the contacts in correct alignment with the bulb.

Hope This Helps.
 

Tom H

Platinum Level Sponsor
You say the brake lights used to work. Absolutely not going to work until you find the other wire to the switch. Or maybe, like Husky Driver said, the previous owner already replaced the brake light switch with a switch mounted near the brake pedal and is actuated by movement of the brake pedal. So look around the brake pedal and the pivoting lever it is mounted on, to see if there is a switch mounted there. If none, then find where is the other green wire that used to go to the pressure switch. I would not order a replacement switch until you find that other wire! No switch will work with just one wire!

The horns ( there are two of them) get power from the green wire circuit. See the wiring diagram here:
http://sunbeamalpine.org/wp-content/uploads/2017/09/s5_diagram.pdf

Note that the right side horn gets power from the same circuit that goes to the brake light switch. The left side ( drivers side) horn gets power from a green wire directly from the fuseholder. This 12 V power is applied to the horns whenever the ignition switch is in the ON position. The other electrical connections from the horns is the ground path provided by the Violet /Black wires that go to the horn switch on the steering wheel hub. When you push the horn ring, that grounds the violet/black wire and completes the circuit .

Tom
 

Scotty

Silver Level Sponsor
You say the brake lights used to work. Absolutely not going to work until you find the other wire to the switch. Or maybe, like Husky Driver said, the previous owner already replaced the brake light switch with a switch mounted near the brake pedal and is actuated by movement of the brake pedal. So look around the brake pedal and the pivoting lever it is mounted on, to see if there is a switch mounted there. If none, then find where is the other green wire that used to go to the pressure switch. I would not order a replacement switch until you find that other wire! No switch will work with just one wire!

The horns ( there are two of them) get power from the green wire circuit. See the wiring diagram here:
http://sunbeamalpine.org/wp-content/uploads/2017/09/s5_diagram.pdf

Note that the right side horn gets power from the same circuit that goes to the brake light switch. The left side ( drivers side) horn gets power from a green wire directly from the fuseholder. This 12 V power is applied to the horns whenever the ignition switch is in the ON position. The other electrical connections from the horns is the ground path provided by the Violet /Black wires that go to the horn switch on the steering wheel hub. When you push the horn ring, that grounds the violet/black wire and completes the circuit .

Tom

I'll check in the morning and post my findings. If I find nothing around the pedal or in the engine bay by where the pedal bits are bolted (WHY didn't I think of that?!), is there a way of testing the brake lights from the tail lights/trunk? Been thinking about the feasibility of that.
 

Tom H

Platinum Level Sponsor
Easy to test the "brake lights". Turn on the lights. Both tail light will light. I think you said the tails lights work . Using a short piece of wire or a paper clip, reach inside the right side access in the trunk to the right side tail light assembly and use the wire to jumper the two side-by-side prongs on the tail light. You may need to pull the connectors back slightly , but do not disconnect them. Be careful not to touch ground with the wire. The right side brake light should light up making the light in there much brighter than just the tail light. That tells you the bulb and socket are good! The left side assembly should also get brighter. That tells you the wiring from left side to right side is good.

Mike's idea is even better.

Tom
 

mikephillips

Donation Time
One nice thing is that as you trace the wires you can use a simple bulb with an attached wire as a test lamp to discover where the juice is disappearing. I've done that to determine where I had breaks in circuits and in these you don't have to worry about damage to a computer or such. Now one other thing to be aware of, depending on when your car was manufactured, somewhere in early 65 the series IV wiring harness changed and I've never seen it documented in the manuals. Mine is an early summer 65 build and when I rewired it the old harness and new harness matched, but were different from the workshop diagram. Seems that in that period they changed to what would be the series V harness but with a generator rather than alternator. So be aware of that since if it a late IV, you may be wondering what not everything matches.
 

Scotty

Silver Level Sponsor
UPDATE: Thanks to your advice, the brake lights DO work!

There is a wire missing from my engine bay that's supposed to go onto the brake light switch. I ran 12v through it and nothing happened. I pulled the wires and tested them from the drivers side and they came to life like a Christmas tree. So I'm going to do some investigating and going mechanical with it. I ran across a brake light switch and some parts to assemble one (Sorry Bill Blue, I didn't think of you until after I started getting parts together :( ). There is something funky going on with the car and I believe at some point since I've had it that someone went in it for some tomfoolery of some sort. I've checked a number of wires behind the dash, rear and in the engine bay and they so far correspond correctly with an Early Series IV wiring diagram, which matches my Alpine. If I run into anything oddball I'll post it here. I appreciate all of you help, thank you all so much!
 
Top