• Welcome to the new SAOCA website. Already a member? Simply click Log In/Sign Up up and to the right and use your same username and password from the old site. If you've forgotten your password, please send an email to membership@sunbeamalpine.org for assistance.

    If you're new here, click Log In/Sign Up and enter your information. We'll approve your account as quickly as possible, typically in about 24 hours. If it takes longer, you were probably caught in our spam/scam filter.

    Enjoy.

Porting the 1725

bobbo

Gold Level Sponsor
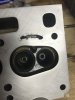
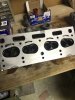
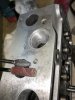
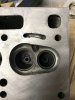
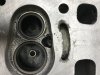
As I have the head off the SV, I have ensured it's flat, lapped the valves, and opened up the water ports ( casting was very rough and encroaching ).
Thought I may as well do a little porting. My thought is to use the sanding drums and not de-burring tools at the valve areas. Nervous of damaging the valve seats.
Will contain all work to inside the casting and not the chamber area.
any suggestions will be appreciated.
 

jdoclogan

Platinum Level Sponsor
For porting I approached this process like a dentist might in removing a cavity - slow and methodical -with a very steady hand. Hold Die grinder or Dremel with both hands. One hand of contact can create a catastrophe (not recommended) especially with de-burring process. Use aluminum (steel tip will clog-up) de-bur tip first to get the high areas removed. One can use a 80 grit sanding drum it just takes longer and you need more drums. Use sanding drum to do the finish and polishing work (going from 80 grit to 320 to 600 grit). Same process while doing the Vizard modification.

upload_2021-2-13_10-49-2.png
upload_2021-2-13_11-6-24.pngupload_2021-2-13_11-6-53.png
 

jdoclogan

Platinum Level Sponsor
Excellent photo reference Jan!

I have not used the grease application technique. I just ran steel specific de-bur tip on some steel. Clogged aluminum would come right off.
 

bobbo

Gold Level Sponsor
So far, I'm using carbide de-burring bits and 80 grit sanding rolls on my cordless, as my compressor is at a jobsite, so no 30,000 rpm tool available.
All in all with the slow speed of a cordless progress is good. I'll need to pick up some finer sanding rolls to finish off.
Getting rid of the ridges and hollows of the casting and working to a smooth uniform polished (120 grit ) finish.
I'll also work over the manifolds a they also are rough.
I will send some pics when I get this #%@& I-phone to download onto my PC.
 

alpine_64

Donation Time
opened up the water ports ( casting was very rough and encroaching ).
Are you reffering to the passages inside the head.. Or the crescent shaped water passages with 2 holes inside on the face of the head?

If the later...do not " open" them up or you will constantly have failing head gaskets. The cresent recess often corrodes and gets larger causing gasket failure. You usually need to weld them to bring them back to original size... Or a mod some of us do is weld them completely and drill the 2 holes to align to the block

Can you post a photo to the site of this area you opeed.
 

bobbo

Gold Level Sponsor
Here is the before of the water passages. I have opened them up so they are uniform and not ragetty looking.
Photo also of the porting on the intakes as it progresses.
If I should not have opened the water passages they were already in bad shape then.
 

Attachments

  • IMG_2090.JPG
    IMG_2090.JPG
    275.7 KB · Views: 27
  • IMG_2091.JPG
    IMG_2091.JPG
    294.1 KB · Views: 27
  • IMG_2099.JPG
    IMG_2099.JPG
    299.7 KB · Views: 27

alpine_64

Donation Time
Im not sure i see the " after" photo of the passages.. But if you opened them up equally to the furthest point on the outer edge lay a headgasket down and check the proximity of gasket to passage.

This area is a comon point of failure where the crescent corrodes ans enlarges the passage and compromises thr gasket.
 

bobbo

Gold Level Sponsor
here are a couple of close ups. cylinder no. 1 seems OK. Cylinder no. 4 might be an issue.
3 and 4 are somewhat in between. Your quite right about the passages, they are very close to the cylinders, not much gasket space.
I've tossed the old head gasket, so I cant check till a new one arrives.
 

Attachments

  • IMG_2100.JPG
    IMG_2100.JPG
    393.7 KB · Views: 25
  • IMG_2101.JPG
    IMG_2101.JPG
    409.1 KB · Views: 24
Top