
-
Welcome to the new SAOCA website. Already a member? Simply click Log In/Sign Up up and to the right and use your same username and password from the old site. If you've forgotten your password, please send an email to membership@sunbeamalpine.org for assistance.
If you're new here, click Log In/Sign Up and enter your information. We'll approve your account as quickly as possible, typically in about 24 hours. If it takes longer, you were probably caught in our spam/scam filter.
Enjoy.
You are using an out of date browser. It may not display this or other websites correctly.
You should upgrade or use an alternative browser.
You should upgrade or use an alternative browser.
Parrish Tops
- Thread starter Bill Blue
- Start date
socorob
Donation Time
having just did a total empty and rearrange of the garage we are trying to find a way to store the hardtop. you can buy little hand pulley systems fairly inexpensively also. What have other people done to store theirs? How tall is your ceiling Bill? Ours is 8 feet and im worried it may be too low to hang it like that. The parish top seems to be a better option than the factory top since you can still get parts for them.
Garage ceiling is 9'10". The top is currently 6"7" from the floor to its lowest point. I think I could raise it a few inches by rejiggering the sling dimensions. Count on this rig requiring two feet of vertical space. If you backed the Alpine in and slung the top so it hung close to the wall, it would probably work.
No pictures of the completed top mounted on the car. Maybe in a few days.
Bill
No pictures of the completed top mounted on the car. Maybe in a few days.
Bill
Ken Ellis
Donation Time
Marine stores (West Marine, Defender) have stuff like that, as anchor hold-downs or general 'cabin management' items. Places like Pegasus Racing have several styles of panel fasteners. Rock and roll equipment cases have other types of rugged, over-center, spring tensioned latches.
I use a similar ceiling suspension system for my hardtop. Same lift, but it rides on a Unistrut trolley to allow relocation between two garage bays.
I think Jim Stone has a rack that tucks up in the upper corner of the garage wall/ceiling junction.
There are a few different builders of manual block-and-tackle lifts for Jeep hardtops, that resemble bicycle hangers.
In my case, solo remove/install was the main design criteria.
I purchased the latches at Marine Depot.
http://www.marinepartdepot.com/ststadla.html
I think they could be modified to fasten the front of the top. Would require modification of the latch hook. A problem I encountered is the thread size, 10-32, is hard to find in stainless steel. I lost one of the hooks and had to make another one out of a 1/4" stainless bolt.
Bill
Just back from the drugstore with the picture!Nice. Pictures of it installed?")

Bill
What was the thickness of the rear window ? Does anyone know what the thickness of the original early series rear window is? I'm thinking about trying my luck to make a buck to make a new rear window since they don't seem to be available anymore.
Are you asking about the Parrish window? I never measured it, but 1/8" would be my guess.
Bill
Time to revisit the Parrish Top.
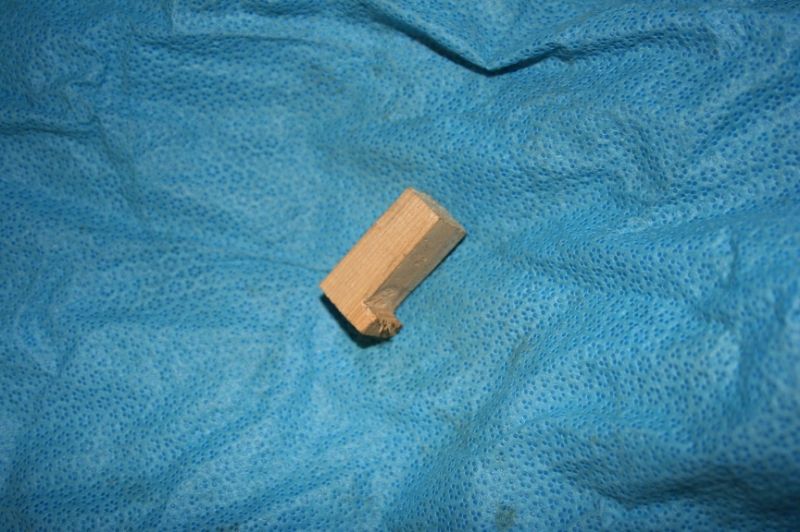
My next generation top hold down wooden mock up. It is designed to hold the top securely in proper position.
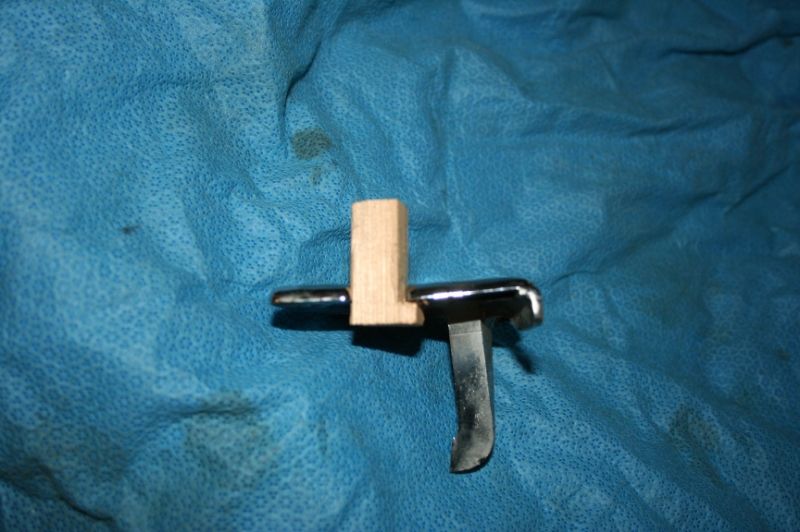
Here it is inserted into the doorpost cap. At this point, I did not know how I was going to attach it to the top hold down hardware.
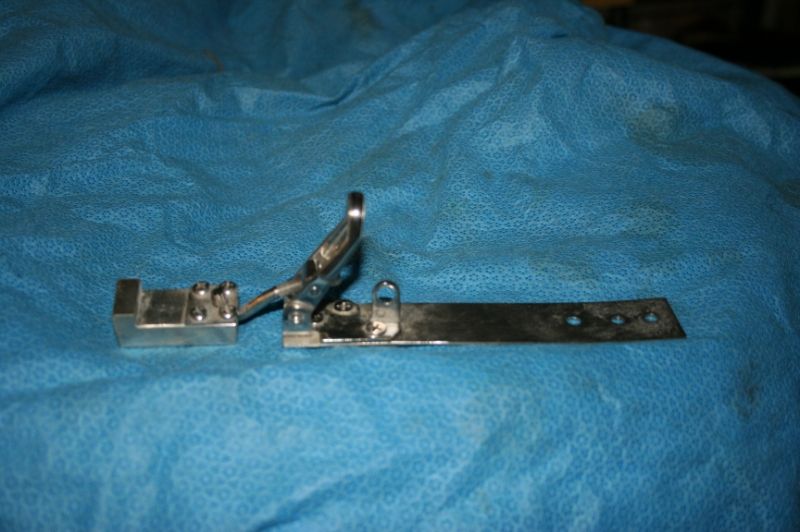
Here it is attached. I must have gone through two dozen designs in my mind before I hit on this. It captures the hold down, is adjustable, uses the old hook and offers flexibility. Beat of all, I could make it!
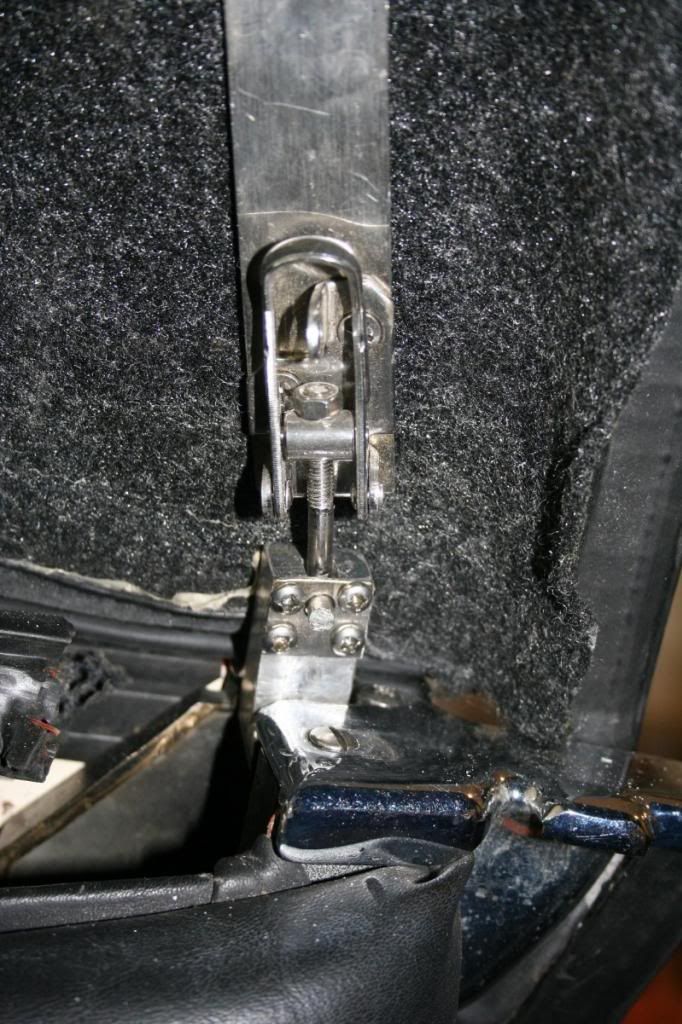
Here it is in action. When the top is removed, all hold down parts go with the top and nothing can fall off.
Bill
My next generation top hold down wooden mock up. It is designed to hold the top securely in proper position.

Here it is inserted into the doorpost cap. At this point, I did not know how I was going to attach it to the top hold down hardware.

Here it is attached. I must have gone through two dozen designs in my mind before I hit on this. It captures the hold down, is adjustable, uses the old hook and offers flexibility. Beat of all, I could make it!

Here it is in action. When the top is removed, all hold down parts go with the top and nothing can fall off.

Bill
Last edited:
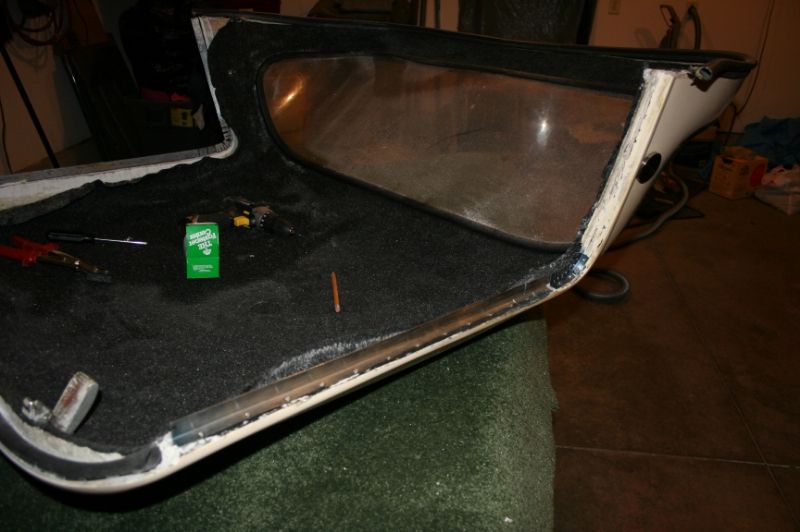
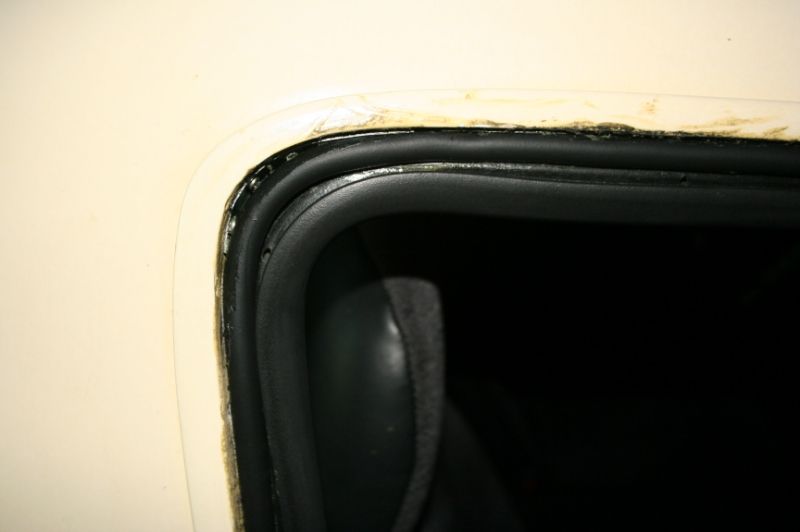
Next up - the window seal. The Smoothline replacement just is not adequate for the job. For a host of reasons, I decided to use the Focus door seal.
It was obvious the factory method of "locating" the window seal was not not going to work with the Focus. But that was no big deal, it did not locate the factory material either. So most of the fiberglass ostensibly designed for that purpose was removed and replaced with steel.
Here is small piece of the Focus material in place.
I think that the manufacturing process used to make the tops just was not capable of producing a product with the accuracy necessary to use most seals. The original Parrish window seal was a big floppy looking thing that was made to accommodate those inaccuracies. Unfortunately, the factory replacement seals are not up to the job.
It was obvious the factory method of "locating" the window seal was not not going to work with the Focus. But that was no big deal, it did not locate the factory material either. So most of the fiberglass ostensibly designed for that purpose was removed and replaced with steel.

Here is small piece of the Focus material in place.

I think that the manufacturing process used to make the tops just was not capable of producing a product with the accuracy necessary to use most seals. The original Parrish window seal was a big floppy looking thing that was made to accommodate those inaccuracies. Unfortunately, the factory replacement seals are not up to the job.
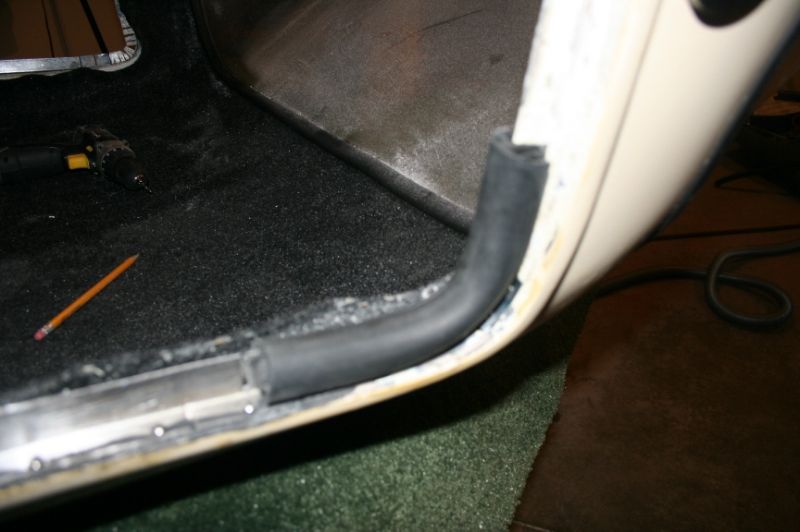
The new seal in place. Not perfect, but a much improved fit. The large space
between the seal and top.

Here is a pic of the old seal. No way I could ever seal that fold that developed.
And here we have the finished product. The filler seal is, I think, stock Alpine window seal. It is something that I got with the parts car. Been in the box about 30 years, had a terrible "set", which did not improve the finished product. Now to give it a few days to let the adhesive to set up and give it a trial run. The smear of glue on the top is the urethane glue that I used to glue the factory seal. Is not removable with anything known to mankind, other than sandpaper. The glue between the two seals is upholstery glue, easily removed with mineral spirits.
The Focus door seal did such a good job of sealing the window (no leaks or whistle), that I removed the headliner and glued in three layers of carpet padding. A very large improvement. So much so that I am installing it elsewhere. sorry, but I forgot to take any photos of that process.
Bill
between the seal and top.

Here is a pic of the old seal. No way I could ever seal that fold that developed.

And here we have the finished product. The filler seal is, I think, stock Alpine window seal. It is something that I got with the parts car. Been in the box about 30 years, had a terrible "set", which did not improve the finished product. Now to give it a few days to let the adhesive to set up and give it a trial run. The smear of glue on the top is the urethane glue that I used to glue the factory seal. Is not removable with anything known to mankind, other than sandpaper. The glue between the two seals is upholstery glue, easily removed with mineral spirits.

The Focus door seal did such a good job of sealing the window (no leaks or whistle), that I removed the headliner and glued in three layers of carpet padding. A very large improvement. So much so that I am installing it elsewhere. sorry, but I forgot to take any photos of that process.
Bill
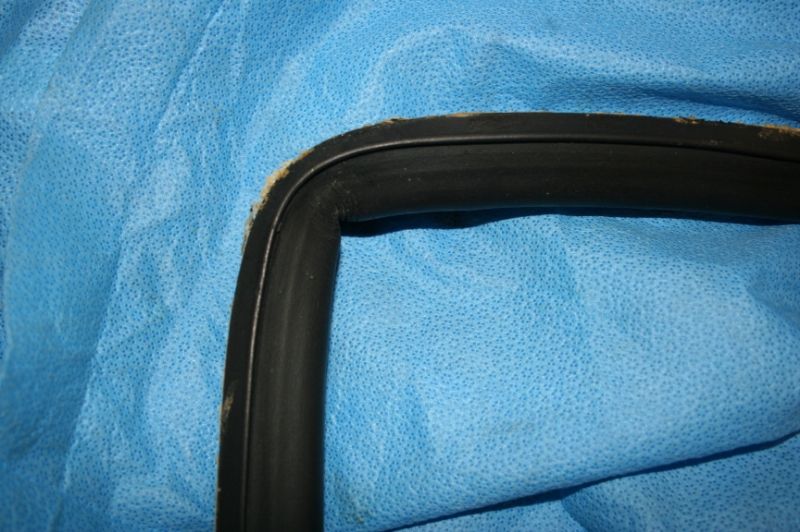
The "finished product" did not work so well. Looked good, but interfered with the seal so that we had an imperfect fit and wind whistle. So I cut round tubing off of a seal that I had used previously and tried that. Looked okay, but it was oval in cross section and tended to flatten in the curve. THAT was cured by using 5/16 vinyl tubing. Of course it was deformed into a maze of permanent curves. Stuck an eighth in dowel rod into it and heated with a heat gun. When the vinyl cooled, it was fairly straight. The vinyl tube was then stuck into the rubber tube, courtesy of a dab of Goop.
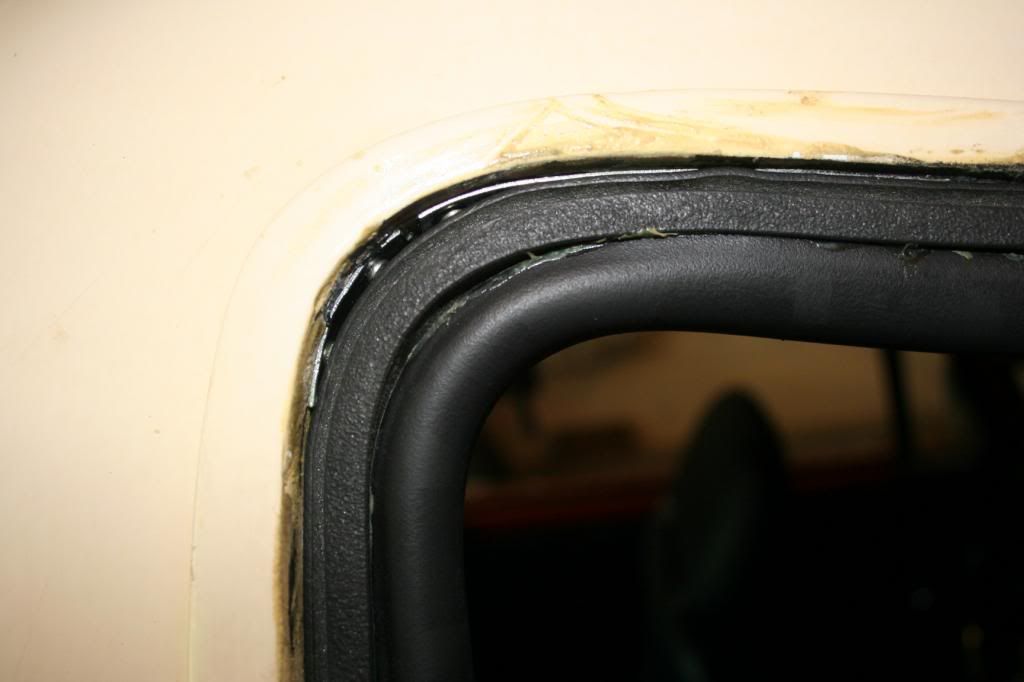
Does not look as good as the "finished product", but works better. No wind whistle around the side windows, just a bit at the area where the windscreen joins the side window. I think it is the stainless gutter. Will leave well enough alone.
At least for the present.
Bill

Does not look as good as the "finished product", but works better. No wind whistle around the side windows, just a bit at the area where the windscreen joins the side window. I think it is the stainless gutter. Will leave well enough alone.
At least for the present.
Bill
While I had the top disassembled, I removed the headliner and glued in three layers of carpet pad. It is a filled foam rubber, about 5/16" thick. Reinstalled the headliner and took it for a spin. Big improvement. The rubber does not prevent noise from entering the cabin, but keeps it from bouncing around once inside. I had already redone the door. Removed the upholstery and placed trunk liner with a cotton shoddy backing behind it.
But all this just made me greedy. I removed the top bag and covered the well and bottom of the bag with carpet pad. Then removed the upholstery around the jump seat and put a layer of pad under it. Also hung a piece of pad in the trunk, so any sound going from the trunk into the cabin has to go through the pad.
All of this has made a huge difference in the Alpine. The padding, window seals and a new muffler have turned it into a totally different car. Oh yes, don't forget the greatly reduced vibration from the new engine.
Bill