• Welcome to the new SAOCA website. Already a member? Simply click Log In/Sign Up up and to the right and use your same username and password from the old site. If you've forgotten your password, please send an email to membership@sunbeamalpine.org for assistance.

    If you're new here, click Log In/Sign Up and enter your information. We'll approve your account as quickly as possible, typically in about 24 hours. If it takes longer, you were probably caught in our spam/scam filter.

    Enjoy.

Headliner Material for HLM

bernd_st

Bronze Level Sponsor
Does anybody know a good source where I could get at least similar style vinyl for doing a HLM headliner ? As far as I could find Harrington used at least 2 different styles, i.e.

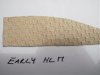
- early style with very fine "fishnet pattern"

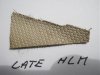
- late style " small bubble type"

Both do not have holes- perhaps the reason why most of the steel supports are badly rotten.

Any hint welcome. Thanks
 

bernd_st

Bronze Level Sponsor
Thanks, I know woolies already but none of their materials on offer is close enough to the original. Anyhow will keep on trying...
 

bernd_st

Bronze Level Sponsor
Have sent my original worn headliner to John. P. Perhaps we can make a pattern out of it to help all those guys for upcoming HLM restorations. However we still seek for some close material...
 

65beam

Donation Time
Hlm Headliner

i think you may find that your headliner may not fit too well in another car without a lot of stretching and heating. we have installed two and they are not easy. back in the early eighties a local shop that does street rod interiors used the original headliner out of the red car to make a new headliner for it and he installed it . he made another for me a couple years ago and refused to install the second one. the wife and i spent several weeks doing it ourselves. we found differences between the two cars. i'm not saying it won't fit others ,it seems to be a lot harder to stretch the material to get it tight due to the weakness of the top. this could be due to the difference between the material now and what was used when the cars were built. we actually broke the top at the flange for the hatch. we were unable to find any headliner material here in the states that was a solid material like the original. we used a material that has small perferations in it. the original seems to be a lighter weight than anything available here. john prittie should have a roll of the original material that came with his car when he bought it from tiger tom. wonder if he has been able to find anything close? JOHN????????
 

bernd_st

Bronze Level Sponsor
Sounds like a terrible job to get the headliner to fit properly. Thanks for the advise.
John will certainly use the original material he got with his car however he was totally lacking any whatsoever pattern. So at least a much better starting point. But understand there must be big tolerances so we´ll see.

Rainer found some material earlier here in EU which is somewhat close and fortunately he had a good friend who is interior trimmer. John and me however are still struggling to get the original materials sorted. Pls. see some some pictures attached. _Not sure whether we are correct with early/late style so perhaps the crowd can help here:
 

Attachments

  • Early HLM headliner.jpg
    Early HLM headliner.jpg
    31.2 KB · Views: 34
  • Late HLM headliner.jpg
    Late HLM headliner.jpg
    32.1 KB · Views: 33

65beam

Donation Time
headliner

the biggest problem is that the windshield has to be off the car in order to fasten the headliner at the front. it needs stapled under the front so that the front drip rail covers the headliner. we found it very hard to pull the material snug without flexing the top. we had all the drip rails off when we did the installation so we were working with wood frame and a 45 year old top. tiger tom bought my red car for a parts car to get the parts that were not with the car that john has. i talked him into selling it to me back in 1982,minus the hatch window that john has. that brings up another problem we had. the plexiglass that was in the hatch of john's car was too big for my hatch. never did figure that one out unless it was installed using aftermarket universal rubber. make sure the headliner around the back of the side windows to the hatch stays intact when you remove the original. very difficult to get wrinkles out of this area. we took lots of photos of the headliner install as the wife and i worked on it. does john have the bows?
 

bernd_st

Bronze Level Sponsor
the front drip rail has been removed on my project already since I may need to exchange the foremost wood rail. The actual holes holding the chrome latches are totally worn out. We have remanufactured the front rail already. Quite a complex shape.

Tiger Tom puzzle story comes together now. Yes John has the bows same as me. However mine were totally rotten therefore I had them remade from 6mm alu rods (lightweight you know:)) ). Not a difficult job if you have the original patterns anyway.

However before getting deeper into installation I still need to find suitable vinyl...
 

napa 1

Donation Time
Sorry guys, missed this thread until now, but just to let you know I just got my headliner back from the auto upholstry shop. Was going to try to sew it myself, but chickened out at the last moment and left it to a pro. Thanks to Bernd's original headliner to use as a pattern, it looks very good and hopefully will install well. Since the car is completely stripped of glass and trim and interior, hopefully I'll have an easier time of it. I've got the pics that Bob sent me of his headliner to help, and yes I've got all the original bows etc. The headliner fabric I have is some that tiger tom bought in the late 70's I believe, and it matches the fabric exactly of the one that Bernd sent me, so I believe is correct for a HLM of my vintage. It's actually some vinyl material rather than fabric. Anyway, I'll keep you posted on how the install goes...lots of adhesive and office depot paper clips, see attached photo from Ranier's restoration.
 

Attachments

  • Picture1-2.jpg
    Picture1-2.jpg
    31.9 KB · Views: 30

bernd_st

Bronze Level Sponsor
Hi John,

good to hear you´re back and working on your project again ! Keep us posted about the progress you make with your headliner...
 

napa 1

Donation Time
Spent most of Sunday beginning the install, got it in and mostly installed, just need to go back in and do some stretching to remove some wrinkles and she's done. The large paper clip method is the answer..you can continually "tweak" it and re-clip it until it's just right, and then go back in and glue it. Thanks to Bernd's authentic template, the fit is just right. I'm told that I'm supposed to go at it with a hair dryer once installed to further tighten it up. I'll post some pics of the install.
 

65beam

Donation Time
headliner

john,
our upholstery man told us to stretch it and secure at the front center and rear center first. then stretch and secure in the center on the sides and work from there. that took care of a lot of wrinkles. both of my cars originally had wrinkles in the area below and to the rear of the small vents in the back. the original headliner is still in the moonstone top and the material you have matches both of my original liners. i have a small piece of your material that tom gave me when i bought my red car. never was able to find anything close to the pattern. i have never seen an original that had fabric headliner. glad to hear that you're at that point. what did you do on the seats? what color?
 

napa 1

Donation Time
Oh Jan, where did we go wrong with you?
I seem to have misplaced my headliner steamer, so I'll just have to make do with a hair dryer.

Anyway, as I was saying, heating up the problem areas with the hairdryer works great and very effectively got rid of any extra wrinkles, except a few around the tight corners of the rear hatch. Wow what a difference a bright new headliner makes. I have enough material left to recover the visors...

I'm going with the original red interior. I have all the material for the seats...but haven't started to tackle that yet.
 

Ken Ellis

Donation Time
If one decides they would like a steamer, "personal steamers" seem to be available for prices ranging from $40 to $65 or so. Might be useful for cleaning other under-hood bits, too. Plus it's the only tool your wife will want to borrow. Here's someone's review of several -- but note that she thinks the steam from one is "hotter" than from another.

http://www.slate.com/id/2190675
(first one up on the Google search 'hand held steamer')

Ken
 

bernd_st

Bronze Level Sponsor
good hint on the personal steamers. Just gave up to install the headliner in the late series hardtop. Will give it to a professional now. Not sure to which extend I can tackle the HLM. Also still have an early series hardtop headliner to install - puuuh...
 
Top