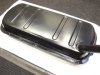
People seem to generally follow two approaches to cleaning the gas tanks - chemicals or contact cleaning (sand blasting or tumbling using gravel or washers/nuts/bolts/etc.).
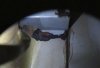
I've been cleaning my pair of tanks for a bit now. I was surprised to find a 2" x 3" x 4" metal box welded to the interior of each tank. The box is positioned near the outlet pipe opening (about 1 inch away), above the drain hole, and is on one half of the tank. See photo showing one side of the box. The box has only 2 small openings. One opening is near the outlet pipe and a second opening is on the opposite side. (It also appears to have an air vent or two on top.) My guess is the purpose of the box is to reduce the rate at which fuel will flow out of and into the tank.
I don't see how sandblasting or tumbling gravel will clean the interior of that box. Even with the Gas Tank Renu process of drilling a bunch of holes in the tank to sandblast (then welding up the holes afterwards), the inside of that box won't be clean. Even if you cut the tank in two, you'd still need to remove that box to blast its inside.
My conclusion is a chemical process is the only way to get everything clean inside the tank without cutting up the tank. Liquid paint stripper and hydrochloric acid (muriatic acid) have been working well so far for cleaning. I expect vinegar sitting for many days would work instead of the hydrochloric acid.
I have hopefully one last pass using the liquid paint stripper, then I'll be ready for phosphoric acid etching and then the coating.
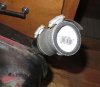
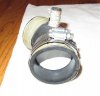
BTW - the old rubber hose joints, a couple of clamps, and a PVC pipe cap make a nice seal for the tank holes during cleaning. See photos. You do need a vent when using the paint stripper or acid, otherwise the chemical reactions will build high pressure in the tank. I always leave one hole open.
Mike
I've been cleaning my pair of tanks for a bit now. I was surprised to find a 2" x 3" x 4" metal box welded to the interior of each tank. The box is positioned near the outlet pipe opening (about 1 inch away), above the drain hole, and is on one half of the tank. See photo showing one side of the box. The box has only 2 small openings. One opening is near the outlet pipe and a second opening is on the opposite side. (It also appears to have an air vent or two on top.) My guess is the purpose of the box is to reduce the rate at which fuel will flow out of and into the tank.
I don't see how sandblasting or tumbling gravel will clean the interior of that box. Even with the Gas Tank Renu process of drilling a bunch of holes in the tank to sandblast (then welding up the holes afterwards), the inside of that box won't be clean. Even if you cut the tank in two, you'd still need to remove that box to blast its inside.
My conclusion is a chemical process is the only way to get everything clean inside the tank without cutting up the tank. Liquid paint stripper and hydrochloric acid (muriatic acid) have been working well so far for cleaning. I expect vinegar sitting for many days would work instead of the hydrochloric acid.
I have hopefully one last pass using the liquid paint stripper, then I'll be ready for phosphoric acid etching and then the coating.
BTW - the old rubber hose joints, a couple of clamps, and a PVC pipe cap make a nice seal for the tank holes during cleaning. See photos. You do need a vent when using the paint stripper or acid, otherwise the chemical reactions will build high pressure in the tank. I always leave one hole open.
Mike
 Carolina Chem Strip. Burlington NC